How can we help you?
Shopify-related questions54
Once your eStore has created 50,000 Product Variants, the limit is set to 1000 variants per 24 hour period. This means that Cart2Cart can migrate a maximum of 1000 product variants every 24 hours. Since this threshold is imposed by Shopify, Cart2Cart cannot directly influence it. Rest assured, this API call limit primarily affects the data transfer speed and won't compromise the integrity of your shopping cart data migration. You have a few options: you can wait for the migration to complete naturally, or contact Shopify Support to explain your situation and request a temporary increase to your API limits.
Note: This limit doesn’t apply to Shopify Plus shops.
Need help with your shopping cart data migration? Start your free demo now!
If you have any questions or need further assistance, please don't hesitate to contact our support team via Live Chat.
Why Didn't My Product Images Migrate to Shopify During Data Migration?
Due to Shopify peculiarities, a limit of 250 images applies per product (including its variants). This means that for 100 products, you can migrate up to 250 images each, totaling 25,000 images. This limitation is imposed by Shopify's platform architecture.
If you have products with more than 250 images, consider these options during your data migration:
- Prioritize Key Images: Migrate only the most important product images to stay within the limit.
- Image Optimization: Reduce image file sizes without significant quality loss to potentially accommodate more images within Shopify's storage limits.
- Third-Party Apps: Explore Shopify apps designed to handle large numbers of product images. These apps often provide features like image hosting and optimization.
Cart2Cart can assist you in selecting and migrating the most crucial images during your data migration to Shopify. Contact our support team for guidance on the best approach for your specific needs.
Ready to start your data migration? Start your free demo today!
After a Shopify migration with Cart2Cart, extra product/customer data often lands as metafields. You can create definitions and edit values in Shopify admin without a third-party app.
Create or edit metafield definitions (current)
1. In Shopify app, choose Metafields Guru
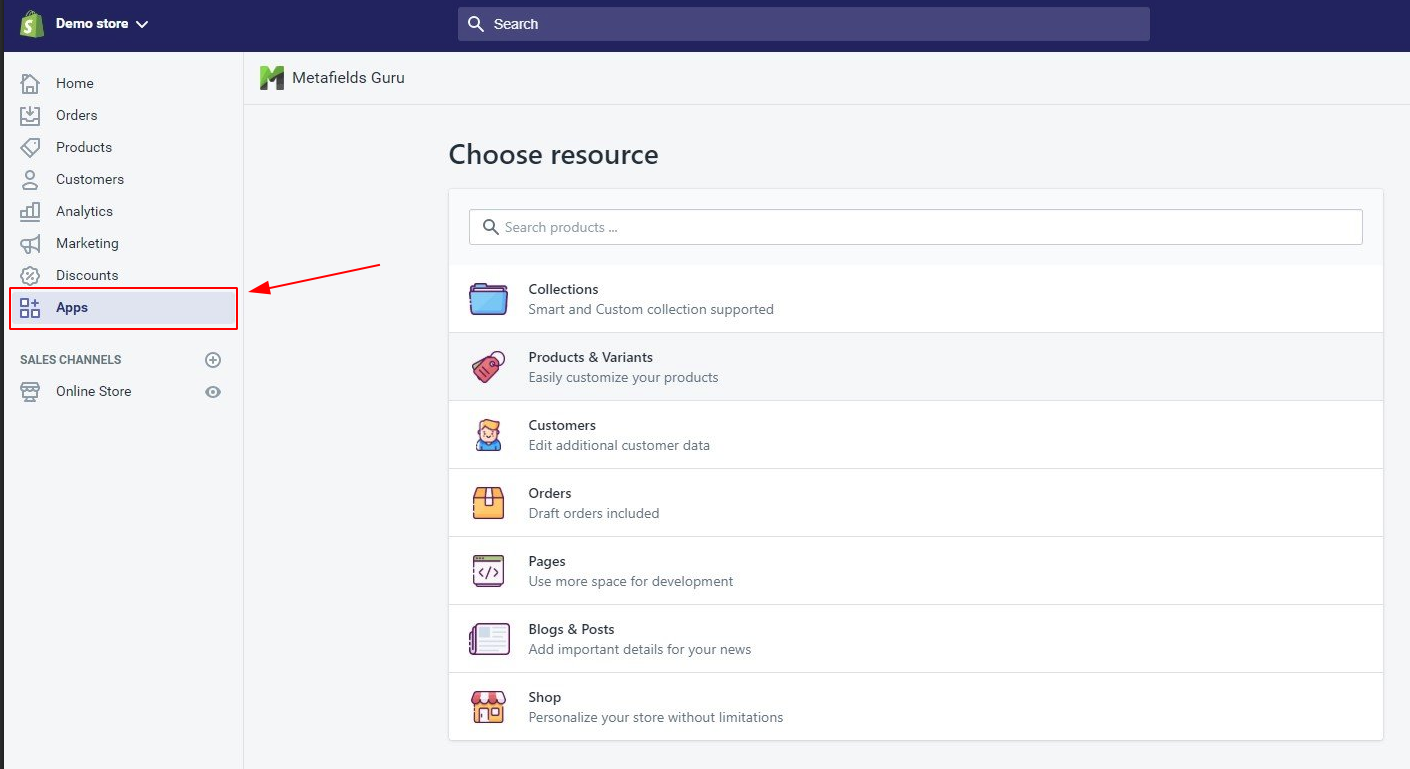
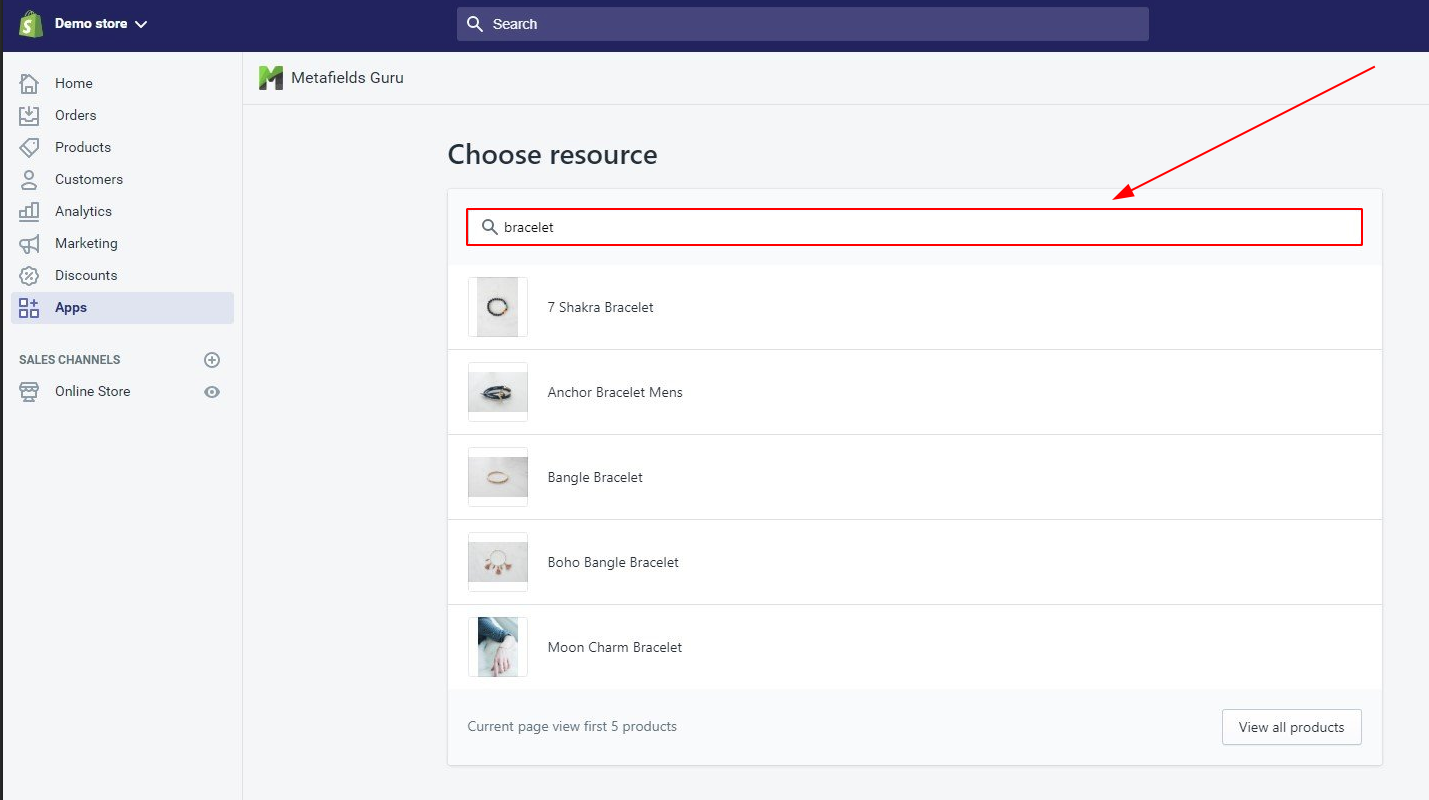
2. Choose the resource (for example Products, Variants, Customers, Orders, or Collections).
3. Click Create metafield (or open an existing definition).
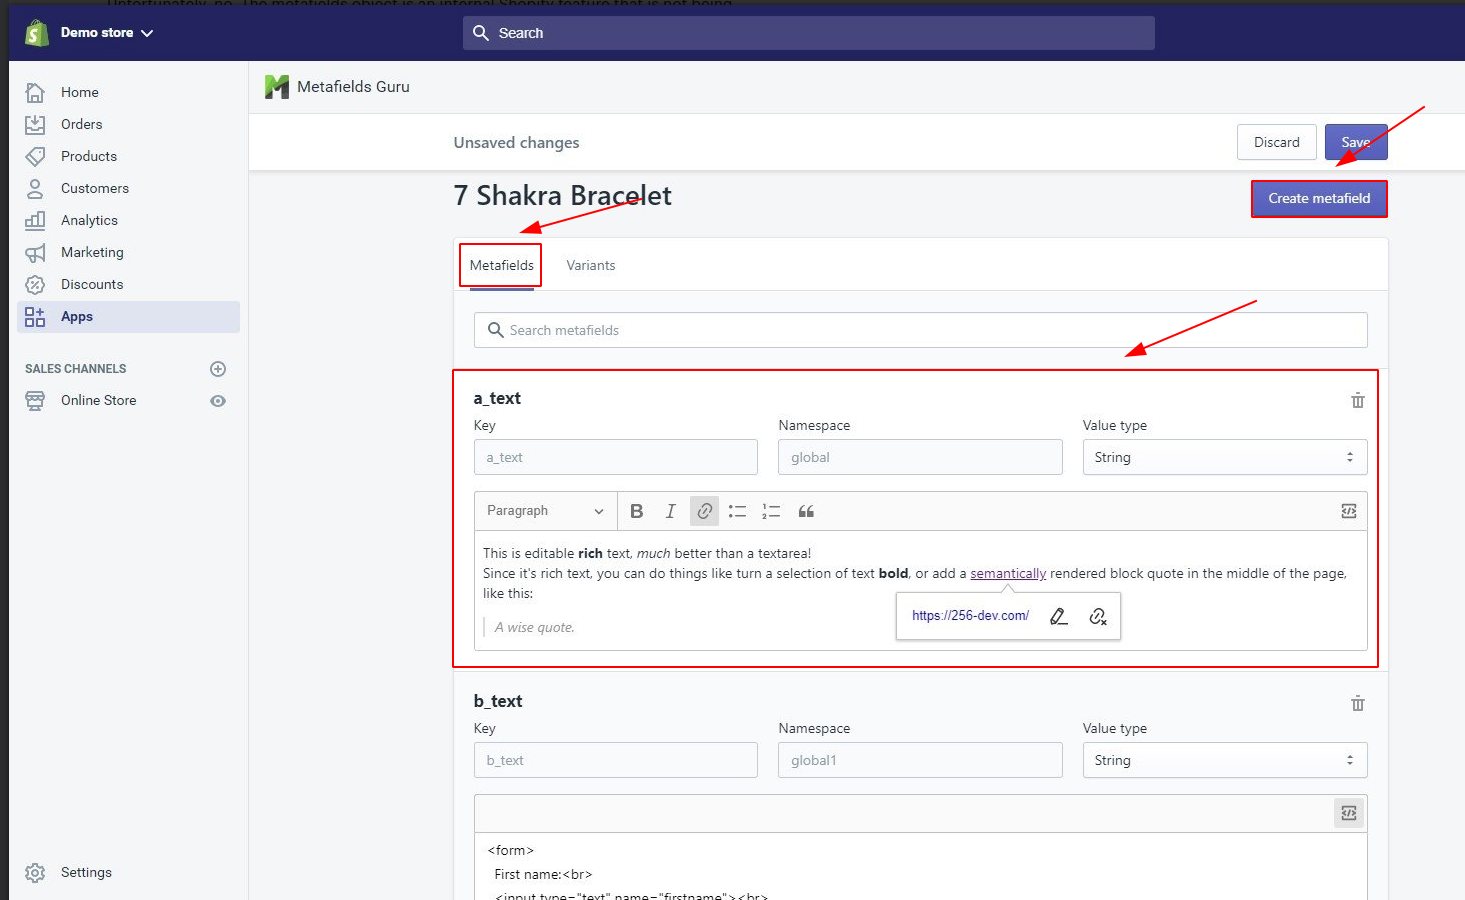
4. Enter a name, confirm namespace/key, choose a type, set validations if needed, then Save.
5. Open a product (or other resource) and scroll to the metafields section to add or update values.
Official reference: Shopify Help — Metafields.
Optional apps (for bulk editing) are still available in the Shopify App Store, but native Custom data covers create/update/delete for most migration follow-up work.
Why is my Shopify migration taking so long?
Several factors can influence the duration of your eCommerce data migration to Shopify. These include the size of your store (number of products, customers, orders, etc.), the complexity of your data, and API limitations.
Shopify API Limitations and Data Migration Speed
Shopify has implemented limits for orders’ migration. If you are using a trial or Partner development version of Shopify, you might be limited to creating only 5 orders per minute. This restriction can significantly slow down the Shopify data migration process.
How to Speed Up Your Shopify Data Migration
To avoid these delays and ensure a smoother, faster data migration, Cart2Cart strongly recommends upgrading to a paid Shopify plan before initiating the Full Migration.
Looking for Seamless Data Migration to Shopify?
Cart2Cart offers a streamlined and reliable data migration service. We support migrations from a wide range of platforms to Shopify, ensuring your valuable data is transferred accurately and efficiently.
Ready to migrate? Start your free demo now and see how easy data migration can be!
Need help? Contact our support team via live chat.
Want to discuss your migration project? Schedule a call with a Migration Expert.
Why is it impossible to migrate to the Shopify test store?
Due to the technical limitations of Shopify, creating a temporary test store for data migration is not feasible. However, you can still perform a complete data migration to Shopify using their free trial plan. This allows you to fully evaluate the migrated data and store functionality before committing to a paid plan. To ensure a smooth Shopify data migration, consider using a specialized service like Cart2Cart. We offer a streamlined process and expert support to help you transfer your products, customers, orders, and other essential data to Shopify efficiently. Start your free demo now to see how easy it is!
Looking for seamless Shopify data migration? If you want to relocate your Shopify store using the "Cart2Cart Store Migration App", this step-by-step guide will walk you through the process. Cart2Cart offers a streamlined solution for your Shopify data migration needs.
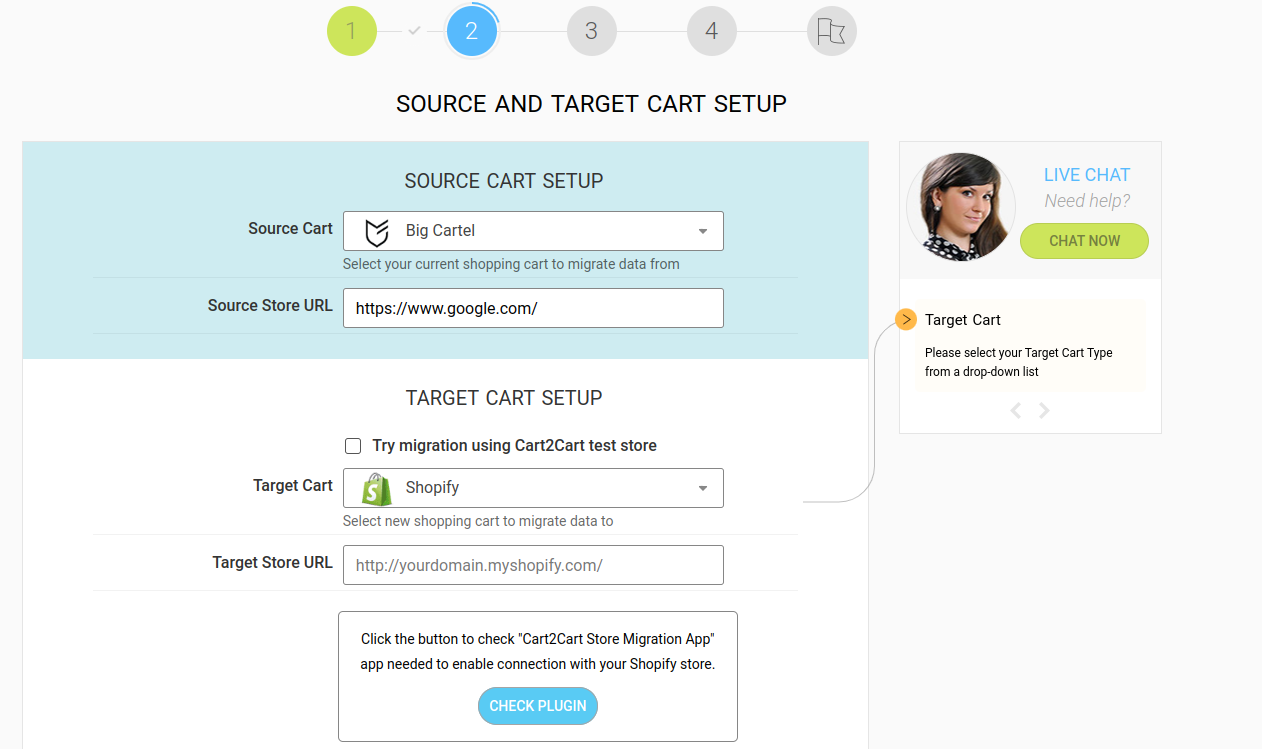
- Step 1: Source & Target Cart Setup for Shopify Data Migration
In the migration wizard, specify your current shopping cart platform. Provide the store’s URL address (if migrating from an open-source cart) or the store’s API details (if migrating from a hosted solution). Then, choose Shopify as your target cart.
Install the Shopify App on your target Shopify store. You'll be redirected to the Shopify App Store, and after installation, back to the Migration wizard
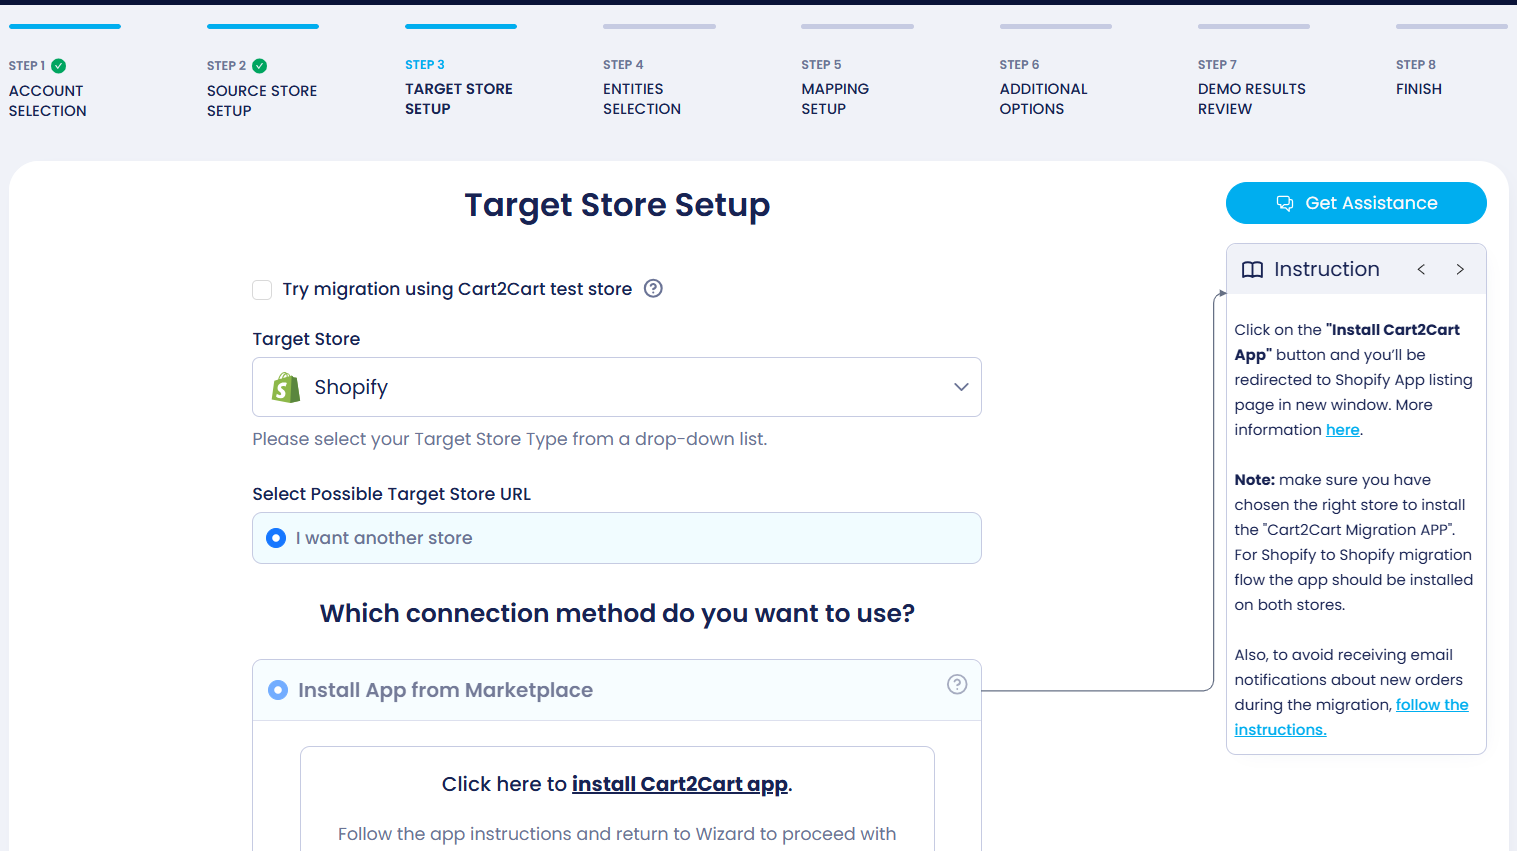
Note: The access details are required to establish an automated connection between the stores. The provided information is secure and protected according to the Cart2Cart Privacy Policy.
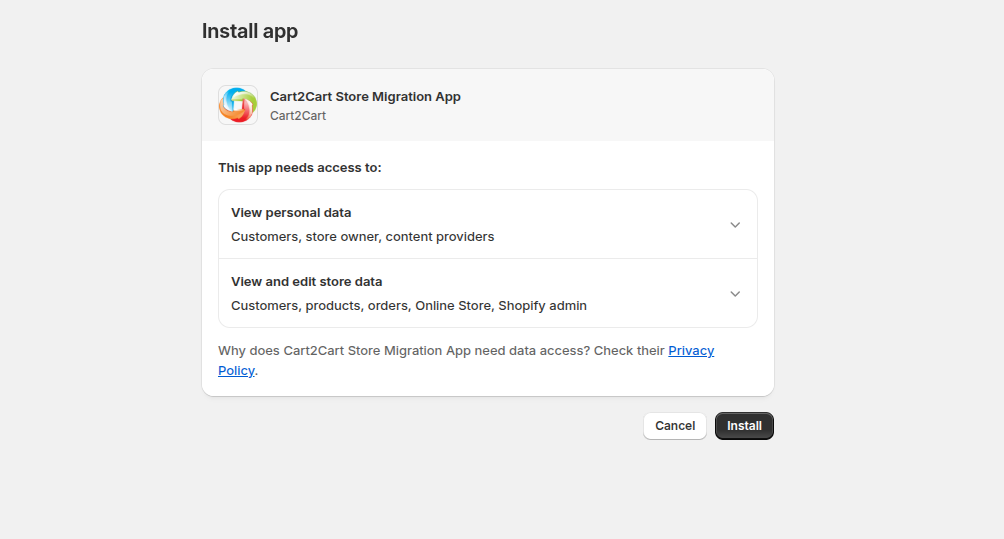
- Step 2: Install the Cart2Cart Store Migration App for Shopify
Install the "Cart2Cart Store Migration App" and proceed with the migration setup within your Shopify Admin Panel. After installation, you can proceed with the migration.
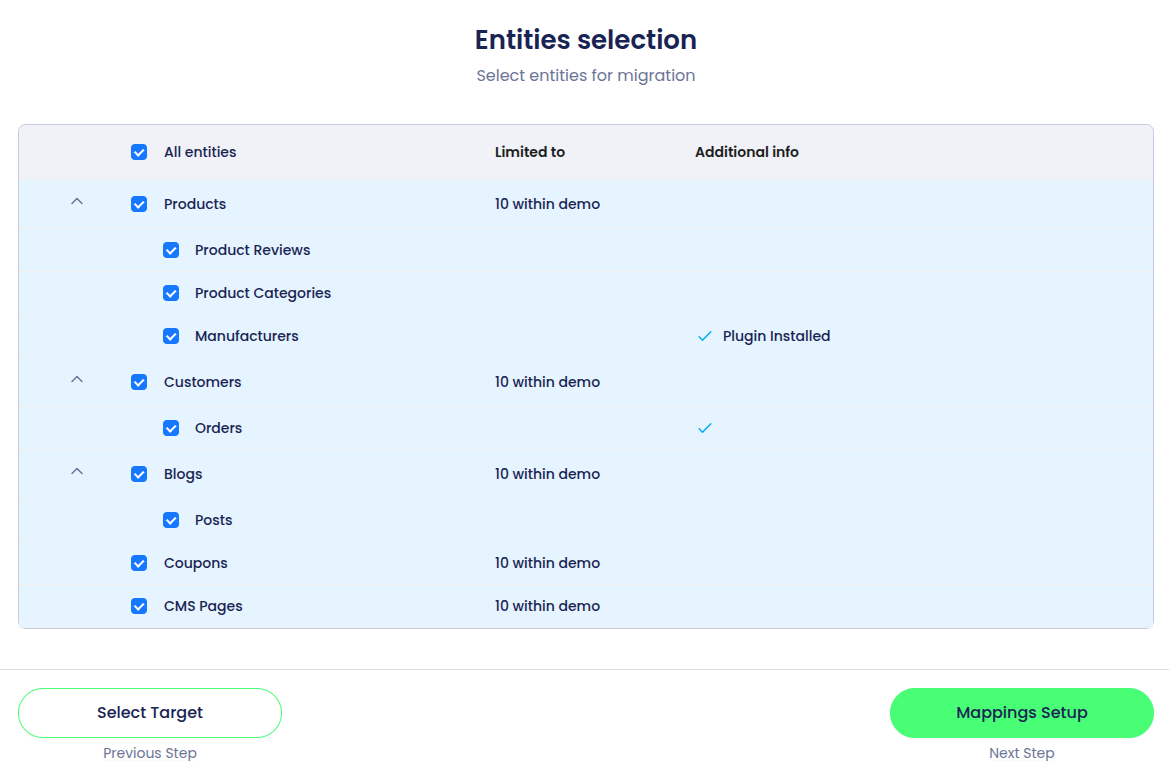
- Step 3: Choose the Data to Migrate to Shopify
Select the specific store data you’d like to transfer during your Shopify data migration. Click the respective checkboxes or use the Select All option to transfer all store data.
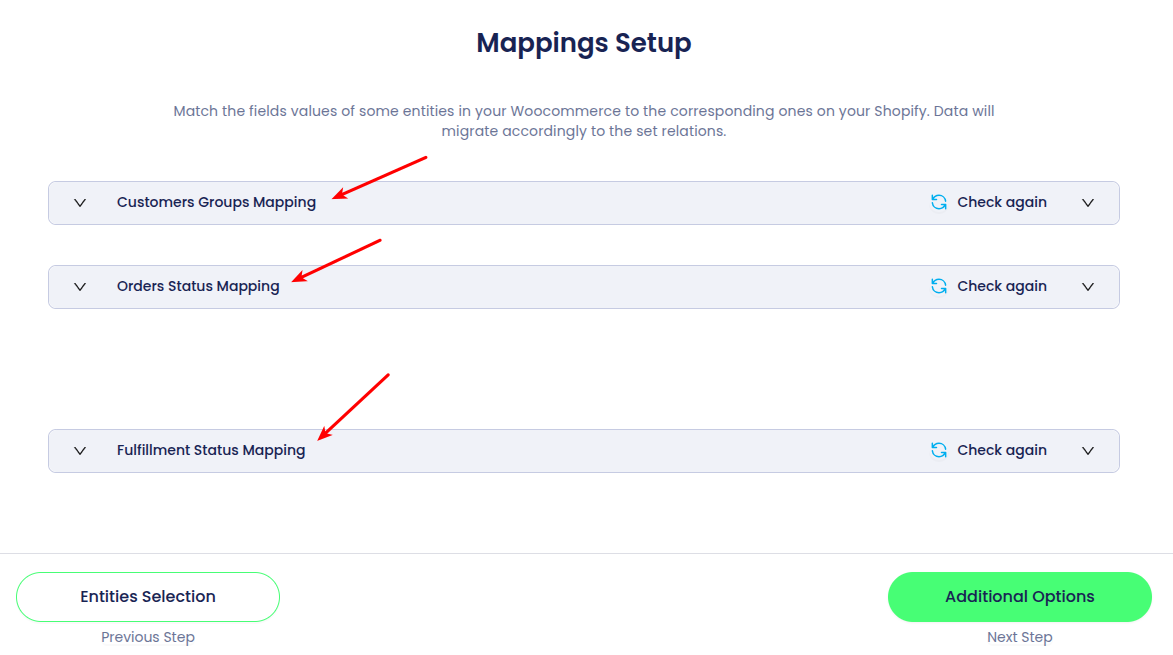
- Step 4: Perform Data Mapping for Shopify
Match Order Statuses and Customer Groups from your current shopping cart to the corresponding ones on your Shopify store. Data will migrate according to these established relationships, ensuring accurate Shopify data migration.
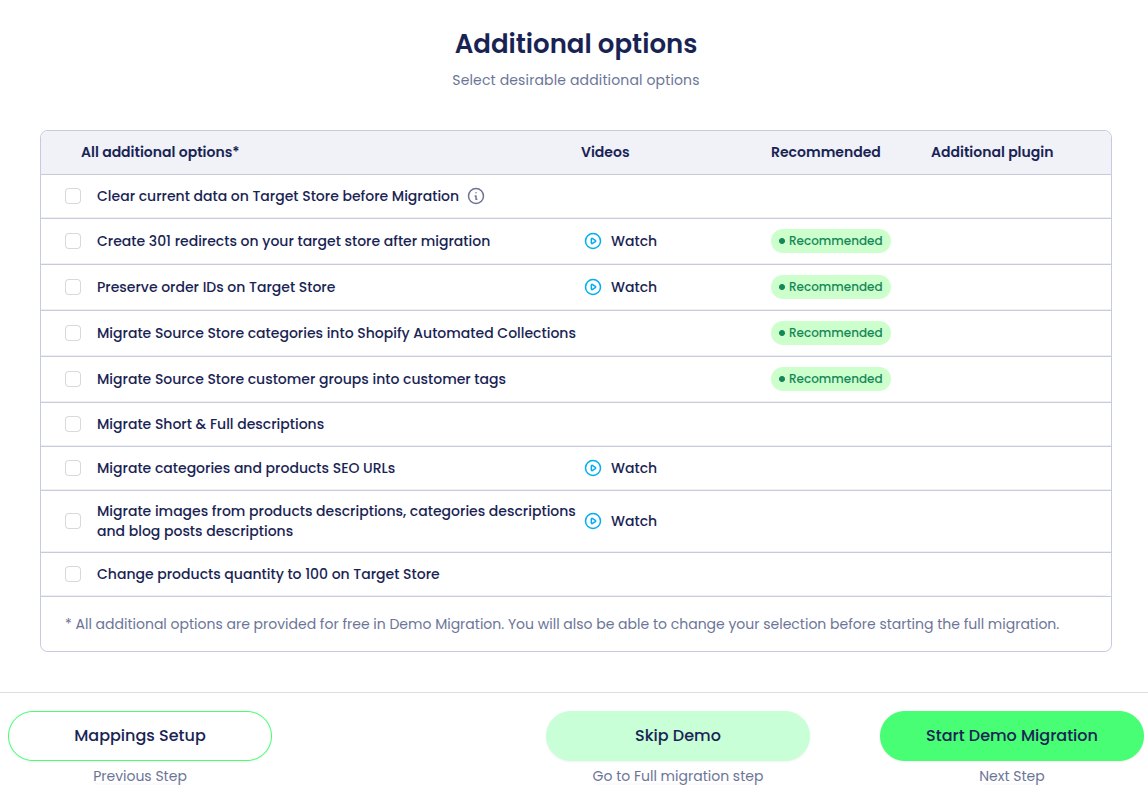
- Step 5: Select Additional Options for Your Shopify Data Migration
Choose additional options that best suit your specific migration needs. These options can customize your Shopify data migration for optimal results.
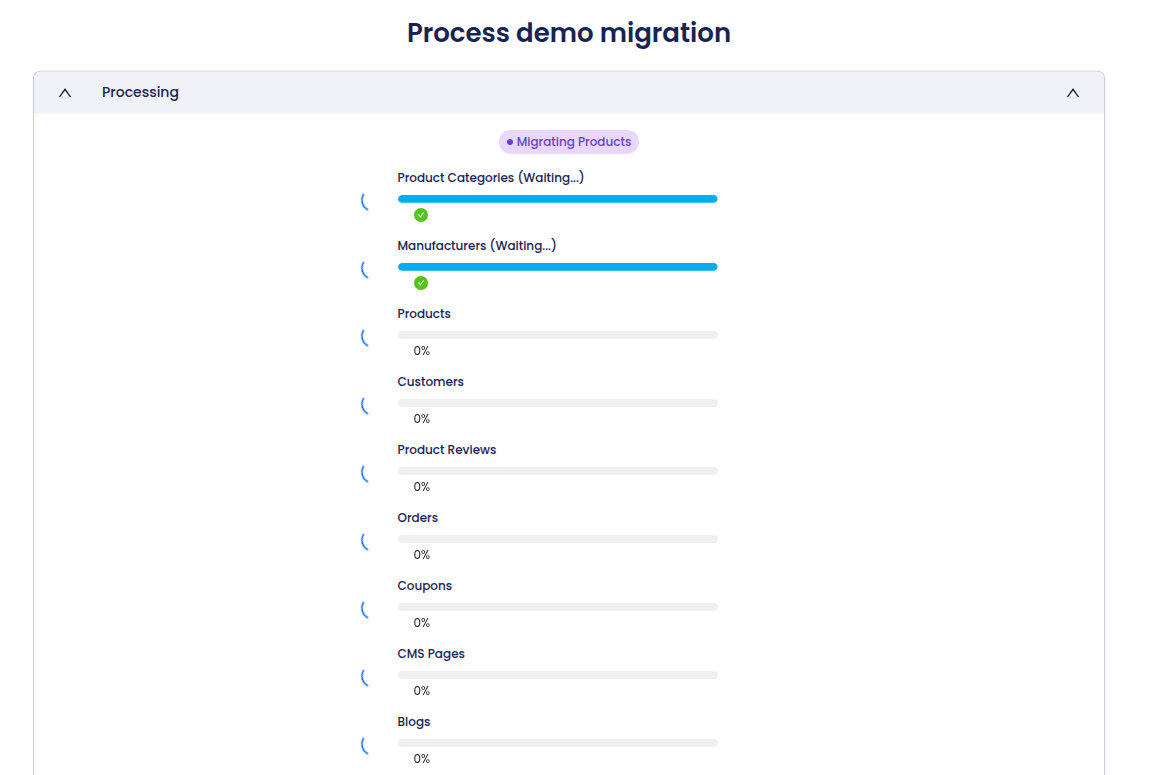
- Step 6: Launch a Demo Migration to Shopify
Test the service by launching a demo migration. This allows you to transfer a limited amount of data to your Shopify store and preview how your store entities will appear on the new platform. This is a crucial step in ensuring a successful Shopify data migration.
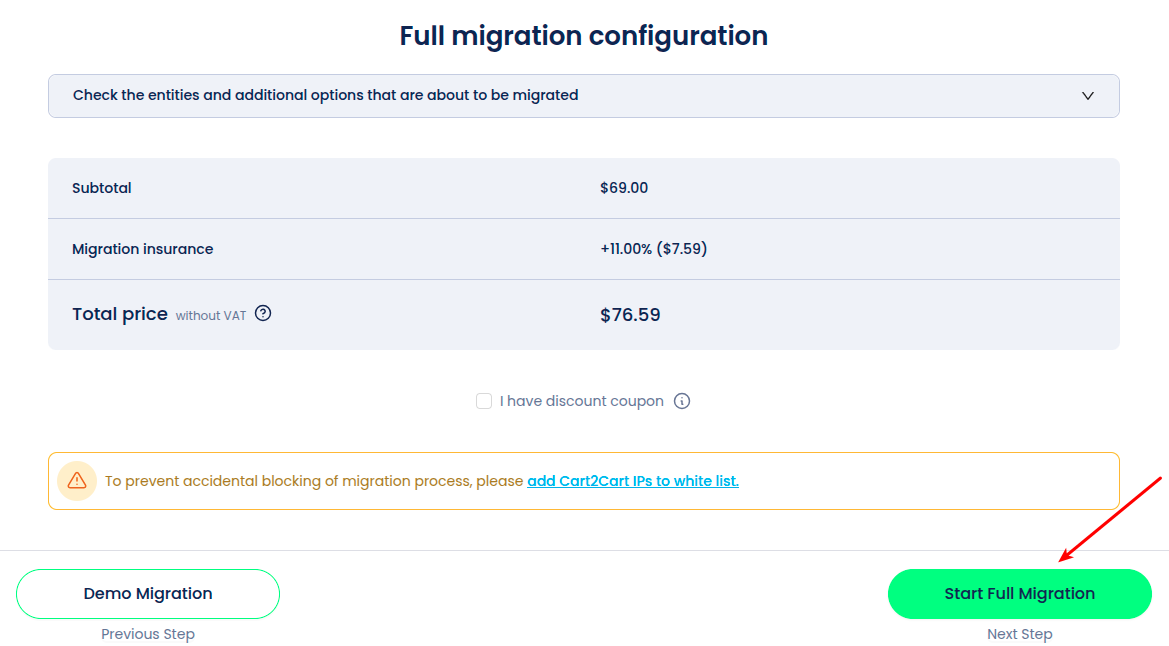
- Step 7: Start Full Shopify Data Migration
Activate the Start Full Migration button to migrate all your current store data to Shopify in a fully automated manner. Get ready to launch your store on Shopify!
Ready to start your Shopify data migration? Start your free demo now!
Troubleshooting Shopify Product Visibility During Data Migration
Shopify merchants leverage various sales channels to reach their customers. These channels can sometimes lead to confusion during a data migration, specifically regarding product visibility.
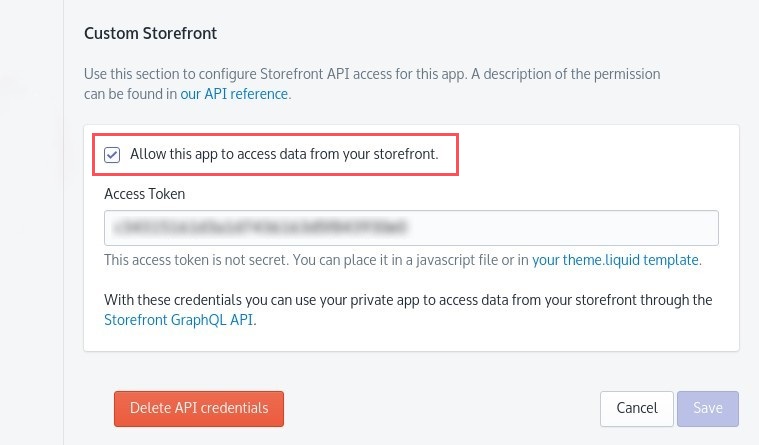
During the migration process with Cart2Cart, our app requires access to your Shopify storefront. When you grant this access by checking the Allow this app to access data from your storefront checkbox, Shopify may interpret the app as a separate sales channel. As a result, Shopify might temporarily hide your products from this "new" channel.
Rest assured, this doesn't affect your Shopify data migration in any way. Your products remain visible to your customers on your active sales channels. To resolve this perceived visibility issue within the Cart2Cart app, simply uncheck the Allow this app to access data from your storefront checkbox and then re-check it. This will refresh the connection and ensure product visibility within the app.
What if I can't find my cart in the list of supported carts?
Cart2Cart supports a wide range of shopping carts for data migration. However, if you cannot find your specific cart platform listed, there are a few options:
- Check for alternative names: Sometimes, a platform may be listed under a slightly different name or an older version name.
- Request custom migration: Cart2Cart offers custom migration services for platforms not officially supported. Contact our support team to discuss your specific needs.
- Consider a CSV migration: If your platform allows exporting data to a CSV file, you may be able to migrate data using the CSV import/export feature of your target platform. Cart2Cart can assist with this process.
Ready to experience a seamless data migration? Start your free demo now!
Metafields migrated to Shopify with Cart2Cart are not always visible on the storefront until you connect them to your theme.
Show metafields on the storefront (current)
1. Confirm definitions exist under Settings → Custom data and that products have values.
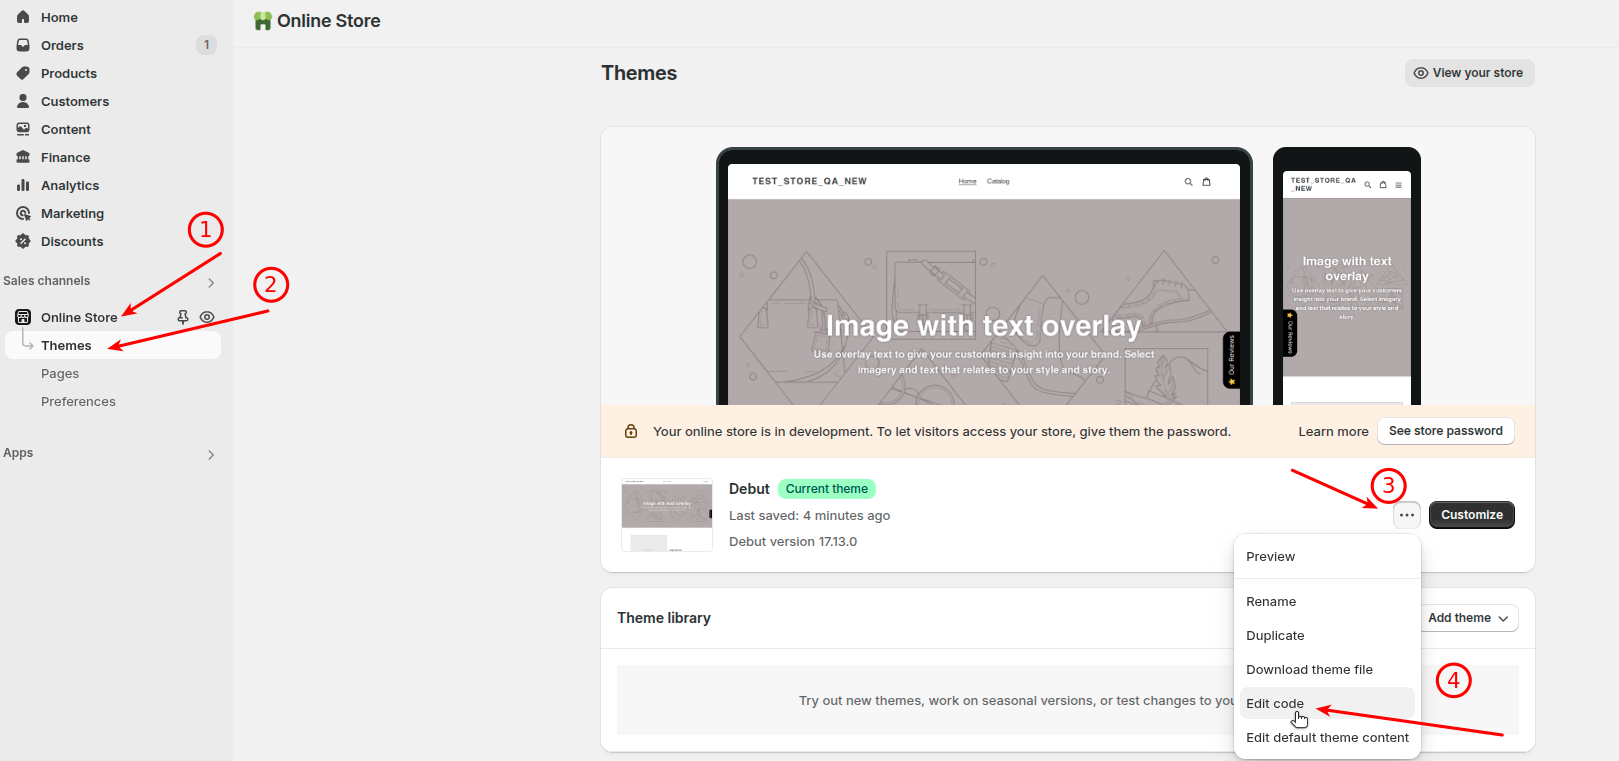
2. In the theme editor (Online Store → Themes → Customize), open the product (or relevant) template.
3. Add a block or section that supports dynamic sources / metafields, or connect a text/rich-text setting to the metafield via the dynamic source icon.
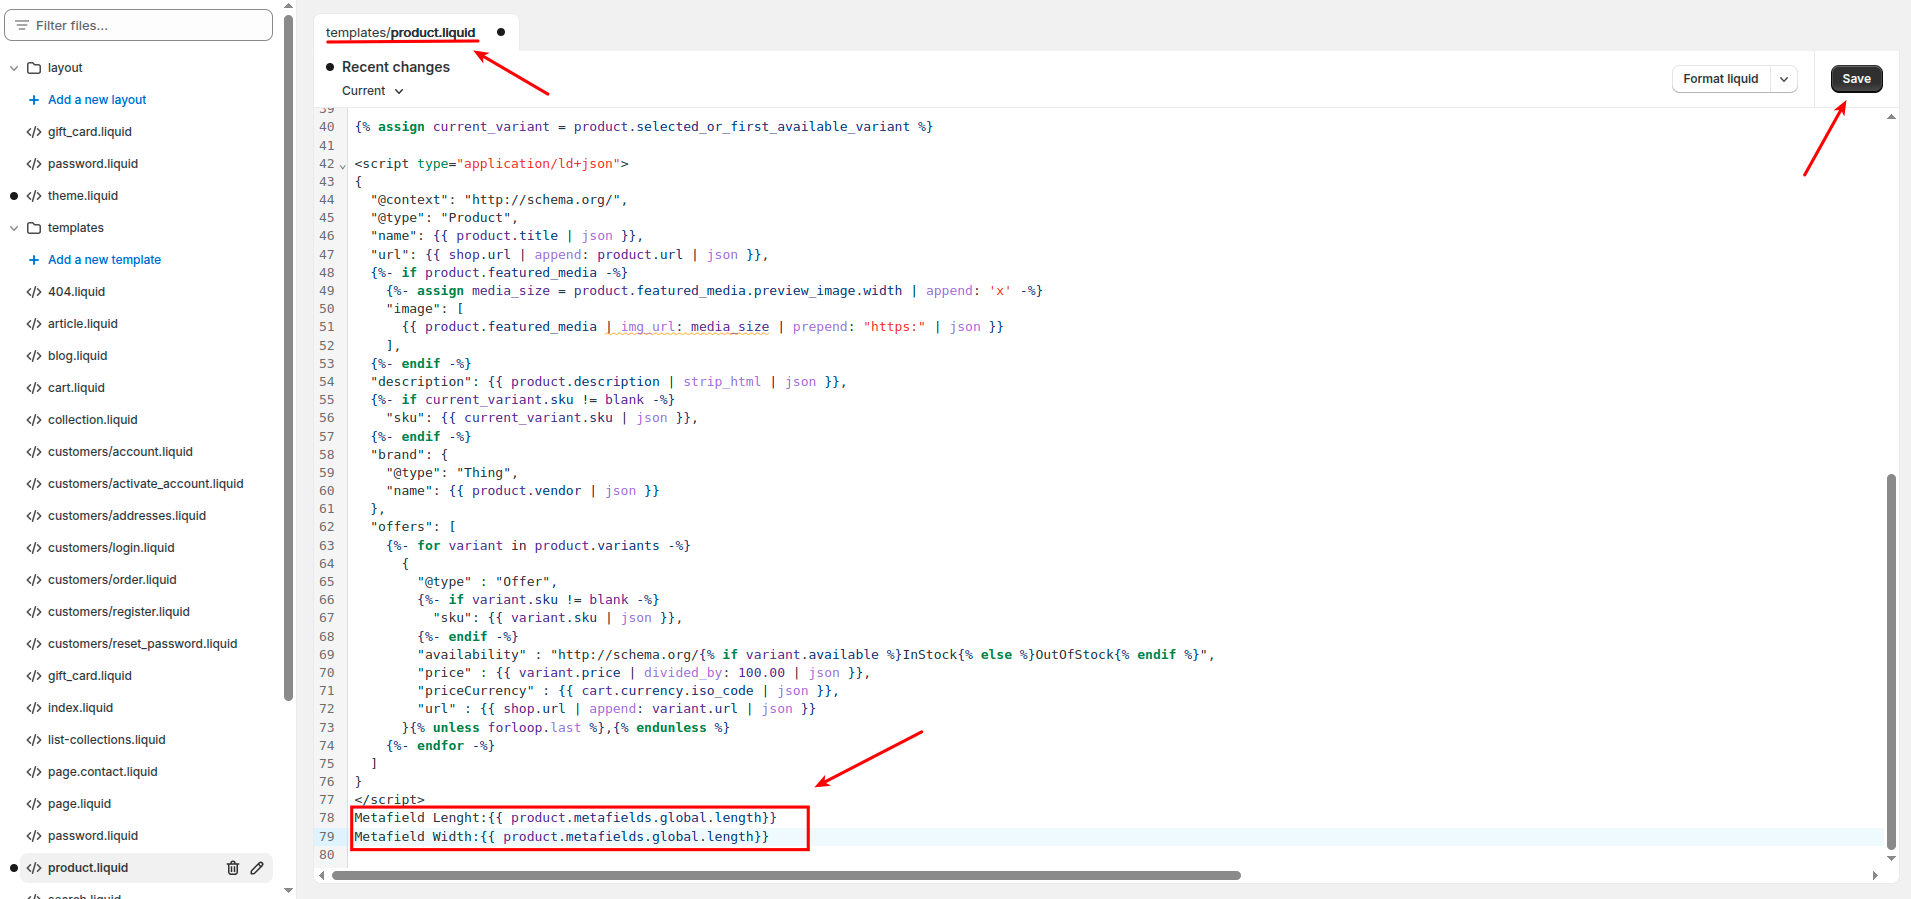
4. Save and preview the storefront.
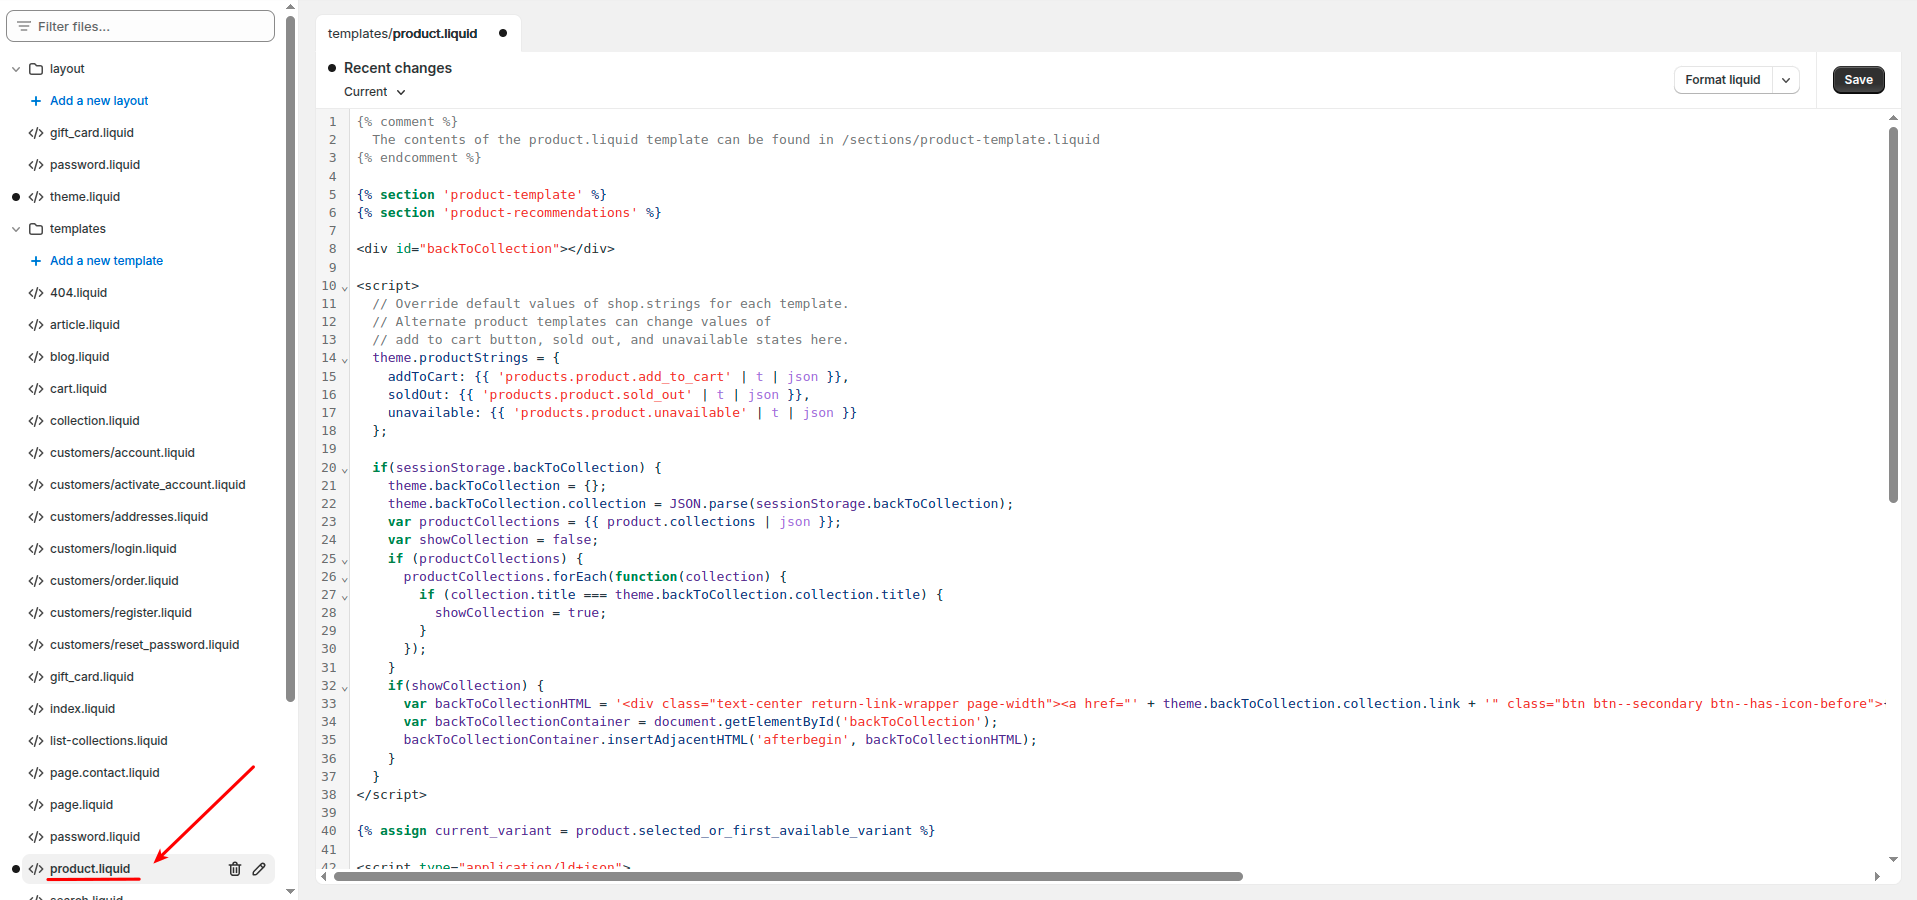
5. Advanced: edit theme Liquid to output {{ product.metafields.namespace.key.value }} (namespace/key from your definition).
See Shopify metafields help for connecting metafields to themes. Third-party metafield apps are optional.

How are Order Statuses Migrated to Shopify During Data Migration?
Due to Shopify's platform structure, you cannot create custom order statuses. However, during your data migration to Shopify with Cart2Cart, you can map the order statuses from your current store to the corresponding payment and fulfillment statuses available within Shopify.
Cart2Cart offers a flexible mapping feature to align your source store's order statuses with Shopify's existing options, ensuring a smooth transition of your order data. This is a crucial aspect of ensuring accurate records after your data migration.
The following payment statuses can be transferred by Cart2Cart: pending, authorized, partially_paid, paid, partially_refunded, refunded, voided. The fulfillment status can be migrated as partially fulfilled or unfulfilled.
By carefully mapping your order statuses, you can maintain data consistency and easily manage your orders within your new Shopify store. Data migration with Cart2Cart ensures that this process is as seamless and efficient as possible.
Next Steps for Shopify Data Migration
Ready to migrate your store to Shopify? Start your free demo now and see how Cart2Cart can simplify your data migration. If you have any questions, contact our support team via live chat or schedule a call with a Migration Expert.
Configure languages on Shopify before a multilingual-aware Cart2Cart migration whenever possible.
Add and publish languages (current)
1. In Shopify admin, go to Settings → Languages (store languages).
2. Click Add language, choose a language, and add it.
3. Install or open Translate & Adapt (Shopify often installs it when you add a language) to create or import translations.
4. Publish the language when translations are ready.
5. If you use Markets, assign languages per market under Settings → Markets (international domains/subfolders may be required).
6. Ensure your theme includes a language selector (or add one via theme / app).
Official references: Localization and translation; Translate & Adapt.
Note: Shopify does not work like Magento multi-store-view in one step. Cart2Cart typically migrates content for the active/default language setup you configure; additional languages are managed in Shopify after migration.
Can Cart2Cart Migrate Product Reviews?
Yes, the Cart2Cart migration service offers the capability to transfer product reviews during your store migration. We provide native support for the Air Product Reviews App & UGC (from and to this App), but we can also migrate data from and to other apps or custom files upon request.
For more details, please check our guides on:Cart2Cart streamlines the often complex process of eCommerce data migration, ensuring a smooth transition of your valuable data, including product reviews, to your new platform. Migrate your store with Cart2Cart and provide your customers with the same experience they are used to!
Next Steps:
- Start your free demo: https://newapp.shopping-cart-migration.com/
- Schedule a call with a Migration Expert: https://meet.shopping-cart-migration.com/team/csm
How to Migrate Reviews from Shopify using Cart2Cart
Migrating your customer reviews from Shopify is crucial for maintaining trust and credibility in your new store. Here’s how to seamlessly transfer your Shopify reviews using Cart2Cart, the automated data migration service:
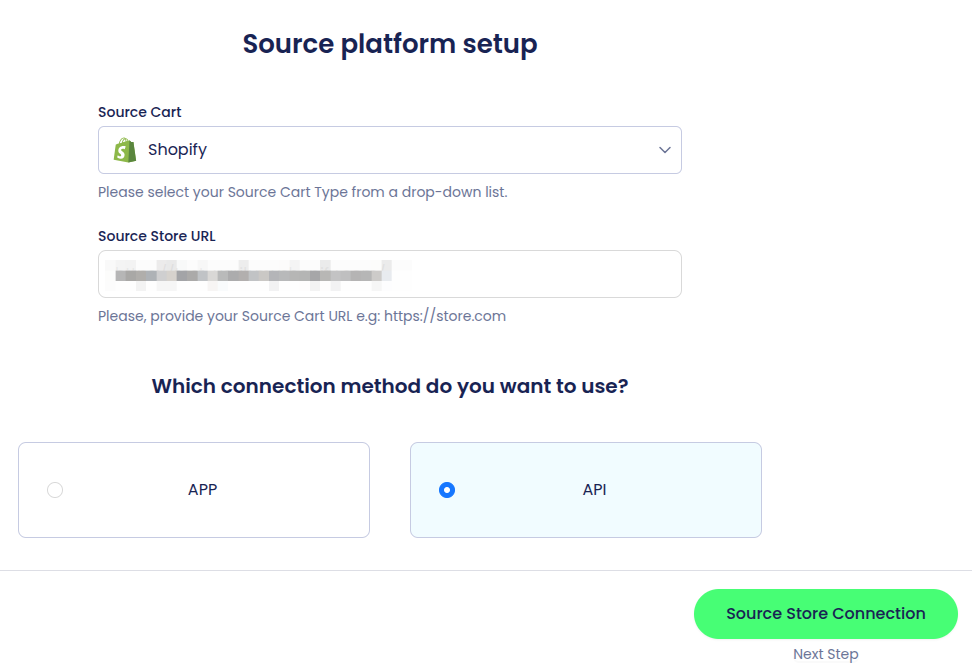
1. Start by accessing the Cart2Cart Migration Wizard and filling in the required fields, such as your Source Store URL and can validate the Admin API access token or by using the "Cart2Cart Store Migration App". Ensure the information you provide is accurate to facilitate a smooth and successful data migration.
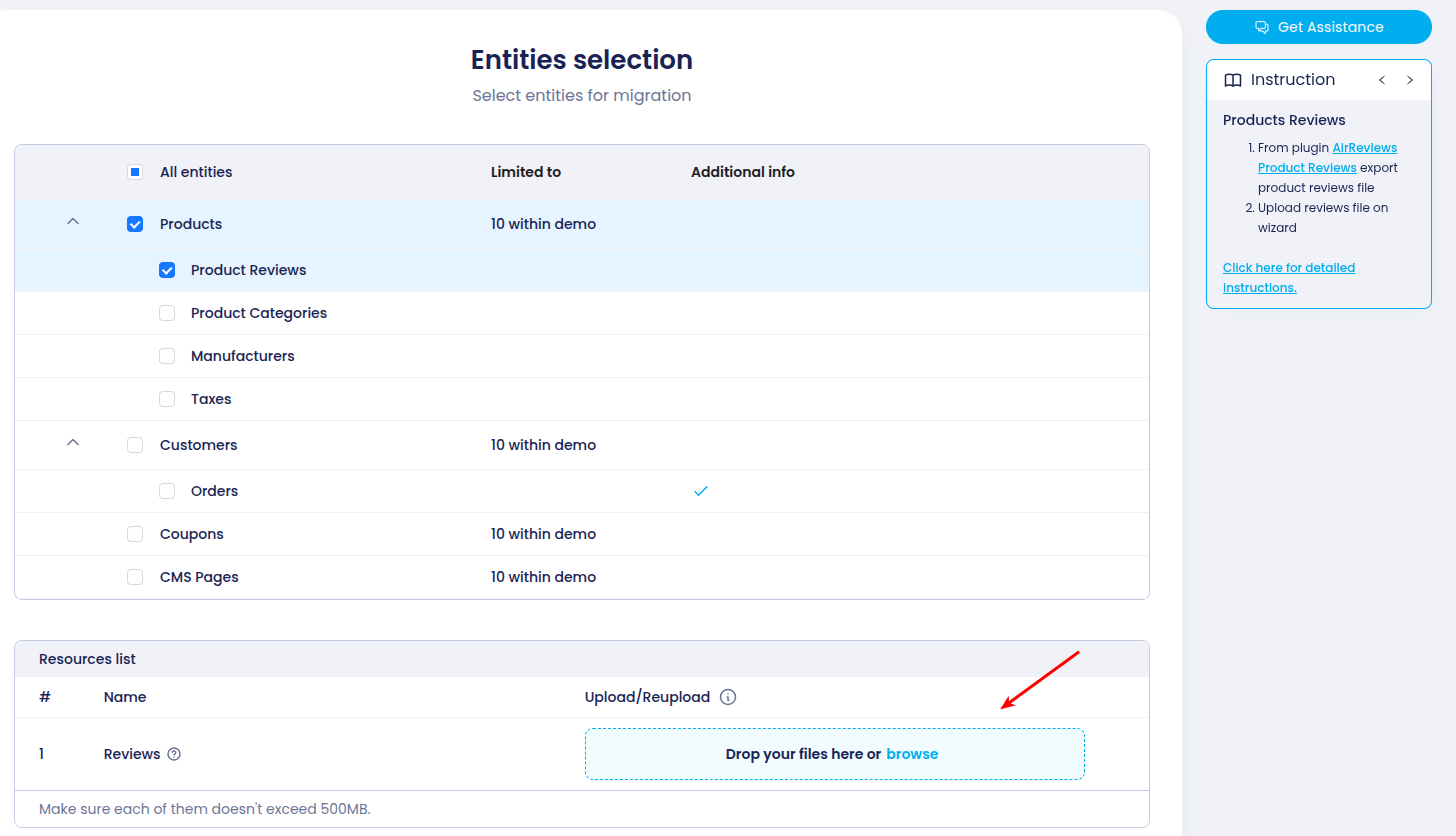
2. On the Entities selection step of the Migration Wizard, select "Reviews". We support exports from the Air Product Reviews App by default. If you have a different app installed, please contact our support team.

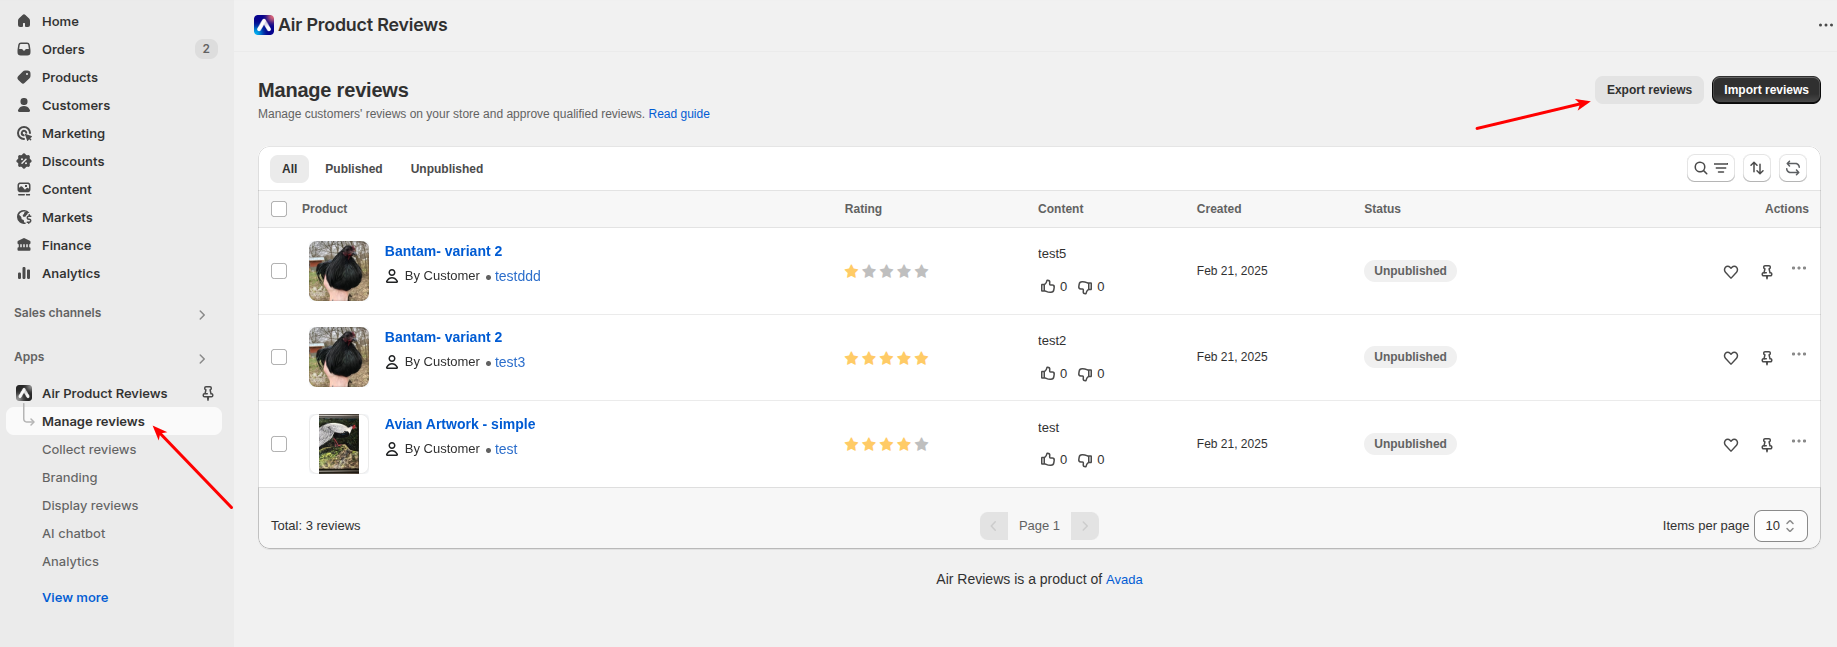
3. Go to your Shopify admin page.
4. Navigate to the Apps menu and select “Air Product Reviews → Export” to download your reviews.
5. Upload the exported CSV file to the Cart2Cart Migration Wizard.
Ready to migrate your Shopify store and all its valuable data? Start your free demo now!
Need personalized assistance with your data migration? Schedule a call with a Cart2Cart migration expert today.
Can I Migrate Duplicate Coupons to Shopify?
Unfortunately, due to Shopify's technical limitations, the platform doesn't directly support the import of coupons with duplicate codes. This is a common constraint across many e-commerce platforms. However, there are workarounds to consider when migrating your store to Shopify using a service like Cart2Cart.
Here are a few options to manage duplicate coupons during your e-commerce data migration:
- Consolidate Coupon Codes: Before migrating, consolidate duplicate coupon codes in your source store into a single code with a higher usage limit.
- Modify Coupon Codes: Slightly alter the duplicate codes to make them unique. For example, append a number or letter to the end of each duplicate code.
- Use Shopify Apps: Explore Shopify apps designed for advanced coupon management. Some apps might offer features to handle duplicate coupons or create more complex promotional rules.
- Post-Migration Adjustments: After the migration, manually recreate the duplicate coupons with unique codes within Shopify's admin panel.
While Cart2Cart automates the transfer of most of your store's data, including coupons with unique codes, it's important to understand platform-specific limitations like this one. Planning ahead and considering these alternatives will ensure a smoother migration process.
Next Steps:
- View the list of supported shopping carts
- Start your free demo with Cart2Cart
- Schedule a call with a Migration Expert to discuss your specific needs.
In Shopify, the order subtotal and order total are calculated automatically by the platform. Because different e-commerce platforms employ various calculation methods for taxes, discounts, and shipping, slight discrepancies of a few cents may appear after the import, especially when dealing with orders containing numerous products. When migrating your store using a data migration service like Cart2Cart, we transfer your order data accurately, but the final calculation is always determined by Shopify's internal algorithms.
To ensure accuracy, you can review Shopify's tax settings, discount codes, and shipping configurations after the migration to align them with your previous platform's settings.
Troubleshooting Order Total Discrepancies After Migration
If you encounter significant differences in order totals after migrating to Shopify, consider the following:
- Tax Settings: Verify that your tax rates and settings in Shopify match those of your previous platform.
- Discount Codes: Ensure that any discount codes are correctly configured and applied in Shopify.
- Shipping Costs: Review your shipping rates and methods to ensure they are consistent with your previous setup.
- Currency Conversion: If applicable, confirm that currency conversion rates are accurate and up-to-date.
If you're still experiencing issues, contact our support team via Live Chat for assistance. We can help you identify and resolve any discrepancies in your order totals.
Next Steps: Ready to migrate your store to Shopify? Start your free demo now! You can also Schedule a Call with our Migration Expert to discuss your specific requirements.
Where Can I Find Extra Data After Shopify Migration?
During the data migration to Shopify, all product sizes (length, width, height), as well as attributes not included in variant creation are migrated to Metafields by default. These Metafields provide a flexible way to store additional information about your products, orders, customers, and other store elements that are not part of the standard Shopify data structure. To access this data, navigate to the relevant entity (e.g., a product) in your Shopify admin panel and look for the Metafields section. You can also use Shopify's API to access and manage Metafields programmatically. This ensures that all your crucial data is transferred and accessible post-data migration.
If you need assistance locating specific data or understanding how it was migrated, please contact our support team. We're here to help you ensure a smooth and complete data migration process.
Ready to migrate your store to Shopify? Start your free demo now!
If the Shopify connection fails while installing the Cart2Cart Store Migration app during wizard setup, use this flow.
1. In the Migration Wizard, select Shopify as Source or Target and start the connection step.
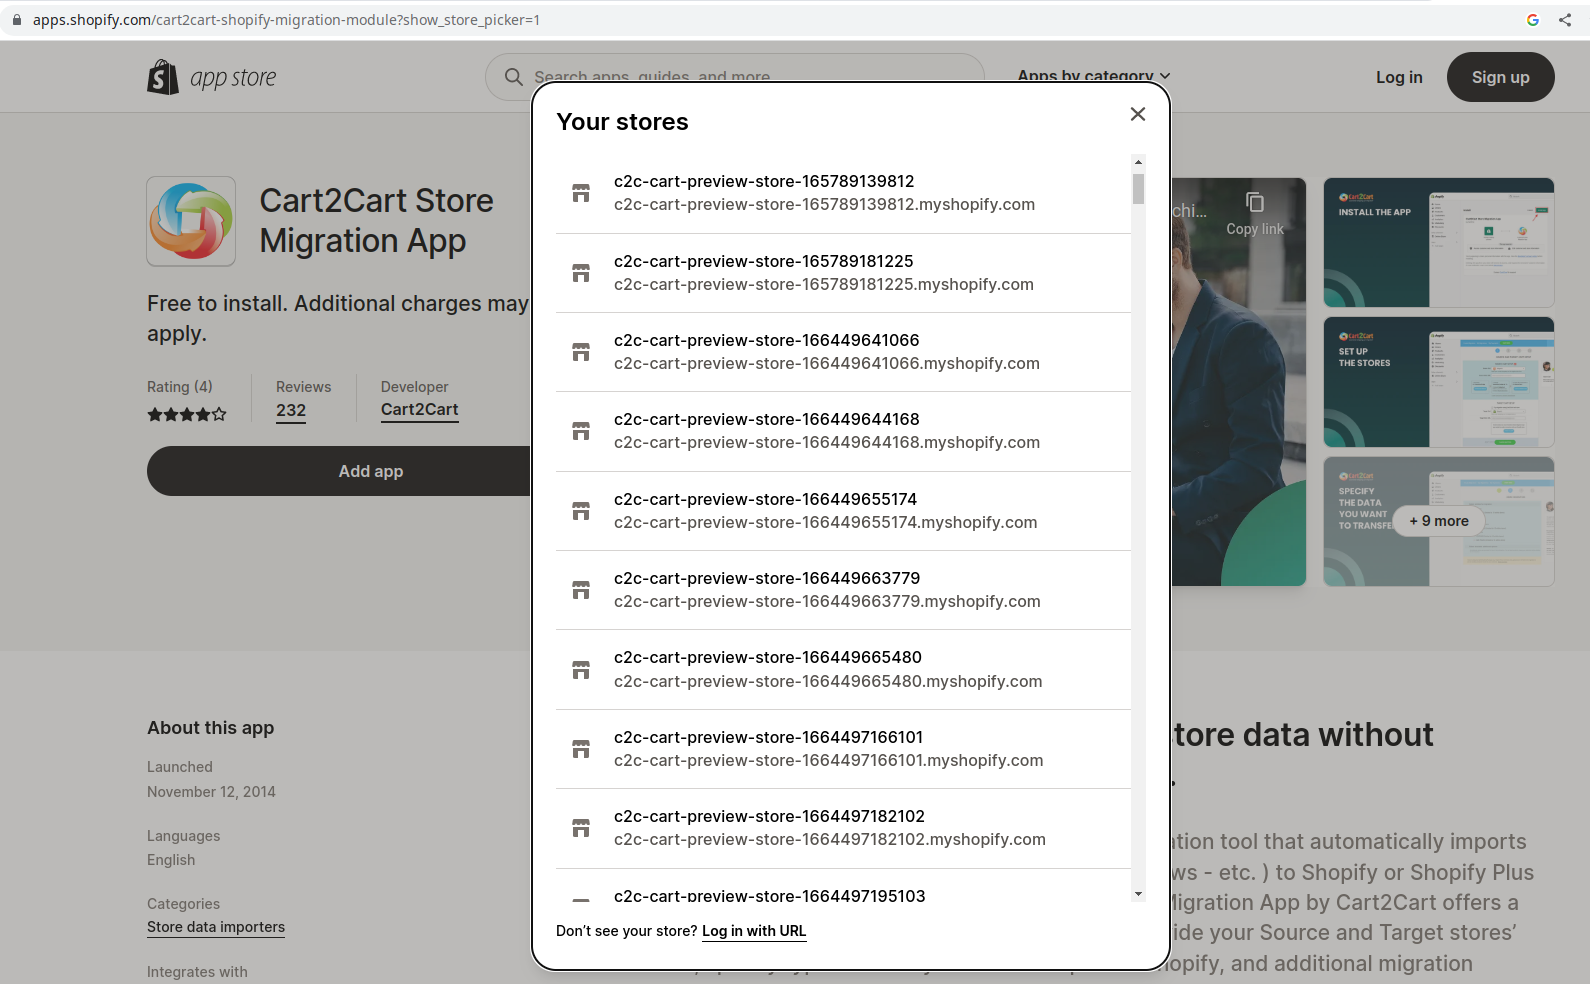
2. When prompted, open the Cart2Cart Store Migration app listing / install page and log in with the Shopify account that owns the correct store.
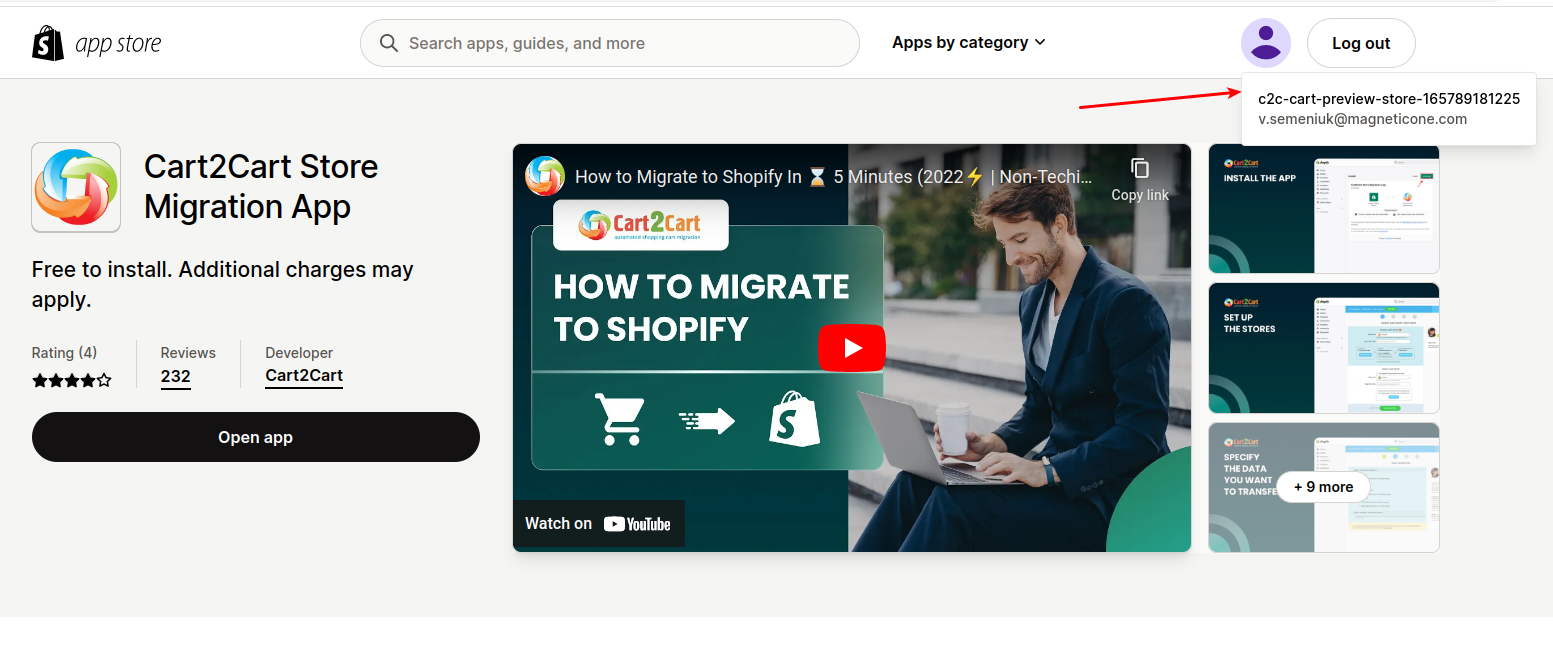
3. Confirm the store name/URL in the Shopify picker (top-right account/store switcher). If the wrong store is selected, log out of Shopify Admin (and the app listing session), then log in again and choose the right shop—Shopify often locks the shop choice for that session.
4. Click Install / Add app and approve the requested permissions.
5. Return to the Cart2Cart wizard and re-run the connection check. If you prefer credentials instead of the app, create a custom app Admin API access token—see Where can I get Shopify API Password?.
6. If install still fails, disable conflicting staff permission limits, try another browser/incognito window, or contact Support with the store URL and error text.
Due to the Shopify Payments Terms of Service, certain business categories and practices are prohibited. These restrictions may stem from Payment Network Rules or the requirements of financial service providers. The list below is representative, not exhaustive.
Consider these restrictions when planning your migration to Shopify. If you're unsure whether your products or services are permissible, contact the Shopify Help Center for clarification. Note that the Prohibited Business list is subject to change. Cart2Cart values your time and convenience, so please review this information carefully!
Shopify Payments Prohibited Businesses: Is Your Business Eligible for Data Migration?
1) Financial and Professional Services
- Investment & credit services
- Securities brokers; mortgage consulting or debt reduction services; credit counseling or repair; real estate opportunities; lending instruments
- Money and legal services
- Money transmitters, check cashing, wire transfers, money orders; currency exchanges or dealers; bail bonds; collections agencies; law firms collecting funds for any purpose other than to pay fees owed to the firm for services provided by the firm (e.g., firms cannot use Shopify Payments to hold client funds, collection or settlement amounts, disputed funds, etc.)
- Virtual currency or stored value
- Virtual currency that can be monetized, resold, or converted to physical or digital products and services or otherwise exit the virtual world (e.g., Bitcoin); sale of stored value, quasi-cash or credits maintained, accepted and issued by anyone other than the seller.
2) IP Infringement, Regulated or Illegal Products and Services
- Intellectual property or proprietary rights infringement
- Sales, distribution, or access to counterfeit music, movies, software, or other licensed materials without the appropriate authorization from the rights holder; any product or service that infringes or facilitates infringement upon the trademark, patent, copyright, trade secrets, or proprietary or privacy rights of any third party; use of Shopify intellectual property without express consent from Shopify; use of the Shopify name or logo including use of Shopify trade or service marks inconsistent with the Shopify Trademark Usage Guidelines, or in a manner that otherwise harms Shopify or the Shopify brand; any action that implies an untrue endorsement by or affiliation with Shopify
- Counterfeit or unauthorized goods
- Unauthorized sale or resale of brand name or designer products or services; sale of goods or services that are illegally imported or exported
- Gambling
- Lotteries; bidding fee auctions; sports forecasting or odds-making; fantasy sports leagues with cash prizes; internet gaming; contests; sweepstakes; games of chance
- Regulated products and services
- Marijuana dispensaries and related businesses; alcohol or alcoholic beverages; sale of tobacco, e-cigarettes, or accessories including e-juice or e-liquid; online pharmacies or pharmacy referral services; age-restricted goods or services; weapons and munitions; gunpowder and other explosives; fireworks and related goods; toxic, flammable, and radioactive materials; products and services with varying legal status on a state-by-state basis
- Adult content and services
- Pornography and other obscene materials (including literature, imagery and other media). Sites offering any sexually-related products or services such as prostitution, massage parlors, dating-services, companion/escort services; international match-making and mail-order brides; pay-per-view, adult live chat or call features; child pornography, fetish gear and services including S&M paraphernalia; hard-core sexually oriented products and services; sex shows, sex clubs, topless bars, strip shows, and other adult entertainment; widgets that allow you to access pornography or pornographic ads.
3) Unfair, Predatory, or Deceptive Practices
- Get rich quick schemes
- Investment opportunities or other services that promise high rewards
- Mug shot publication or pay-to-remove sites
- Platforms that facilitate the publication and removal of content (such as mug shots), where the primary purpose of posting such content is to cause or raise concerns of reputational harm
- No-value-added services
- Sale or resale of service without added benefit to the buyer; resale of government offerings without authorization or added value; sites that we determine in our sole discretion to be unfair, deceptive, or predatory towards consumers.
4) Products or Services Prohibited by Financial Partners
- Aggregation
- Engaging in any form of licensed or unlicensed aggregation of funds owed to third parties, factoring, or other activities intended to obfuscate the origin of funds
- Drug paraphernalia
- Any equipment designed for making or using drugs, such as bongs, vaporizers, and hookahs
- Event Tickets
- Event or festival tickets, event ticket resellers, including theme park ticket reseller
- Government Services
- Embassies, foreign consulates or other foreign governments
- High-risk businesses
- Human hair, fake hair, or hair-extensions; age verification services; bankruptcy lawyers; computer technical support; psychic services; extended warranties; travel reservation services and clubs; airlines; cruises; timeshares; chain-letters; essay mills; flea markets; prepaid phone cards, phone services, and cell phones; telemarketing, telecommunications equipment and telephone sales; shipping or forwarding brokers; door-to-door sales; negative response marketing; credit card and identity theft protection; the use of credit to pay for lending services; any businesses that we believe poses elevated financial risk, legal liability, or violates card network or bank policies
- Multi-level marketing
- Pyramid schemes, network marketing, and referral marketing programs
- Pharmaceuticals or Pseudo pharmaceuticals
- Pharmaceuticals and other pseudo-pharmaceutical products that make health claims (e.g. retinol creams, lash growth serums, products containing hyaluronic acid, etc.) and medical devices
- Social media activity
- Sale of Twitter followers, Facebook likes, YouTube views, and other forms of social media activity
- Substances designed to mimic illegal drugs
- Sale of a legal substance that provides the same effect as an illegal drug (e.g., salvia, kratom)
- Video game or virtual world credits
- Sale of in-game currency unless the merchant is the operator of the virtual world
- Use of Shopify Payments in a manner inconsistent with its intended use or as expressly prohibited in the Terms of Service
- Use of Shopify Payments principally as a virtual terminal (e.g., submitting card transactions by manually inputting card information); processing where there is no bona fide good or service sold, or donation accepted; card testing; evasion of card network chargeback monitoring programs; sharing cardholder information with another merchant for payment of upsell or cross-sell product or service; offering substantial rebates or incentives to the cardholder subsequent to the original purchase.
To avoid delays, ensure your business doesn't fall into any of these categories before initiating a data migration. If you encounter any issues, the Cart2Cart team can assist you in finding the best eCommerce solution for your needs. Schedule a call with our migration expert to discuss your options. Happy migrating!
How Are Product Prices Migrated to Shopify During Shopping Cart Migration?
Cart2Cart migrates product prices exactly as they are stored on your source store. These prices may be without tax, include tax, or have tax added later depending on your source store’s configuration.
What If Prices on the Source Store Include Tax?
If the prices on your source store include tax, Cart2Cart does not migrate the tax settings themselves but marks these products as taxable by enabling the "Charge tax on this product" option in Shopify. This ensures Shopify will apply taxes based on your own tax rules.

Who Configures Tax Settings in Shopify?
After migration, it is your responsibility to configure tax rates, regions, and rules in Shopify. These settings will automatically apply to all imported products marked as taxable, ensuring your store calculates and displays taxes correctly. For detailed information on how taxes are migrated and handled, you can read more about tax migration to Shopify here.

Will Prices Appear Correctly After Migration?
Yes, provided you configure Shopify tax settings appropriately. Shopify will then calculate and add taxes to the migrated prices based on your configurations, maintaining consistency with your original store.
Need Help with Complex Tax Migrations?
If you need advanced tax migration services, such as migrating products with different tax rates, consider our Data Migration Service Package. Our experts will customize your shopping cart migration to fit your specific needs.
Next Steps
Ready to move your store to Shopify? Start your free demo now and see how Cart2Cart can simplify your shopping cart migration!
If the Cart2Cart Migration Wizard reports a Shopify Admin Access Validation Error, Shopify rejected the store login or automatic credential creation. Use the checks below, then connect with a manual Admin API token or the Cart2Cart Shopify app.
Common causes
1. Wrong admin email or password (typos, wrong store, expired SSO session).
2. Staff account lacks permission to install apps or create custom apps.
3. Two-factor authentication / SSO requires you to approve access in Shopify before the wizard can continue.
4. Temporary Shopify outage or API rate limits.
5. Store cannot create admin custom apps anymore (Shopify moved new apps toward the Dev Dashboard).
Fix: reconnect without relying on admin password validation
Option A (preferred): In the wizard, authorize Shopify through the Cart2Cart Store Migration app install flow when offered.
Option B: Create or reuse a custom app Admin API access token and paste it into the wizard fields. Full steps: Where can I get Shopify API Password?
If your store can no longer create custom apps under Settings → Apps and sales channels → Develop apps, contact Cart2Cart support for the current connection method for your store.
For a Shopify data migration with Cart2Cart, Shopify no longer uses a separate long-lived API password from legacy private apps. You typically connect via the Cart2Cart Store Migration app in the Shopify App Store, or—when the Migration Wizard asks for API credentials—via a custom app Admin API access token.
Preferred: connect through the Cart2Cart Shopify app
1. In the Cart2Cart Migration Wizard, choose Shopify as source or target and follow the on-screen Shopify authorization.
2. Install or open the Cart2Cart app from the Shopify App Store when prompted, approve the requested permissions, then return to the wizard.
This avoids copying tokens manually whenever the wizard supports app-based connection.
If the wizard asks for an Admin API access token (custom app)
Shopify retired private apps. Older docs that mention API Key + API Password refer to that obsolete flow. Use a custom app token instead:
1. In Shopify admin, go to Settings → Apps and sales channels.
2. Click Develop apps. If prompted, allow custom app development.
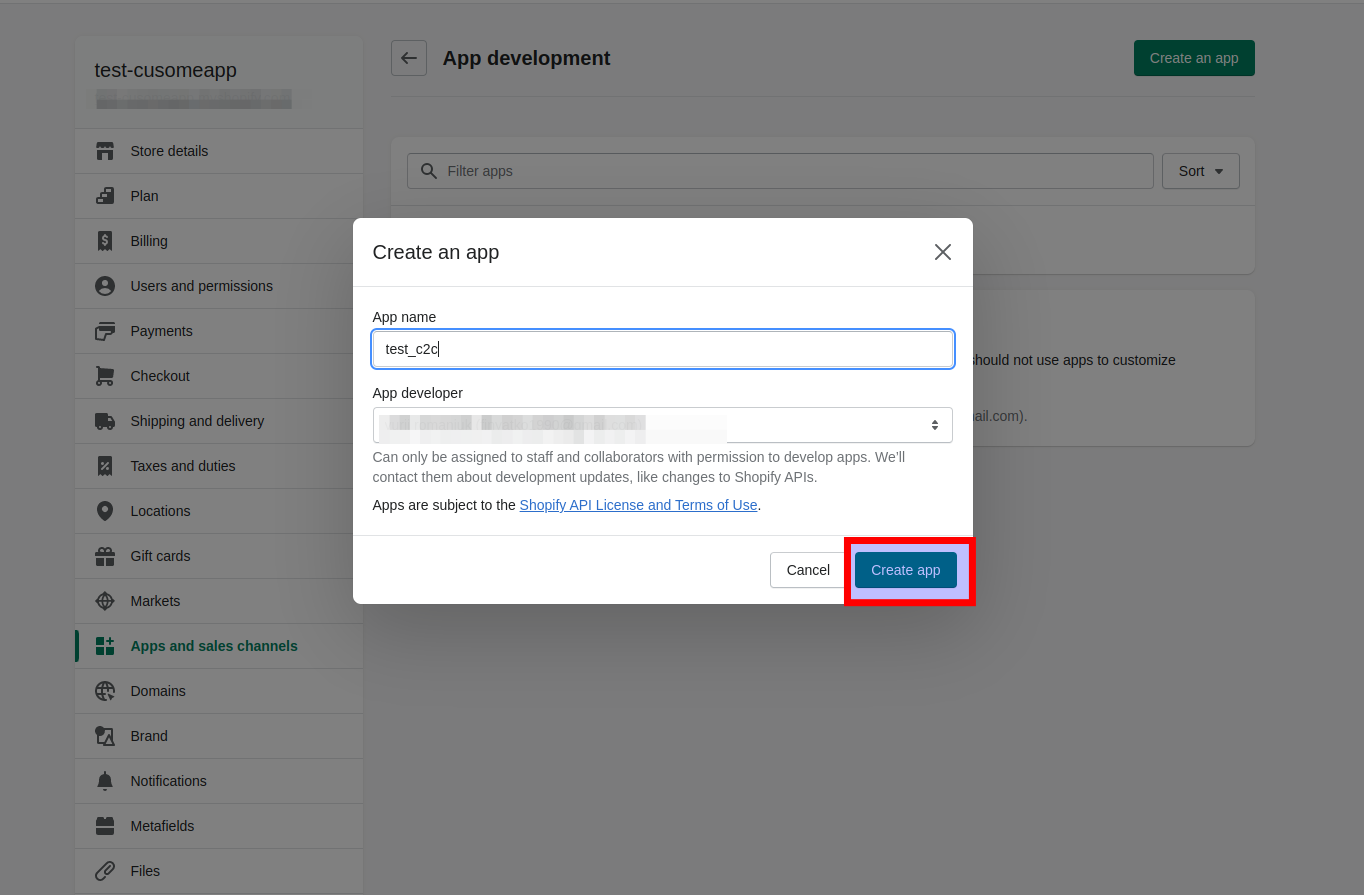
3. Click Create an app, name it (for example Cart2Cart Migration), and create the app.
4. Open Configure Admin API scopes and grant read/write access Cart2Cart needs (products, customers, orders, inventory, and related resources). Save.
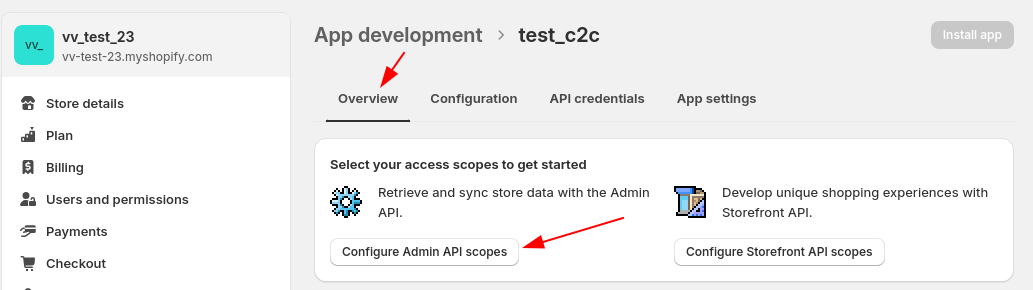
5. Click Install app and confirm.
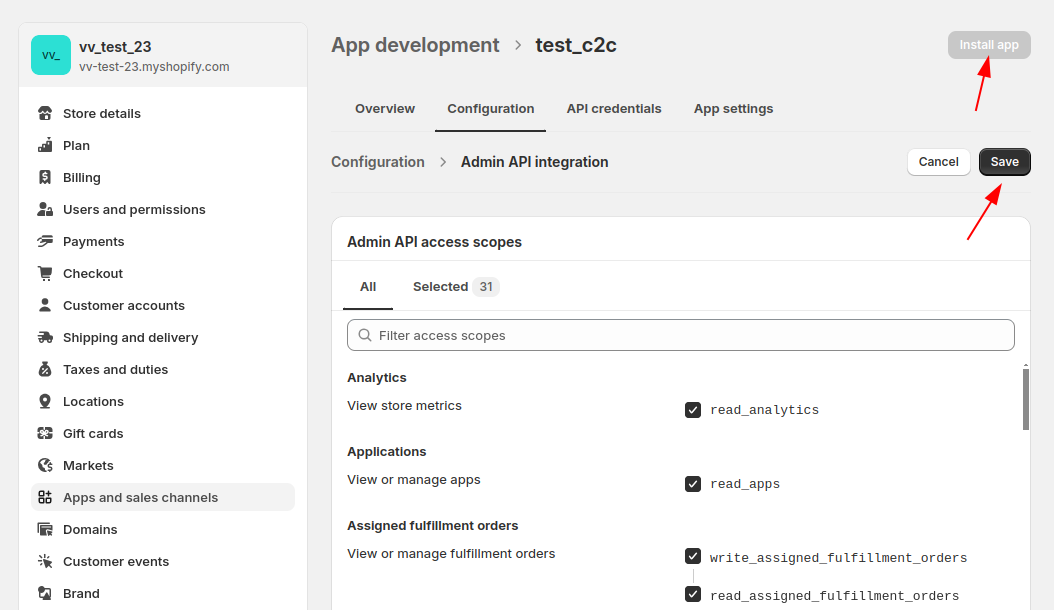
6. On API credentials, reveal the Admin API access token once, copy it, and paste it into the Cart2Cart Migration Wizard field (often still labeled similarly to “API password” for historical reasons—use the access token value).
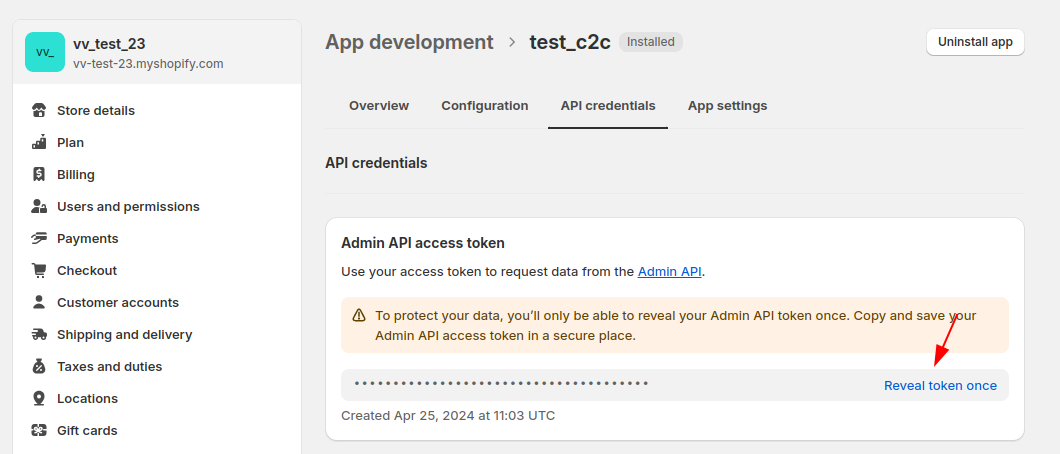
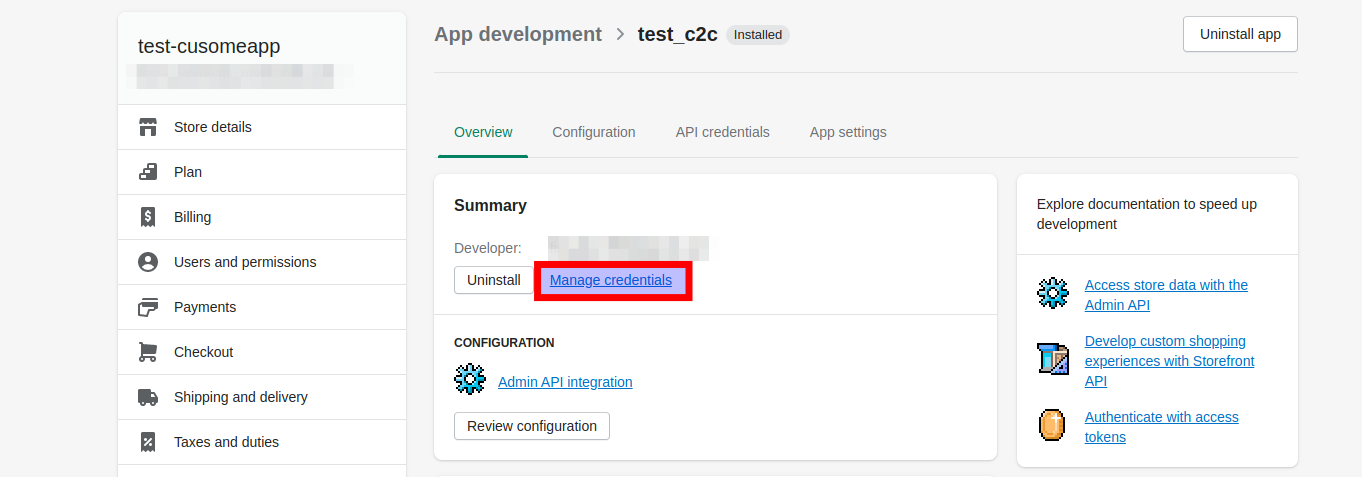
If you need a new token for an existing custom app, open the app’s API credentials (or uninstall/reinstall the app when required). Example:
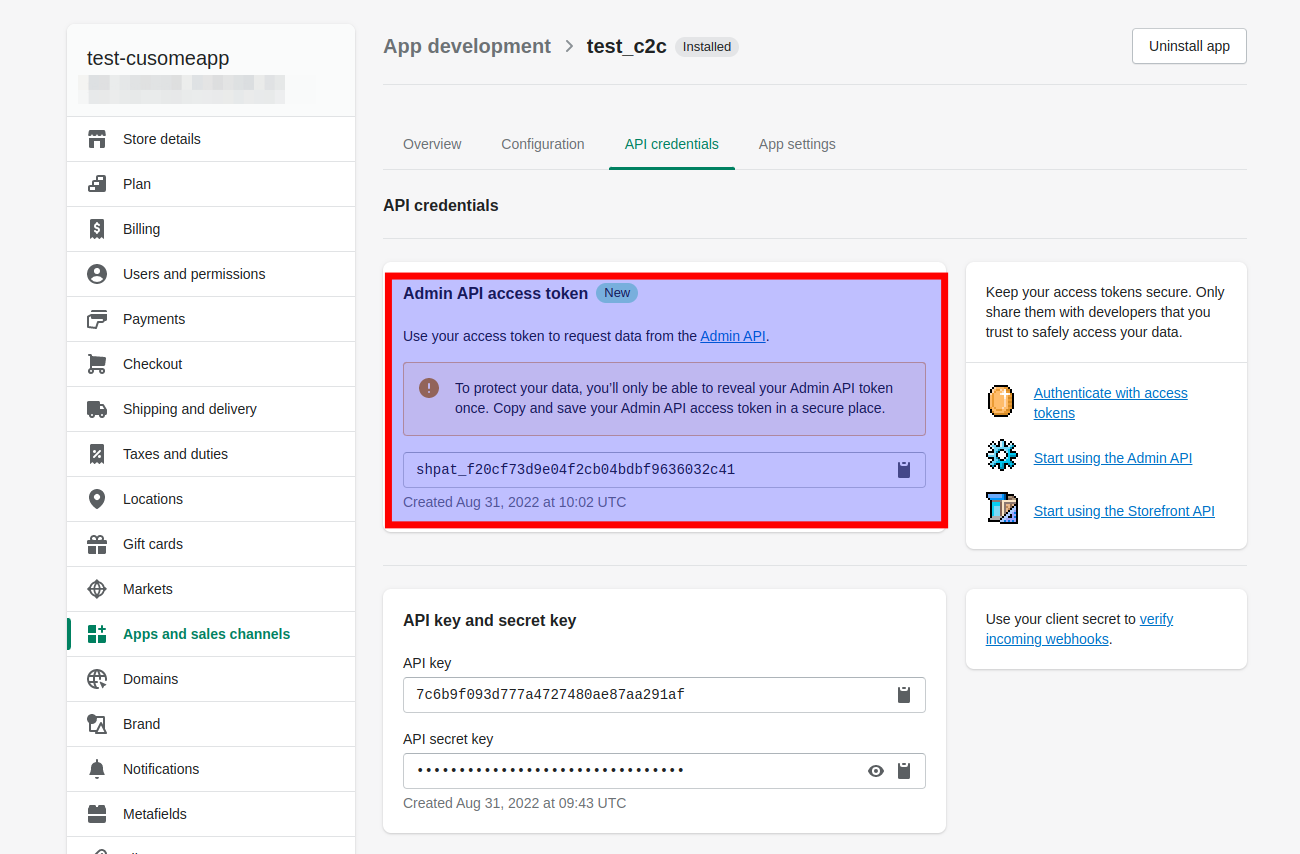
Note (2026+): Shopify is moving new app creation toward the Dev Dashboard, where some apps expose Client ID/Secret and short-lived tokens instead of a permanent token in admin. If your store can no longer create admin custom apps, use the Cart2Cart Shopify app connection or contact Cart2Cart support for the current credential method for your store.
Ready to migrate? Start your free demo.
Will my old store SEO URLs remain working after Shopify migration?
When performing an eCommerce data migration to Shopify, we strongly recommend selecting the additional option “Create 301 redirects on your target store after migration”. This is crucial to ensure that links to your old store are correctly redirected, preserving your SEO ranking and preventing lost traffic. Due to Shopify’s specific system of categories and subcategories, it's impossible to transfer URLs unchanged. Arranging redirects for your products and categories links is vital, especially those already indexed in search engine results. Keep reading to find out the details.
Understanding Shopify's URL Structure After eCommerce Data Migration
Shopify uses a specific system for organizing products. Products are arranged into collections instead of traditional categories and use tags for subcategories. This influences how products and categories URLs are formed. For example, a product URL on Shopify typically looks like this: www.dresses-store.myshopify.com/products/dress-red, instead of a more standard www.dresses-store.com/dress-red.html. Similarly, a category URL might be: www.dresses-store.myshopify.com/collections/women-clothes.
Preserving SEO Value During Shopify eCommerce Data Migration
Due to Shopify’s inherent URL structure, preserving your current store URLs after migration isn't possible without adjustments. When migrating to Shopify, your products and categories URLs will automatically include the /products/ and /collections/ sections. To maintain some resemblance to your old URLs, choose the additional option “Migrate categories and products SEO URLs” during your Shopify migration via Cart2Cart. This option transfers the part of the URL after the domain name and appends it to your Shopify products and collections URLs.
How Cart2Cart Handles URL Migration for Shopify
Here’s a practical example of how this works during Shopify eCommerce data migration. If your source cart has a product link like this: https://www.my-source-store.com/my-product, with the "Migrate categories and products SEO URLs” option selected, the corresponding link on Shopify will be: http://www.my-shopify-store.com/products/my-product. For categories, which become collections on Shopify, an old link like https://www.my-source-store.com/my-category-name will be transferred as http://www.my-shopify-store.com/collections/my-category-name.
For personalized guidance and assistance with your specific migration needs, please contact the Cart2Cart Support Team. Start your free demo now!
Troubleshooting Shopify Migration: Why Can't I Migrate from Shopify?
Before initiating a Shopify migration using the Cart2Cart migration tool, it's crucial to ensure you have both a custom collection and a smart collection created within your Shopify admin panel. These collections are a technical requirement for the Cart2Cart Shopify migration process to function correctly.
Why is this necessary? Due to the way Shopify's API is structured, Cart2Cart relies on the presence of at least one of each type of collection to properly access and migrate your product data. Without these collections, the Cart2Cart migration tool may not be able to establish a connection and initiate the data transfer.
If you are experiencing issues setting up your data migration from Shopify, specifically during the Cart2Cart migration tool setup, verify that you have created at least one custom collection and one smart collection in your Shopify store. Once created, attempt the setup process again.
If you've confirmed the presence of both collection types and the issue persists during your data migration, please don't hesitate to contact our Support Team for further assistance. They can provide personalized guidance and troubleshooting to ensure a smooth migration process.
Ready to migrate your store? Start your free demo now!
Shopify Product Variant Limits During Data Migration
Due to the specific way Shopify handles product configurations, there are limitations on the number of variants a product can have. Specifically, Shopify restricts products to a maximum of 100 variants and 3 option attributes. This means that during a data migration to Shopify using Cart2Cart, products exceeding these limits may not be migrated in their entirety.
Why does this limitation exist?
Shopify's architecture is designed to optimize performance and user experience, and these limits on product variants are a part of that design. While it might seem restrictive, it helps ensure that Shopify stores remain fast and efficient, even with large catalogs.
What happens if my products exceed these limits during migration?
If your products in your source store have more than 100 variants or use more than 3 option attributes, Cart2Cart will migrate as many variants as possible, up to the Shopify limit. Variants exceeding the limit will not be migrated automatically. You'll need to consider alternative solutions to handle these products.
Workarounds for Shopify Product Variant Limits During Data Migration:
While the Shopify limit is firm, there are several ways to address products with excessive variants during your Shopify data migration:
- Consolidate Variants: Evaluate if you can consolidate similar variants into fewer options. For example, if you have multiple shades of a color that are very close, consider combining them.
- Use Apps: Explore Shopify apps designed to handle complex product configurations and variants. These apps can often extend Shopify's capabilities.
- Create Separate Products: Instead of having one product with hundreds of variants, break it down into multiple products, each with fewer variants.
- Custom Development: For highly complex scenarios, consider custom development to tailor your Shopify store to handle your specific product configurations.
Cart2Cart is here to help!
Our team of migration experts can help you plan and execute your data migration to Shopify, even with complex product catalogs. We can advise on the best approach for handling products with many variants and ensure a smooth transition.
Next Steps:
- Learn more about Cart2Cart's Shopify migration services.
- Start your free demo to see how Cart2Cart works with your data.
- Contact our support team via Live Chat for personalized assistance.
- Schedule a call with a Migration Expert to discuss your specific needs.
Can I migrate product options and attributes to Shopify?
Yes, you can migrate product options and attributes to Shopify using a specialized data migration service like Cart2Cart.
Shopify Product Variant Limitations and Cart2Cart's Solution
Due to the Shopify platform's architecture, there are limitations on product variants. Specifically, Shopify allows a maximum of 100 variants per product, with each variant having up to 3 options. When migrating to Shopify, Cart2Cart addresses this by migrating product attributes to Shopify as product metafields, ensuring no data is lost during your data migration.
Displaying Metafields in Your Shopify Store
To make these metafields visible on your storefront, you'll need to adjust your Shopify theme. Refer to this guide for instructions on how to display metafields in your Shopify store after the data migration.
Start Your Data Migration Today
Ready to migrate your product options and attributes to Shopify? Start your free demo now!
Migrating Categories and Subcategories to Shopify with Automated Data Migration
Yes, with Cart2Cart's automated data migration service, you can seamlessly transfer all the relationships between product categories and subcategories to your new Shopify store. This ensures your product organization remains intact during the migration process.
Shopify utilizes a unique system for organizing products. It uses collections to represent categories and tags to represent subcategories. When you migrate to Shopify, your source store's categories and subcategories need to be correctly mapped to Shopify's collections and tags to maintain your product structure.
Therefore, when you migrate to Shopify, your existing categories/subcategories will be transferred into Shopify collections, and products will be assigned tags corresponding to the subcategories in your original store. To guarantee the preservation of all relationships between product categories and subcategories, it's highly recommended to select the additional option “Migrate Source Store categories into Shopify Automated Collections”. Learn more about this option.
Ready to experience a seamless data migration? Start your free demo today and see how easy it is to transfer your store to Shopify with Cart2Cart!
How Can I Migrate Order Statuses to Shopify?
Yes, Cart2Cart allows you to map order statuses from your source store to corresponding default order statuses in Shopify. Due to Shopify's platform limitations, you cannot create custom order statuses. Instead, you'll need to map your existing statuses to the available Shopify options.
Cart2Cart simplifies the data migration process, allowing you to align your order management workflow in Shopify with your previous store. Correctly mapping order statuses ensures accurate reporting and a seamless customer experience after the migration.
Mapping Order Statuses During Shopify Data Migration
During the data migration setup, you'll be presented with a mapping interface. Here, you can select the corresponding Shopify order status for each status in your source store. This ensures that orders are correctly categorized in your new Shopify store, reflecting their actual state (e.g., "Processing," "Shipped," "Completed").
For more information on migrating fulfillment statuses, please refer to this article.
Next Steps After Shopify Data Migration
After completing the data migration, it's crucial to review the migrated orders and their statuses. Verify that the mapping was accurate and that all orders are correctly categorized in Shopify. This step is essential for maintaining data integrity and ensuring a smooth transition for your business.
Ready to migrate your store to Shopify? Start your free demo now or schedule a call with a migration expert to discuss your specific needs.
Understanding the "Clear Target Store Data Before Migration" Option
Cart2Cart offers an additional option, "Clear current data on a Target Store before migration," to prevent mixing and duplication of data during your eCommerce data migration. This is especially useful when moving to a new platform and starting fresh. However, it's important to understand how this option functions, particularly for hosted shopping carts like Shopify.
How Clearing Target Store Data Works on Shopify
Due to the way Shopify's API works, enabling the "Clear current data on a Target Store before migration" option will remove the following data from your Shopify store:
- Shopify collections
- Shopify navigation links
If you want to keep this data after the migration, it’s best not to use this option.
Important Considerations Before Clearing Data
The "Clear current data on a Target Store before migration" action is irreversible. While the option primarily affects Shopify as described above, other platforms may also experience data loss. To ensure a safe eCommerce data migration, we strongly recommend backing up your target store before enabling this option. You can easily export your data to CSV files and save them to your computer.
Safeguarding Your Data During Migration
Protecting your data is paramount. Before initiating any eCommerce data migration, always create a comprehensive backup of your existing store. This precautionary measure ensures that you can restore your data in the event of unforeseen issues or if the "Clear current data on a Target Store before migration" option removes data you intended to keep.
Ready to start your secure and seamless eCommerce data migration? Start your free demo now!
Why are my product SKUs not migrating to Shopify?
Due to the way Shopify is structured, product SKUs are associated with variants rather than the main product itself. This means that during a Shopify data migration, Cart2Cart migrates SKUs to the variant level within Shopify.
Here's a breakdown of what happens during the Cart2Cart migration process regarding SKUs and Shopify:
- SKUs Migrate to Variants: If your source store has SKUs assigned to individual product variations (e.g., size, color), Cart2Cart accurately transfers these SKUs to the corresponding variants in Shopify.
- No Product-Level SKUs in Shopify: Shopify doesn't natively support SKUs directly on the product level. Therefore, SKUs that were only assigned to the main product in your source store will need to be handled differently.
How to Handle Product-Level SKUs:
If your original store system only used SKUs at the product level and didn't utilize product variants, you have a couple of options:
- Create a Default Variant: The simplest solution is to create a default variant for each product in Shopify (e.g., "Default"). Then, you can manually add the original product-level SKU to this default variant.
- Use a Shopify App: Several Shopify apps in the Shopify App Store allow for more customized SKU management, potentially enabling you to associate SKUs with products in a way that better aligns with your previous store's structure.
Need Help with Your Shopify Data Migration?
Migrating your store to Shopify can seem daunting, but Cart2Cart simplifies the process. Cart2Cart supports a wide range of e-commerce platforms for migration *to* Shopify.
Ready to migrate your store to Shopify? Start your free demo today to see how easy it is!
Why are Order Dates Not Migrating Correctly to Shopify?
The successful transfer of order dates to Shopify during data migration depends on how Shopify's servers interpret the data. While Cart2Cart accurately transfers the date format, differences in server configurations can lead to inconsistencies.
Order Date Migration to Shopify: Considering Time Zones for Accurate Data Migration
When performing a data migration to Shopify, it's crucial to consider the time zone settings of your source shopping cart. Currently, this time zone consideration is specifically implemented when migrating from Magento and WooCommerce.
During the data migration process from Magento or WooCommerce to Shopify, Cart2Cart uses the source store's time zone configuration to accurately transfer the order dates to your Shopify store. To ensure the most accurate data migration and consistent data, we strongly recommend setting the same time zone (e.g., UTC) in both your source and target cart configurations before initiating the migration.
Note: This time zone consideration currently applies only to migrations from Magento and WooCommerce to Shopify. For data migrations involving other shopping carts, the process is performed without time zone adjustments.
Troubleshooting Order Date Issues After Data Migration
If you encounter issues with order dates after migrating to Shopify, verify the time zone settings in both your original store and your Shopify store. Contact our support team via Live Chat for assistance in diagnosing and resolving any discrepancies. Our Migration Experts can help you ensure the integrity of your data during the data migration process.
Next Steps:
- Start your free demo: https://newapp.shopping-cart-migration.com/
- Schedule a call with a Migration Expert: https://meet.shopping-cart-migration.com/team/csm
After you migrate orders to Shopify with Cart2Cart, Shopify may treat imported orders as new. Staff/store-owner inboxes can then receive a flood of “new order” emails. Customer order emails are separate; this guide covers staff notifications.
Before migration: also pause apps or automations (for example Shopify Flow) that fire on new orders, so customers are not messaged about historical orders.
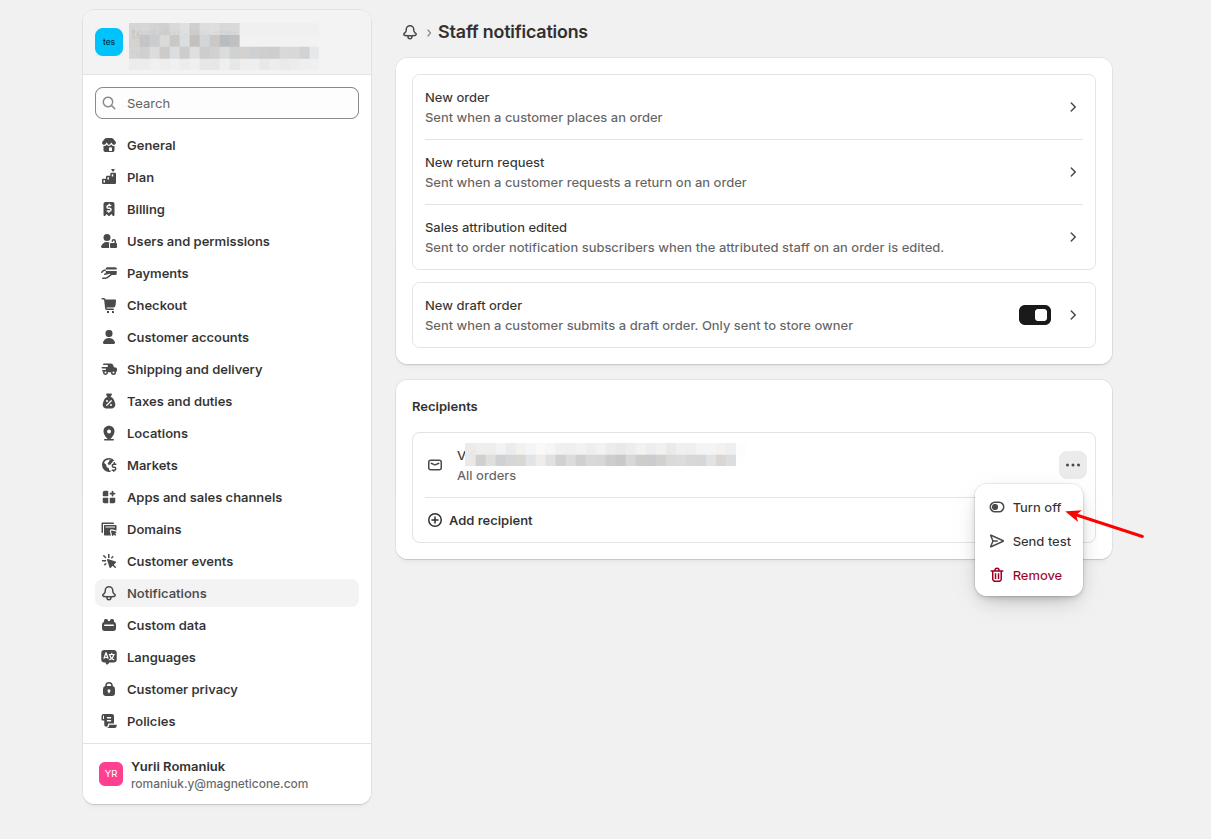
Disable staff new-order emails (current Shopify admin)
1. In Shopify admin, go to Settings → Notifications.
2. Open Staff notifications.
3. In Recipients, click the ⋯ (more) menu next to each staff member or email that should stop receiving alerts.
4. Choose Turn off (or remove the recipient if you no longer need them on this notification).
5. Repeat for every recipient that would be spammed during import.
6. After migration finishes, return here and Turn on notifications again if you want live-order alerts.
Official reference: Shopify Help — Staff notifications.
If orders do not appear on Shopify after a Cart2Cart demo or full migration, check plan and location setup first.
Pause and Build plan
Stores on Shopify’s Pause and Build plan do not accept orders. Cart2Cart cannot create demo/full orders on that plan. Switch to an active plan that accepts orders, then re-run Demo/Full Migration. See Shopify — pause store / plans.
Inventory locations
1. In Shopify admin, go to Settings → Locations.
2. Ensure at least one active location exists and is set to fulfill online orders.
3. Confirm products are stocked at a location that can fulfill.
Also verify Admin API scopes include orders, and that you are not filtering the Orders list by an unexpected location or channel.
Will Customer Accounts Be Migrated During Shopify Data Migration?
Cart2Cart offers a comprehensive eCommerce data migration service to transfer your store's data to Shopify. While we migrate all your customer data, including names and addresses, customer *accounts* themselves are not directly migrated.
Why Aren't Customer Accounts Migrated to Shopify?
Shopify's platform has a unique security feature: each time a new customer account is created, an email notification is automatically sent to the customer. Migrating all your existing customer accounts would trigger a large number of these notifications, potentially overwhelming your customers. To avoid this, Cart2Cart doesn't automatically migrate customer accounts.
How Do Customers Access Their Accounts After the Shopify Data Migration?
After the Cart2Cart eCommerce data migration to Shopify is complete, you'll need to send your existing customers invitations to reactivate their accounts. Shopify provides a straightforward process for this. Refer to this detailed guide for easy instructions.
Ready to migrate your store to Shopify? Start your free demo now!
Need help with your eCommerce data migration? Schedule a Call with a Migration Expert or contact our support team via Live Chat
Does Cart2Cart Migrate Tags to Shopify?
Yes, Cart2Cart supports the migration of tags to Shopify. This feature allows you to preserve your product organization and filtering options when switching to the Shopify platform. During the data migration process, subcategories from your source store can also be transferred as tags within Shopify, further simplifying your product categorization.
Migrating tags to Shopify ensures that your customers can easily find the products they're looking for, maintaining a seamless shopping experience. This is especially beneficial for stores with large inventories and complex product classifications.
To learn more about migrating your online store to Shopify and how Cart2Cart can help, visit our Shopify migration page.
Ready to migrate your store to Shopify? Start your free demo now!
Cart2Cart supports the migration of standard and some custom fields; however, Shopify has limitations regarding custom data storage. Shopify does not have a built-in custom fields feature like some platforms (e.g., WooCommerce’s Custom Fields or Magento’s Custom Attributes). Instead, Shopify relies on Metafields to store extra information.
Can Cart2Cart Migrate Custom Fields to Shopify?
Yes, Cart2Cart can migrate standard and certain custom fields during your shopping cart migration to Shopify. However, it's important to understand Shopify's approach to custom data. Unlike platforms like WooCommerce or Magento, Shopify doesn't offer native custom fields in the same way. Instead, it utilizes Metafields to store additional data associated with products, customers, orders, and other entities.
Therefore, when performing a data migration to Shopify, Cart2Cart will attempt to map your existing custom fields to the appropriate Metafields within Shopify. The success of this mapping depends on the nature of your custom fields and the structure of your source store. We support migration from various platforms, including WooCommerce and Magento.
Ensuring Accurate Custom Field Migration to Shopify
For crucial business data contained within custom fields, consider using Cart2Cart’s Assisted Migration Service. Our expert specialists will carefully analyze your data and ensure it's mapped correctly to Shopify’s available Metafield structures. This minimizes the risk of data loss or corruption during the data migration process.
To better understand how your specific custom fields will be handled during the data migration, we recommend running a free demo migration. This will allow you to preview the results and identify any potential issues before migrating your entire store.
Need help? Schedule a call with a migration expert or contact our support team via live chat for personalized assistance with your data migration!
Password Migration to Shopify: Understanding the Limitations
Cart2Cart, a leading eCommerce data migration service, understands the importance of a seamless transition when switching to Shopify. However, due to security protocols, Cart2Cart cannot directly migrate customer passwords from other platforms to Shopify.
The reason for this limitation lies in the unique password encryption methods employed by each shopping cart platform. For security reasons, these encryption methods are generally incompatible. Directly transferring encrypted passwords between systems could compromise data security.
Also, it's important to note that Cart2Cart migrates customer *data*, not customer accounts themselves. This means that while customer information like names, addresses, and order history are transferred, the actual account credentials (usernames and passwords) are not.
Therefore, the best practice after migrating to Shopify is to send account invite emails to your customers, prompting them to reactivate their accounts and reset their passwords. Learn more about sending account invite emails in bulk.
While direct password migration isn't possible, Cart2Cart ensures a smooth and comprehensive migration of all other essential customer data. This allows your customers to quickly regain access to their accounts and continue shopping on your new Shopify store with minimal disruption.
Ready to experience a seamless eCommerce data migration to Shopify? Start your free demo now!
Will Cart2Cart Migrate Videos in Descriptions to My Shopify Store During eCommerce Data Migration?
If your source cart platform includes video tags directly within product descriptions, Cart2Cart can migrate these videos to your Shopify store during the eCommerce data migration process. This ensures that your product descriptions retain their visual appeal and informative content after the migration.
However, if the videos are embedded using methods other than direct video tags (e.g., custom code, third-party apps), they may not be automatically transferred. In such cases, you might need to consider alternative solutions, such as:
- Manually embedding the videos in your Shopify product descriptions after the migration.
- Using a Shopify app that supports video embedding from your chosen video hosting platform.
- Contacting our Support Team for assistance with custom migration options.
For a seamless eCommerce data migration experience and to confirm how your specific video implementation will be handled, we recommend running a demo migration. Start your free demo today to see Cart2Cart in action!
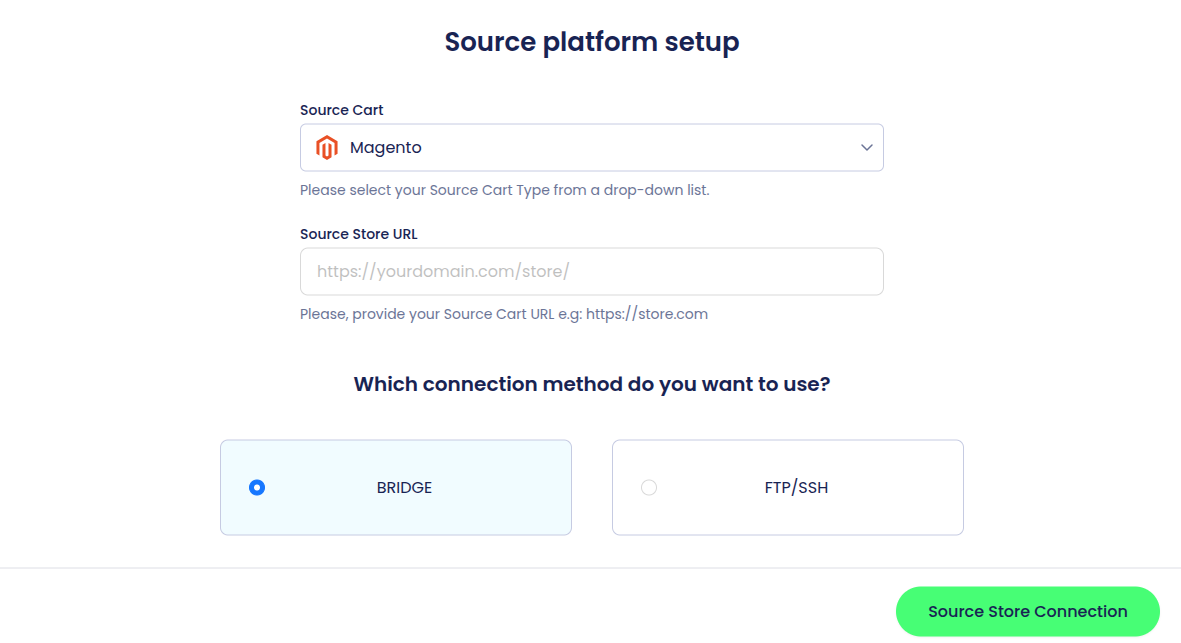
No. You do not upload a Connection Bridge for Shopify. Shopify is API-hosted, so Cart2Cart connects through the Shopify API.
In the Migration Wizard, authorize Shopify via the Cart2Cart Store Migration app when prompted, or provide an Admin API access token from a custom app. See Where can I get Shopify API Password? for current credential steps.
Can I migrate several languages to Shopify?
Unfortunately, direct language transfer to Shopify is not supported. Shopify's architecture handles multilingual storefronts differently.
However, there are effective workarounds to create a multilingual Shopify store after your data migration. You can use a Shopify app specifically designed for translating storefront content into multiple languages. These apps often integrate seamlessly with your store and provide tools for managing translations. Another option is to create separate Shopify stores for each language, although this requires more management overhead.
For stores requiring multilingual capabilities, consider exploring platforms that natively support multiple languages during data migration. Visit the Cart2Cart Multiple Languages Migration page to see a list of platforms compatible with multilingual imports. This can streamline your data migration process if you require a multilingual store.
Ready to migrate your store? Start your free demo with Cart2Cart today and see how easy data migration can be!
A transfer to Shopify doesn’t require FTP access since the platform is hosted. Shopify utilizes an API (Application Programming Interface) for data transfer, making the migration process secure and streamlined. To migrate your data effectively, follow the simple API Cart’s migration scenario. This approach simplifies the process and avoids any potential confusion. Using Cart2Cart's automated data migration service ensures a seamless and secure transition to Shopify.
Migrating to Shopify: No FTP Required
When migrating to Shopify, you won't need FTP access. Shopify is a hosted platform, meaning your store's files and database are stored on Shopify's servers. Instead, Cart2Cart uses Shopify's API to securely transfer your data. This method is much more efficient and user-friendly than traditional FTP transfers.
Understanding API-Based Migration for Shopify
API-based migration offers several advantages over FTP. It's more secure, reliable, and often faster. With Cart2Cart, the entire migration process is automated, minimizing the risk of errors and ensuring a smooth transition. Learn more about API Cart migration scenarios.
Next Steps for Your Shopify Migration
Ready to migrate to Shopify? Here's what to do next:
- Prepare Your Shopify Store: Ensure your Shopify store is set up and ready to receive your data.
- Connect Your Carts with Cart2Cart: Use the Cart2Cart migration tool to connect your source cart and your Shopify store.
- Configure Your Migration: Choose the data entities you want to migrate (products, customers, orders, etc.).
- Start Your Free Demo: Try a free demo migration to see how Cart2Cart works with your data. Start your free demo.
- Run the Full Migration: Once you're satisfied with the demo, run the full migration to transfer all your data to Shopify.
If you have any questions or need assistance, contact our support team via Live chat or schedule a call with a Migration Expert.
Can Cart2Cart Migrate Chargify Data and Purchase History to Shopify?
Unfortunately, direct migration of Chargify data and purchase history to Shopify is not possible. This limitation stems from the fact that Shopify lacks a publicly available API that would allow Cart2Cart to access and transfer this specific data.
While a direct automated migration isn't feasible, you might explore alternative solutions such as:
- Manual Export/Import: Check if Chargify allows exporting data in a compatible format (e.g., CSV). If so, you might be able to manually import some data into Shopify, although purchase history is unlikely to be supported.
- Custom Development: Consider engaging a Shopify developer to create a custom app or integration that could potentially extract data from Chargify and import it into Shopify. This is a more complex and costly option.
- Third-Party Integrations: Investigate if any third-party apps or services exist that can bridge the gap between Chargify and Shopify for data synchronization.
If you're looking to migrate other data from your existing e-commerce platform to Shopify, Cart2Cart supports a wide range of entities like products, customers, orders, and more. Check the Cart2Cart website for a full list of supported platforms and data types.
Next Steps: Explore Cart2Cart's capabilities and see if it meets your other migration needs. Start your free demo today!
Cart2Cart can migrate customer records to Shopify, but Shopify generally does not accept existing customer passwords from other platforms. After migration, invite customers to activate accounts.
Invite customers (current)
1. In Shopify admin, go to Customers.
2. Open a customer profile (or select multiple customers if your admin supports bulk actions).
3. Use Send account invite / account invite action (wording may be Invite to create account).
4. Confirm the email is sent. The customer sets a new password via the invite link.
5. For large lists, filter customers and invite in batches, or use a Shopify Flow / email app if you need automated campaigns.
Tell customers the invite is expected after your store switch so messages are not treated as spam.
Resolving Attribute Name Issues During Shopify Data Migration
When performing a Shopify data migration with Cart2Cart, you might encounter an issue if your attribute or option names contain slashes (/). Shopify's system doesn't permit slashes in these fields, which can prevent the successful transfer of your data.
How Cart2Cart Handles Slashes in Attribute Names During Shopify Migration
To ensure a smooth and complete Shopify data migration, Cart2Cart automatically replaces any slashes (/) found in attribute and option names with hyphens (-) during the migration process. This prevents errors and ensures that all your product data is successfully transferred to your new Shopify store.
This automatic replacement ensures data integrity and prevents migration failures due to Shopify's naming restrictions.
Ready to migrate your store to Shopify? Start your free demo now and see how Cart2Cart can simplify the process.
For any further questions or assistance, please contact our support team.
Can I Migrate Taxes to Shopify During Shopping Cart Migration?
Due to the unique structure of each e-commerce platform, Cart2Cart's automated shopping cart migration service has some limitations when it comes to migrating product taxes to Shopify. While the specific tax values themselves cannot be directly transferred, the information about whether a product is "taxable" or "untaxable" will be preserved during the shopping cart migration. This means that if a tax was applied to a product on your source cart, it will be migrated with the "Charge taxes on this product" box ticked in Shopify. You can find this setting in your Shopify admin dashboard, as shown below:
After the shopping cart migration, Shopify's default tax settings will be applied to all products marked as taxable.
For more detailed information on how product prices are migrated during the shopping cart migration to Shopify, please see our dedicated FAQ.
Complex Tax Migration Solutions
If you require a more complex tax migration, such as moving products with varying tax rates to Shopify, consider our Data Migration Service Package. Our experts can provide a customized shopping cart migration solution to meet your specific needs. Contact us to discuss your shopping cart migration requirements and get a personalized quote.
Next Steps
Ready to migrate your store to Shopify? Start your free demo now to see how Cart2Cart can simplify your shopping cart migration!
Yes, Cart2Cart, the leading data migration service, supports the migration of reviews to your Shopify store. While there are several methods, here's a streamlined approach using the AirReviews app:
- Install a free AirReviews Product Reviews app on your Shopify store.
- Click the Install App button and press the Get Started button. Perform all the required configurations.
- Download the “Reviews” XLSX file on the “Migration Details Information” page after the migration.
- Go to your Shopify admin, Apps -> Air Product Reviews -> Manage reviews.
- Click the Import via marketplace button.
- Select the .XLSX option.
- Click the Add file button and pick your XLSX file. Once ready, activate the Import .XLSX reviews button.
- Click the Import reviews button in the popup window to confirm.
- That's it! Your reviews have been uploaded.
That's it! Your reviews should now be imported into your Shopify store. If you encounter any issues during the data migration or review import process, don't hesitate to contact our support team via Live Chat.
Ready to migrate your store to Shopify? Start your free demo now!
Why is My Shopify Sales Report Wrong After Data Migration?
Migrating your store to a new platform like Shopify is a significant step. However, you might encounter discrepancies in your sales reports immediately following the data migration. Specifically, you might notice distorted sales reports for the current month, potentially showing negative values (e.g., -$453.7), while previous months show inflated figures. Let's explore why this happens and how it relates to data migration.
The Impact of Shopify's API on Refund Dates During Data Migration
This issue typically arises from the way the Shopify API handles refund transaction dates during data migration. Cart2Cart accurately migrates orders with a refunded status, preserving their original creation dates. For example, if you migrate to Shopify today, and a refund order was initially created three months ago, that order will be migrated with the correct original date.
Shopify Refund Transaction Date Restrictions and Data Migration
The core problem lies in Shopify's API limitations: refund transaction dates *cannot* be backdated during data migration. This means that if you migrate to Shopify today, all refund transactions will be recorded as occurring on the migration date, regardless of when they actually happened.
How This Affects Your Shopify Sales Reports After Data Migration
Consequently, refunds that occurred *before* the data migration will impact the sales report for the month in which you migrated. These refunds will decrease the sales total for the current month and artificially inflate the sales totals for previous months. All new refund transactions *after* the data migration to Shopify will be recorded correctly.
Understanding this limitation of Shopify's API during data migration is crucial for interpreting your sales data accurately. While Cart2Cart ensures the accurate transfer of order data, the refund date restriction is a Shopify platform-specific behavior.
Ready to migrate your store? Start your free demo now and experience a seamless data migration with Cart2Cart. If you have further questions, schedule a call with our migration expert.
How will the order statuses of my current store be migrated during data migration to Shopify?
During data migration to Shopify with Cart2Cart, each order will migrate with an assigned fulfillment status. This status is determined by the original order status in your source store and the presence of a tracking number. Cart2Cart aims to accurately reflect the state of each order in your new Shopify store.
Here's how Cart2Cart maps order statuses during data migration to Shopify:
- If an order is migrated with a tracking number, Cart2Cart will set its fulfillment status to 'fulfilled'. This indicates that the order has been shipped and is trackable.
- If an order's status in your source store matches 'refunded' or 'paid', Cart2Cart will set the fulfillment status to 'fulfilled' in Shopify. This assumes that a refunded or fully paid order has been successfully processed.
- If an order's status matches 'partially_refunded' or 'partially_paid', Cart2Cart will set the order's fulfillment status to 'partially fulfilled'. This accurately represents the partial completion of the order.
- In all other cases, Cart2Cart will set the order's fulfillment status to 'not fulfilled'. This covers orders with statuses like 'pending', 'processing', or any other custom status, indicating that further action is required.
It's important to review the migrated order statuses in your Shopify store after the migration to ensure they accurately reflect the state of each order. Shopify's order management system allows you to easily update and manage fulfillment statuses as needed.
Need help with your data migration to Shopify? Schedule a call with a migration expert or contact our support team via Live Chat.
Ready to get started? Start your free demo now!
Is it Possible to Migrate Currencies To/From Shopify?
Due to platform’s technical peculiarities, migration of currency to Shopify is not possible while currency migration from Shopify is supported by the service.
To have the currency exported from your Shopify store - it is necessary to set the corresponding currencies on your Target store (e.g. products in the store currency, and orders - in the customer currency) and launch the eCommerce data migration. As a result, you'll have the products transferred in the store currency while orders - in the customer currency.
Understanding Currency Migration Limitations with Shopify
When planning your eCommerce data migration, it's crucial to understand the nuances of currency handling, especially when dealing with Shopify. While Cart2Cart can migrate currency *from* Shopify, migrating currency *to* Shopify directly isn't possible due to Shopify's platform architecture. This means you can bring your existing currency data from Shopify to another platform, but you'll need to configure currencies within Shopify itself when migrating *to* it.
Migrating Currency *From* Shopify: How It Works
Cart2Cart simplifies the process of migrating currency data *from* your Shopify store. To ensure a smooth transfer, make sure the corresponding currencies are properly configured in your target store *before* initiating the eCommerce data migration. This involves setting the desired currencies for products (e.g., your store's base currency) and orders (e.g., the currency used by the customer during checkout). Cart2Cart will then transfer product prices in the store currency and order amounts in the customer's currency.
Converting Currencies During Your eCommerce Data Migration
Need to convert currencies during your eCommerce data migration? Cart2Cart offers options for currency conversion as part of the migration process. This allows you to standardize your currency across platforms or adapt to different regional requirements. Contact our support team via Live Chat to discuss currency conversion options and ensure a seamless transition. You can also Schedule a Call with Migraion Expert - here.
Ready to migrate your data? Start your free demo now!
Yes, Cart2Cart automatically creates 301 redirects during migrations to and from Shopify. This ensures your customers and search engines are seamlessly directed to the new URLs on your Shopify store, preserving your SEO ranking and customer experience. To enable this feature, simply select the "Create 301 redirects on your target store after migration" option within the Migration Wizard.
How to Verify 301 Redirects After Shopify Data Migration
After the Shopify data migration, you can easily verify the newly created 301 redirects. In your Shopify admin panel, navigate to Online Store -> Navigation -> URL Redirects. Here, you'll find a list of all the redirects created during the migration process.
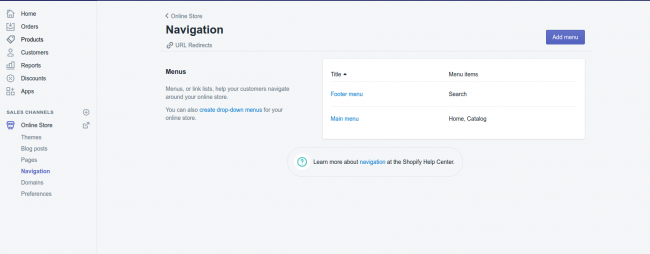
By implementing 301 redirects during your eCommerce platform migration, Cart2Cart helps you maintain your search engine rankings and prevent lost sales. Don't lose valuable traffic!
If you have any further questions or need assistance, please don't hesitate to contact our Support Team. You can also schedule a call with migration expert here.
Ready to migrate? Start your free demo now.
Why Weren't All My Orders Deleted When Migrating to Shopify with the "Clear Current Data" Option?
Due to technical limitations within Shopify, orders where payment was processed through Shopify POS or the Shopify online checkout *cannot* be automatically deleted. Therefore, when migrating to Shopify with the "Clear current data on Target Store" option enabled through Cart2Cart, some of your existing Shopify orders might remain.
Specifically, this applies to orders created and processed *within* Shopify, not orders migrated from your previous platform. Cart2Cart *will* clear all other existing data in your Target Shopify store as expected during the data migration process. To ensure a clean slate for all your data, including orders, consider manually deleting them within your Shopify admin panel before initiating the migration.
Understanding Shopify Order Deletion Limitations During Data Migration
This limitation is not a bug in the Cart2Cart data migration service, but a technical constraint imposed by Shopify's platform architecture. Shopify's API restricts the deletion of certain order types for auditing and record-keeping purposes. Cart2Cart adheres to these limitations to ensure data integrity and compliance.
Next Steps After Your Shopify Data Migration
While Cart2Cart efficiently migrates the majority of your data, we recommend the following after your migration is complete:
- Review Remaining Orders: Manually review the remaining orders in your Shopify admin panel to determine if any need to be archived or addressed.
- Verify Data Integrity: Double-check all migrated data (products, customers, categories, etc.) to ensure accuracy and completeness.
- Configure Shopify Settings: Configure your Shopify store settings, such as payment gateways, shipping options, and tax rates.
Need assistance with your Shopify data migration? Schedule a call with a Cart2Cart migration expert or start your free demo today!
Will Cart2Cart migrate my description images during Shopify data migration?
Yes. Cart2Cart can efficiently migrate images embedded within your product descriptions and category descriptions to your Shopify store. To enable this, simply select the "Migrate images from products descriptions and categories descriptions" option during your Cart2Cart data migration setup. This feature ensures that all images are seamlessly transferred and properly linked in your new Shopify store.
Specifically, Cart2Cart will upload these images directly to Shopify’s Content > Files section. Once uploaded, the tool automatically updates all image links within your product and category descriptions to point to their new locations within Shopify. This ensures a smooth transition and prevents broken image links on your storefront after the migration.
This comprehensive approach to Shopify data migration ensures that your store's visual content remains intact and continues to enhance the customer experience.
Ready to experience seamless data migration? Start your free demo today!
For a successful Shopify migration from a multilingual source (for example WPML on WooCommerce), set Shopify’s default / primary language to match the language you are migrating before you run Demo or Full Migration.
Important: Because of Shopify platform limits, Cart2Cart does not migrate multiple language variants into Shopify in one pass the way Magento store views work. Migrate the primary language content, then add and translate additional languages in Shopify (Translate & Adapt or a translation app). See also How to enable multiple languages on Shopify and multiple languages migration.
Set the store default language (current)
1. In Shopify admin, go to Settings → Languages.
2. Confirm the language that matches your source cart’s primary language is present. If not, click Add language and add it.
3. Set that language as the store default (Shopify labels this as the default / primary language on the Languages screen).
4. If you use Markets, open Settings → Markets, select the market that will receive migrated traffic, go to Languages and domains, and set the same language as that market’s default when required.
5. Run the Cart2Cart migration for that primary language.
6. After migration, add extra languages under Settings → Languages and translate with Translate & Adapt (or another app).
Official reference: Shopify — Localization and translation.
Why are "unknown" email addresses created after data migration to Shopify?
During customer data migration to Shopify using Cart2Cart, you might notice "unknown" email addresses in your Shopify customer list. This happens when the email address associated with a customer record in your source store is invalid or missing. Cart2Cart automatically generates a default email address in these cases to ensure the customer data is successfully migrated to Shopify.
This also applies to order data. If orders in your source store were placed by guest users (i.e., not registered customers) and are not linked to a valid customer account, Cart2Cart will create a default "unknown" email address for those orders during the data migration process.
Here's an example of how these automatically generated customer emails will appear in Shopify:
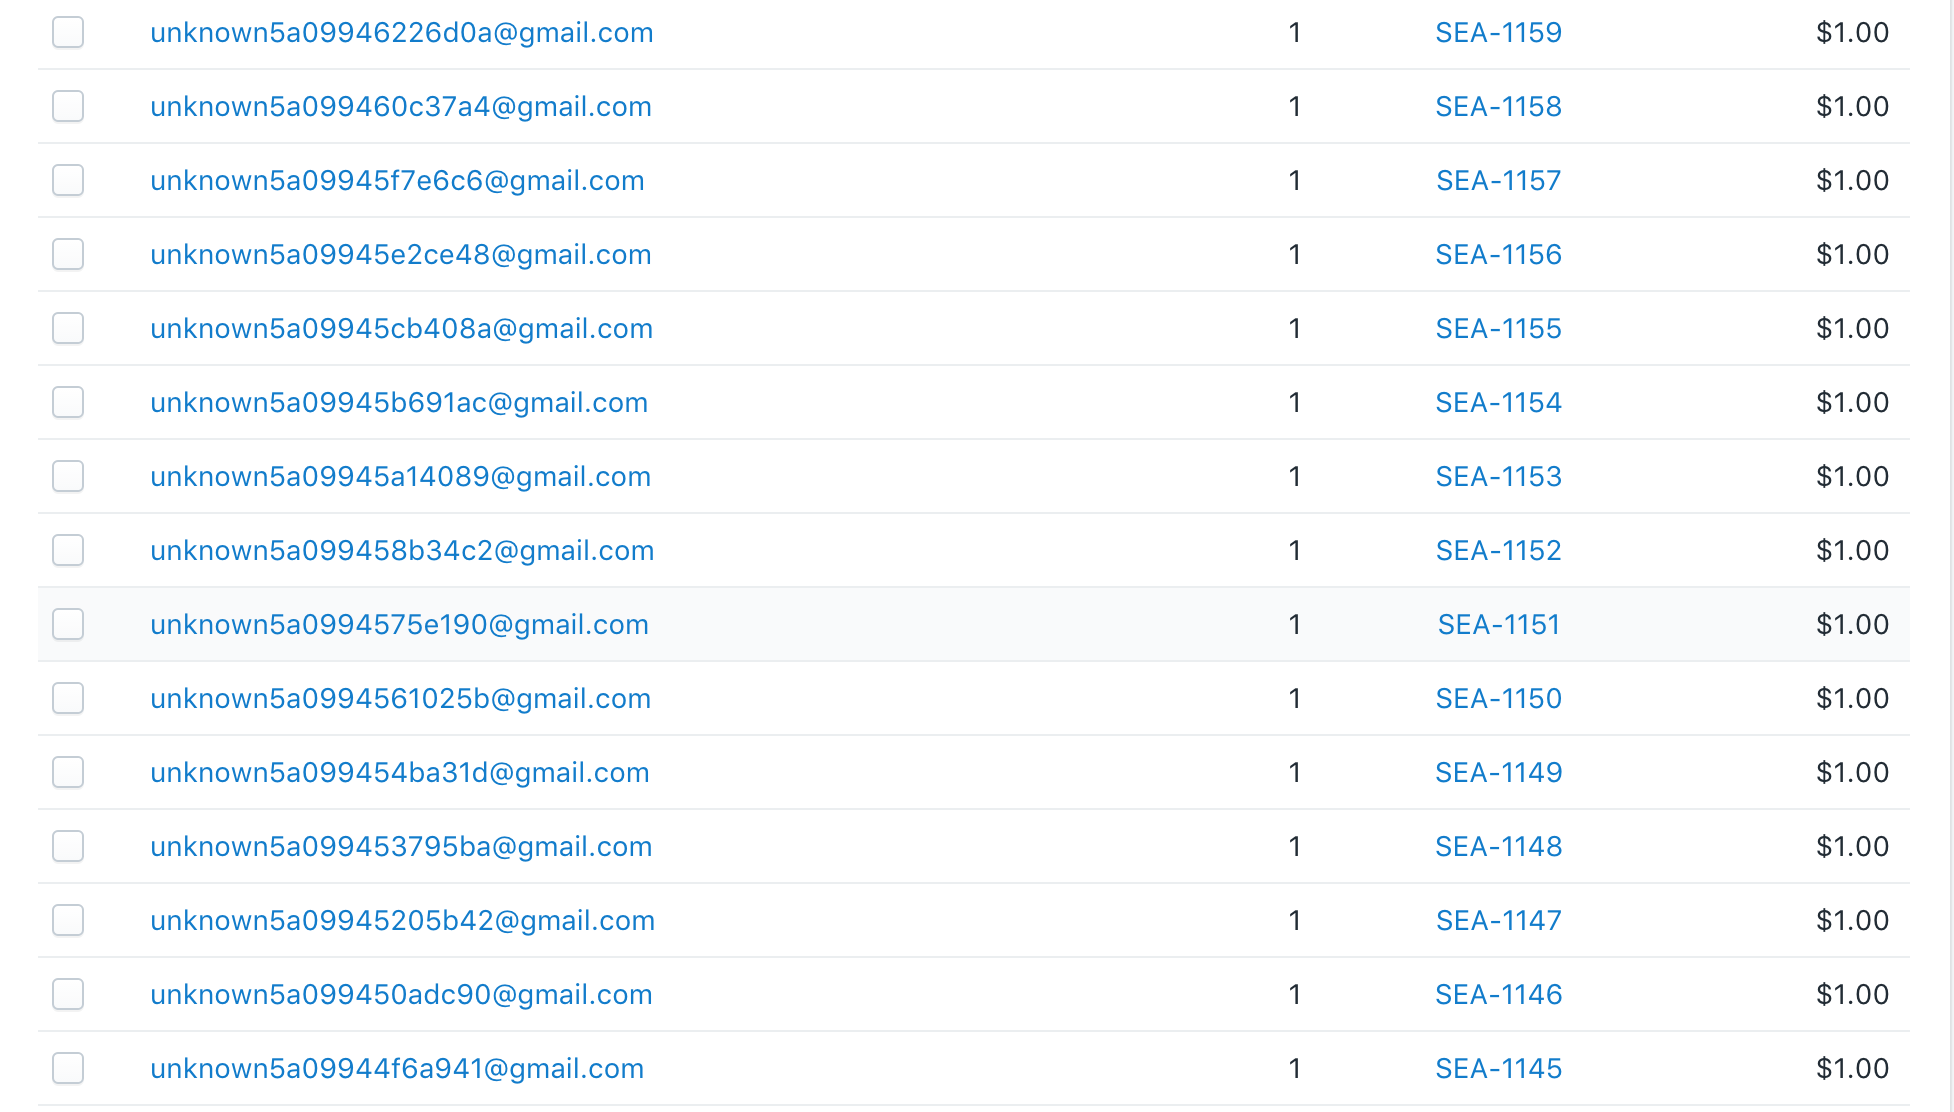
Understanding "Unknown" Email Addresses After Data Migration
These "unknown" email addresses serve as placeholders to maintain data integrity during the data migration. They ensure that all customer records and order information from your previous platform are transferred to Shopify, even if some data is incomplete or invalid.
Managing "Unknown" Email Addresses in Shopify
Once the data migration is complete, you can manage these "unknown" email addresses within your Shopify admin panel. You can choose to update them with correct email addresses if you have the information, or leave them as is. Remember to comply with all applicable data privacy regulations.
Ready to migrate your store to Shopify? Start your free demo now!
If you have any questions or need assistance with your data migration, contact our support team via live chat.
Do you support “Preserve order IDs” option for Recent Data Migration?
Yes, Cart2Cart supports the “Preserve order IDs” option during Recent Data Migration under specific conditions. This feature helps maintain continuity by keeping the original order IDs from your source store in your new target store.
When Can I Preserve Order IDs During Recent Data Migration?
The availability of the "Preserve Order IDs" option depends on whether new orders have been created in your target store after the full migration. Here's a breakdown:
- General Case: If no new orders have been created in your target store after the full migration, you can select the "Preserve order IDs on Target Store" option during Recent Data Migration.
- Shopify and WooCommerce Exception: Even if new orders have been created in your Shopify or WooCommerce target store after the full migration, you can still use the "Preserve order IDs on Target Store" option during Recent Data Migration.
Important Note About Preserving Order IDs
For all platforms, the "Preserve order IDs on Target Store" option is available within Recent Data Migration only if it was initially selected before the Full Migration. This ensures the system is prepared to handle the preservation of order IDs during subsequent migrations.
Why is Preserving Order IDs Important for Data Migration?
Preserving order IDs is particularly beneficial for accounting, customer service, and order tracking purposes. When migrating your online store, maintaining these IDs ensures a seamless transition and avoids confusion for both you and your customers.
Ready to Start Your Data Migration?
Ensure a smooth transition to your new platform with Cart2Cart's data migration services. Take advantage of features like preserving order IDs to minimize disruption and maintain data integrity.
Start your free demo now: https://newapp.shopping-cart-migration.com/.
Need assistance? Contact support via Live chat or schedule a call with a migration expert.
Just set up the migration and choose the entities to move – the service will do the rest.
Try It FreeDelegate the job to the highly-skilled migration experts and get the job done.
Choose Package