How can we help you?
PrestaShop-related questions21
How to Preserve SEO After PrestaShop Data Migration
When performing a data migration to PrestaShop, we strongly recommend selecting the additional option “Create 301 redirects after migration.” This crucial step ensures that your existing SEO URLs remain functional, minimizing any negative impact on your search engine rankings. By creating 301 redirects, you seamlessly direct users and search engines from your old URLs to the corresponding new ones on your PrestaShop store.
To implement these redirects, you'll need to purchase and install a 301, 302, 303 URL Redirects – SEO Module on your PrestaShop store before initiating the full migration.
Why Migrate SEO URLs During PrestaShop Migration?
Due to PrestaShop's default URL structure, category and product URLs often include ID numbers. This can negatively impact your store's SEO after migration. For example:
- Product URL (without SEO module): music-ipods/1-ipod-nano.html
- Product URL (with SEO module): music-ipods/ipod-nano.html
- Category URL (without SEO module): 3-music-ipods
- Category URL (with SEO module): music-ipods
To avoid these SEO complications, Cart2Cart offers the option to “Migrate categories and products SEO URLs.” Selecting this option requires the installation of the aforementioned SEO module.
By using the "Migrate categories and products SEO URLs", you will keep your URLs clean and SEO-friendly, avoiding any potential ranking drops.
To ensure a seamless and SEO-friendly eCommerce migration to PrestaShop, install the SEO module and select both the "Create 301 redirects" and "Migrate categories and products SEO URLs" options during the migration setup. If you have any questions, please don't hesitate to contact our Support Team.
Ready to migrate to PrestaShop? Start your free demo now and see how easy it is to migrate your store with Cart2Cart!
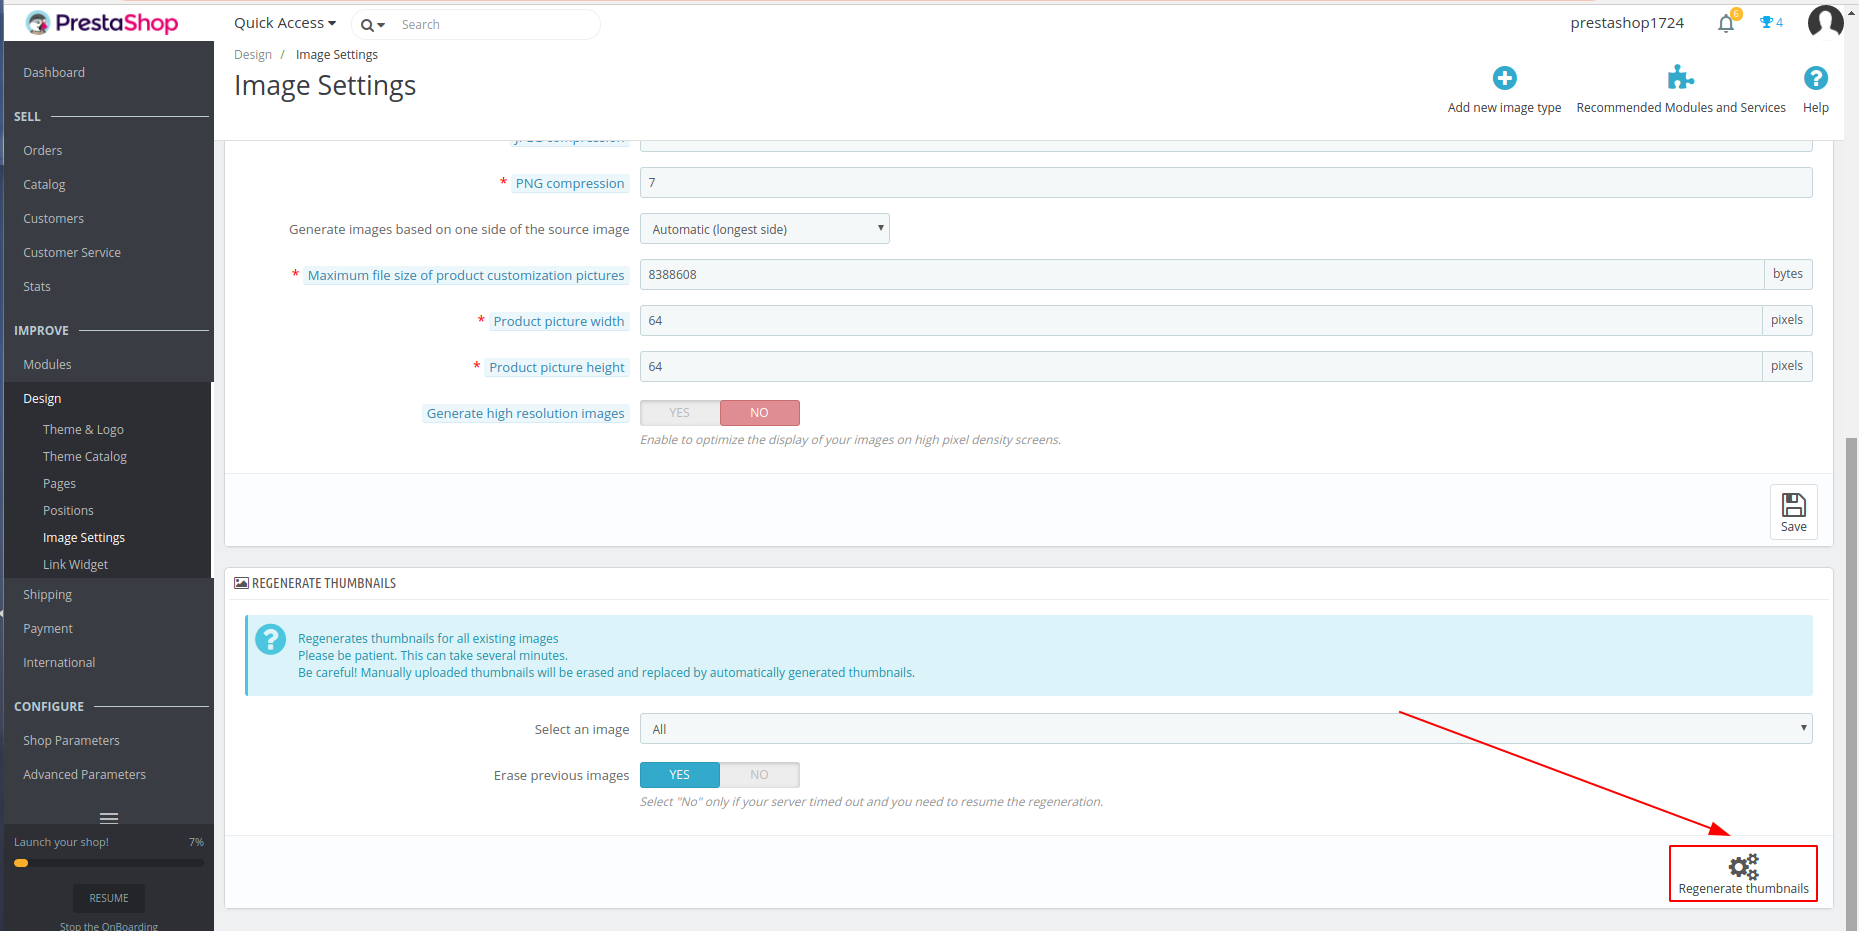
If product images look broken or oversized after a Cart2Cart migration to PrestaShop, regenerate thumbnails in the Back Office.
PrestaShop 1.7 / 8.x / 9.x (current)
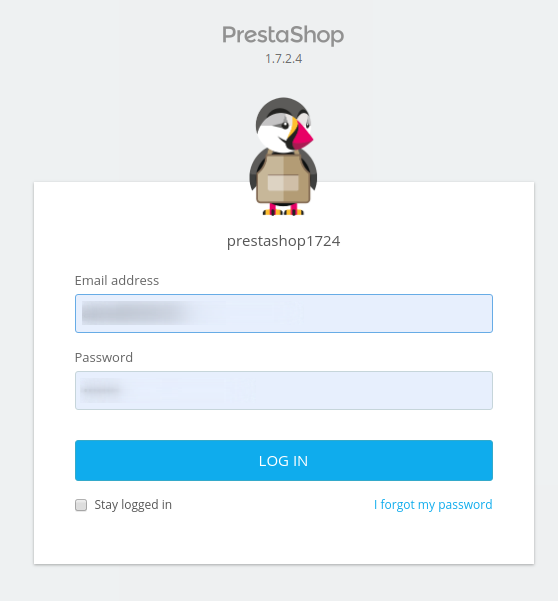
1. Log in to the Back Office.
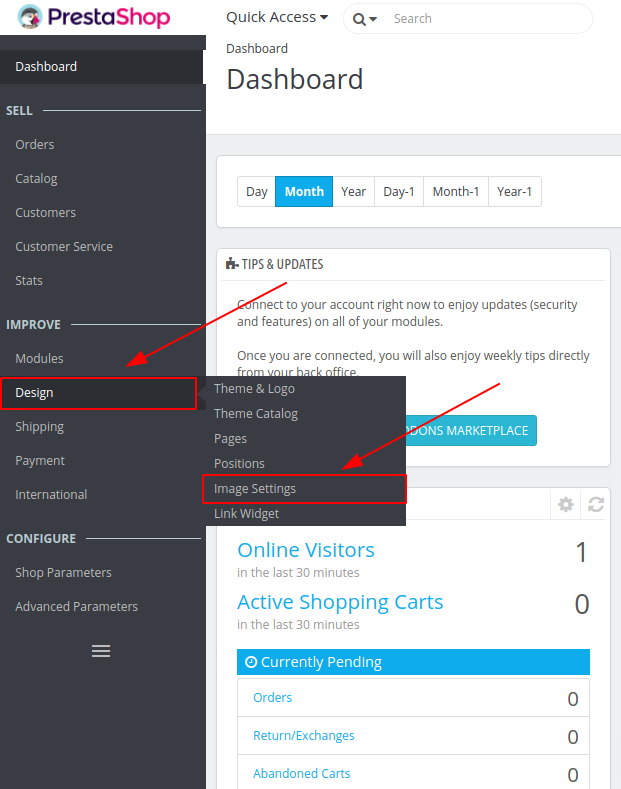
2. Go to Design → Image Settings (under Improve).
3. Scroll to Regenerate thumbnails.
4. Choose the image type (for example products) and whether to erase previous thumbnails.
5. Click Regenerate thumbnails. For large catalogs this can take several minutes; avoid interrupting the request.
6. Clear cache: Advanced Parameters → Performance → Clear cache, then hard-refresh the storefront.
Docs: PrestaShop 8 — Image Settings.
PrestaShop 1.6 (legacy)
On 1.6, open Preferences → Images (wording varies by theme/pack), use Regenerate thumbnails for products/categories, then clear Smarty cache under Advanced Parameters / Performance or by clearing cache/smarty carefully as in older guides.
Why are products not displayed correctly on my PrestaShop store after data migration?
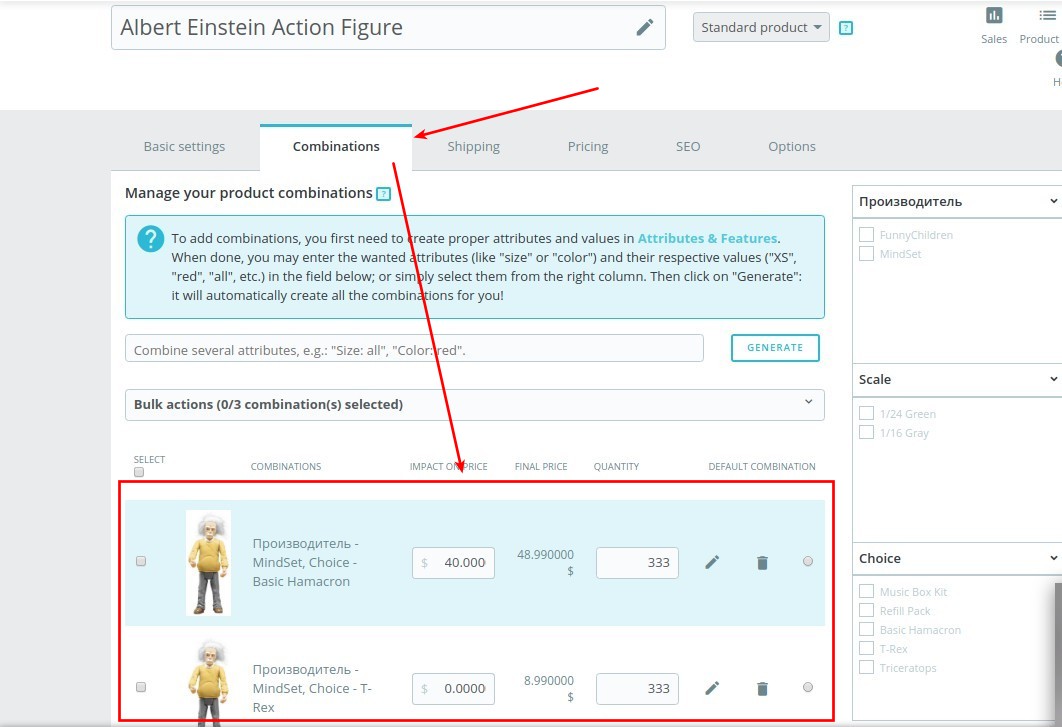
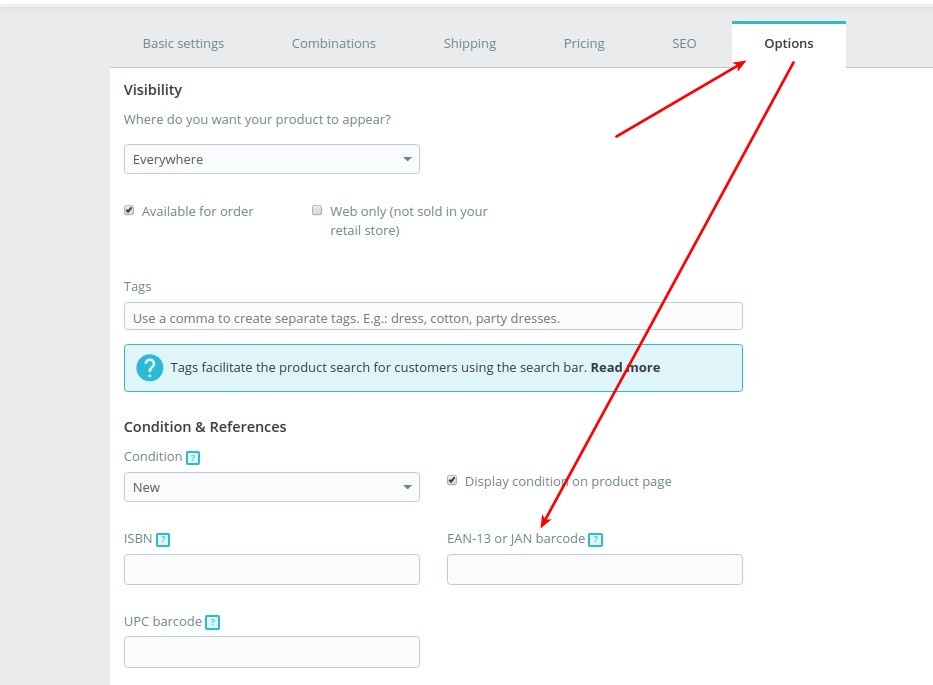
If you've migrated your store to PrestaShop using a data migration service like Cart2Cart and your products aren't displaying correctly, the issue might be related to product combinations and the EAN13 field configuration.
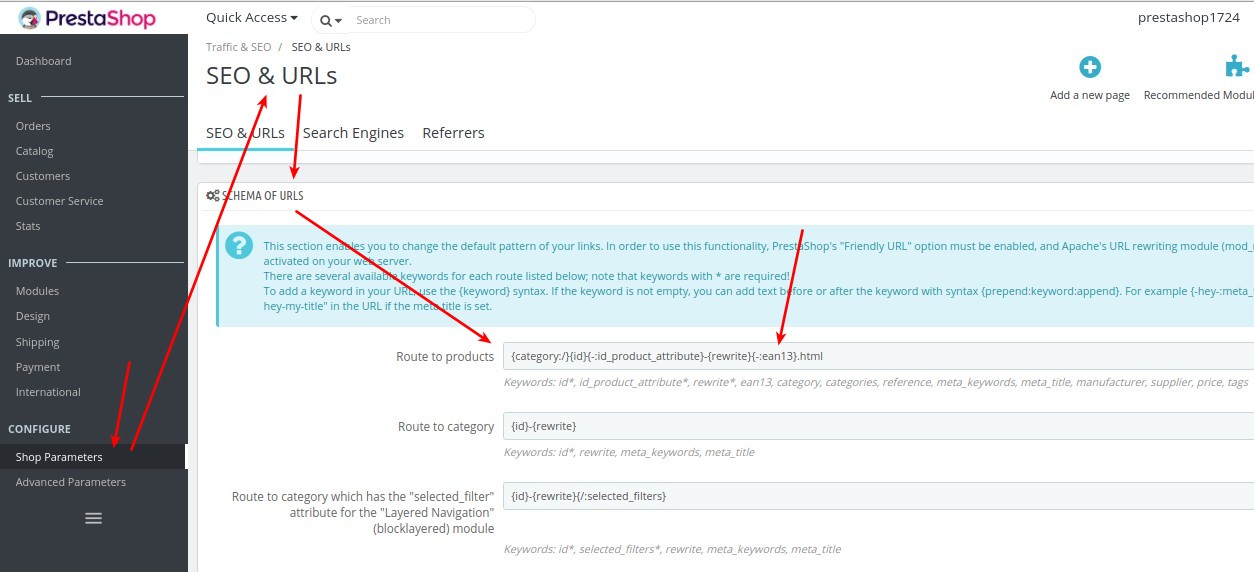
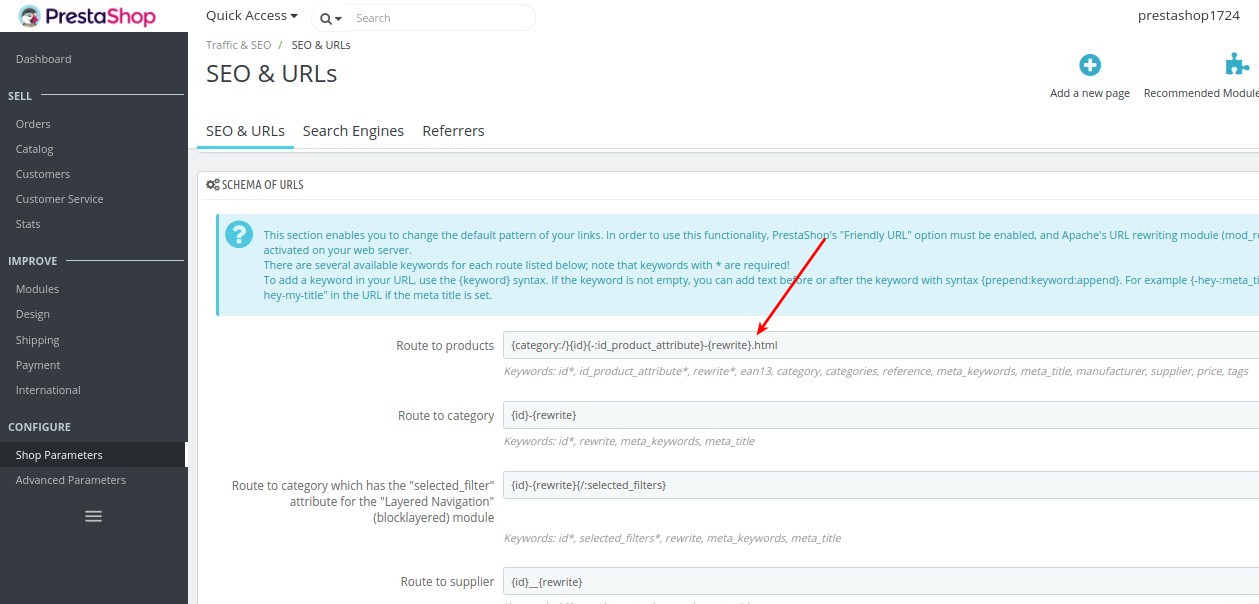
In case your products are associated with combinations, check if they have the EAN13 field populated. Then, verify if your PrestaShop store's configuration (under Route to Products) contains the field *{-:ean13}*.
If the *{-:ean13}* field is present in the Route to Products configuration, it's recommended to remove it. This adjustment can resolve the display issues and ensure your products are shown correctly on your PrestaShop store after the data migration.
By removing this field, PrestaShop will rely on other identifiers to display your products, which can prevent conflicts arising from the migrated data. This ensures a smoother customer experience and accurate product representation after your data migration.
If you're still encountering issues after making this change, Cart2Cart offers comprehensive support to assist you with your data migration process. Schedule a call with a Migration Expert or contact our support team via live chat for personalized assistance.
Ready to start your data migration? Start your free demo now!
Use Cart2Cart to migrate into PrestaShop 1.7 / 8.x. The wizard connects to your stores, then you choose entities, map statuses, run a Demo, and start Full Migration.
PrestaShop 1.7 / 8.x via Cart2Cart (current)
1. Open the Migration Wizard. Select your Source cart and provide URL/API credentials as required.
2. Set Target to PrestaShop and enter the store URL plus Back Office admin login (and Connection Bridge or module connection method when the wizard requests it).
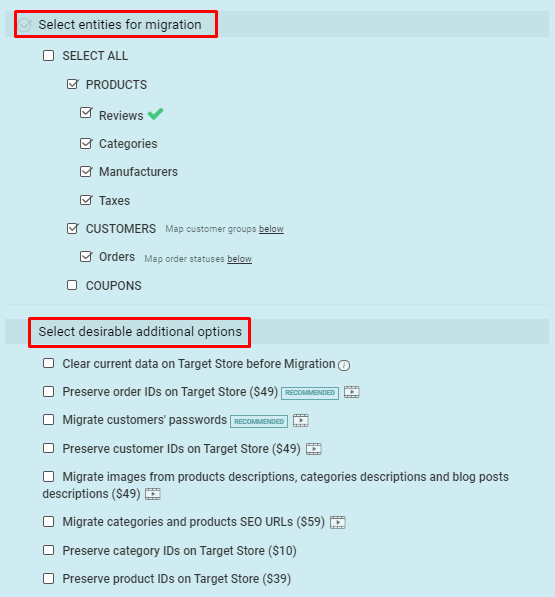
3. Choose entities (products, customers, orders, etc.) and additional options, then continue.
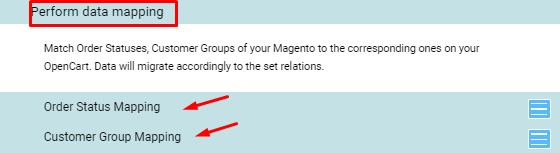
4. Map order statuses and customer groups from Source to PrestaShop equivalents.
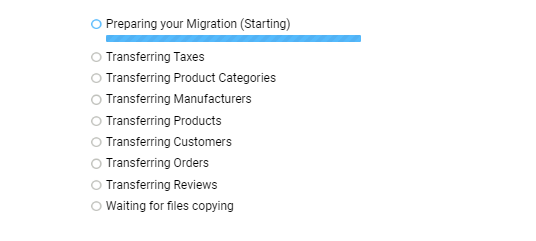
5. Run a Demo Migration, review results in the PrestaShop BO/storefront, then start Full Migration.
6. After migration, clear cache (Advanced Parameters → Performance → Clear cache) and regenerate thumbnails if images look wrong (Design → Image Settings).
Older wizard screenshots (legacy)
Guides from ~2020 show the same five steps (carts → entities → mapping → demo → full) with an older Cart2Cart UI. Entity selection and mapping behavior are unchanged on the current wizard.

PrestaShop Carrier Migration: Can Cart2Cart Help?
Yes, Cart2Cart fully supports automated carrier migration, but currently only between PrestaShop stores. This feature streamlines your PrestaShop to PrestaShop migration process, ensuring a seamless transition of your shipping configurations.
To migrate your carriers, simply select the "Carriers" entity within the Migration Wizard during the configuration stage. Cart2Cart will then automatically transfer your carrier data from your current PrestaShop store to your new PrestaShop platform.

This automated process saves you valuable time and effort, eliminating the need for manual data entry and reducing the risk of errors. With Cart2Cart, migrating your PrestaShop carriers is quick, easy, and reliable.
Benefits of Migrating PrestaShop Carriers with Cart2Cart:
- Automated Migration: Eliminates manual data entry and reduces errors.
- Seamless Transition: Ensures your shipping configurations are accurately transferred.
- Time-Saving: Streamlines the migration process, saving you valuable time.
- Reliable Results: Guarantees accurate and reliable transfer of your carrier data.
Ready to migrate your PrestaShop store? Learn more about PrestaShop migration with Cart2Cart or start your free demo today!
How to Get Your PrestaShop API Access Key for Data Migration
To migrate from PrestaShop with Cart2Cart, you may need a webservice key or module access key depending on your store type.
PrestaShop Cloud
- In the PrestaShop Cloud back office, go to Advanced Parameters → Webservice.
- Enable the webservice if it is disabled.
- Click Add new webservice key.
- Click Generate, then grant Cart2Cart the required permissions (view/add/edit/delete) for Categories, Products, Customers, Orders, and other entities you plan to migrate.
- Save the key and copy it into the Cart2Cart Migration Wizard.
- Go to Shop Parameters → Traffic & SEO (or SEO & URLs) and enable Friendly URL if it is not already enabled.
Self-hosted PrestaShop 1.7 / 8.x
- Go to Advanced Parameters → Webservice.
- Enable webservice, create a new key, generate it, and assign full permissions for the entities you want to migrate.
- If you migrate via the Cart2Cart module, copy the access key shown in the module settings after installation.
If you need help, contact Cart2Cart support.
Yes, multiple languages are supported when performing a PrestaShop data migration with Cart2Cart.
Migrating Multi-Language Data *to* PrestaShop
If PrestaShop is your target cart, you can migrate your e-shop and its multiple languages from the following shopping carts using our data migration service: Magento, OpenCart, osCommerce, ThirtyBees, VirtueMart, WooCommerce, WP eCommerce, X-Cart, xt:Commerce and Zen Cart.
Migrating Multi-Language Data *from* PrestaShop
You can also migrate multiple languages *from* PrestaShop to the following online shopping carts: WooCommerce, Magento, OpenCart, and Shopware.
For information on adding languages to your PrestaShop store, refer to the PrestaShop guide.
Explore the list of online stores that support multiple languages import with Cart2Cart here.
Ready to start your PrestaShop data migration? Start your free demo now!
Yes. You can migrate customer passwords to PrestaShop from supported Sources using the free Cart2Cart PrestaShop Passwords Migration Plugin, or preserve passwords during PrestaShop→PrestaShop upgrades by aligning the cookie key. See the password migration table.
Migrate passwords to PrestaShop 1.7 / 8.x (current)
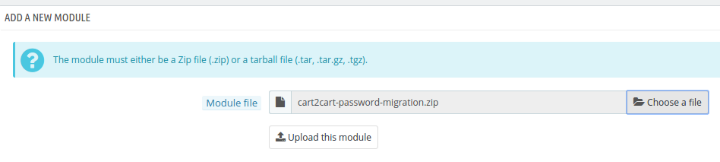
1. Download Cart2Cart-PrestaShop-Passwords-Migration.zip.
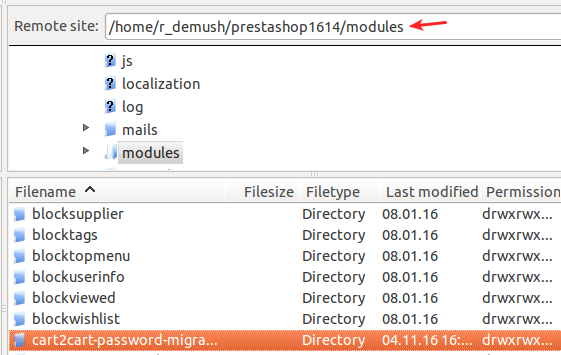
2. In PrestaShop Back Office go to Modules → Module Manager → Upload a module and upload the ZIP (or place the module folder under /modules via SFTP).
3. Install/enable the Cart2Cart passwords module.
4. In the Migration Wizard, enable Migrate customers’ passwords for a supported Source→PrestaShop pair, then run Demo and Full Migration.
Supported Sources include Magento, OpenCart, osCommerce, VirtueMart, WooCommerce, CS-Cart, thirty bees, Zen Cart, and others listed on the password migration page.
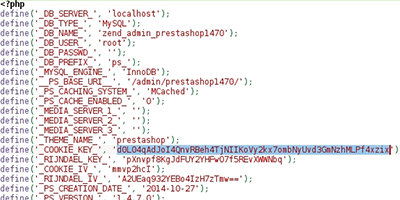
PrestaShop → PrestaShop upgrade — cookie key (current for 1.7+)
1. On the Source store open /app/config/parameters.php and copy the cookie key value (cookie_key / related parameter).
2. On the Target store set the same value in /app/config/parameters.php.
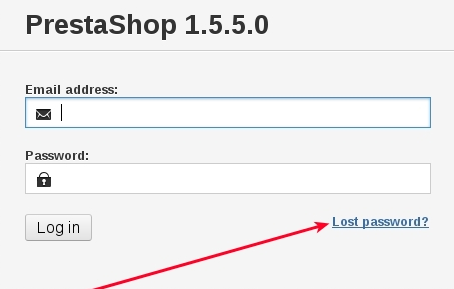
3. Recover the Target admin password via “Lost password?” if needed after the key change.
PrestaShop 1.6 and older module UI (legacy)
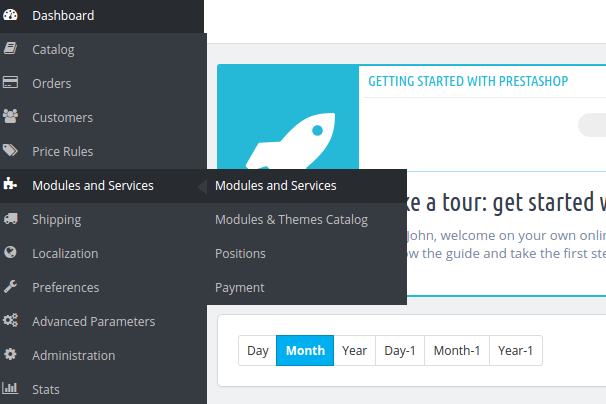
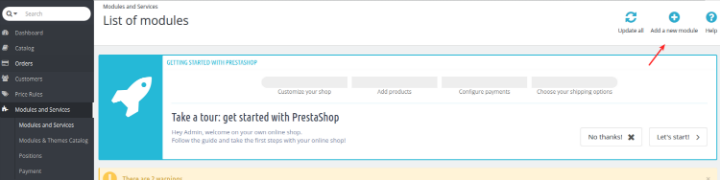
Older guides used Modules and Services → Add a new module, FTP into /modules, and for upgrades copied COOKIE_KEY from /config/settings.inc.php on Source to Target. Prefer Module Manager and parameters.php on 1.7/8.x.


After a Cart2Cart migration to PrestaShop, the storefront may still show cached content. Clear cache for your PrestaShop version.
PrestaShop 1.7 / 8.x (current)
1. Log in to the Back Office.
2. Go to Advanced Parameters → Performance.
3. Click Clear cache (top right).
4. Optionally set caching as needed for production, then save.
5. Hard-refresh the storefront (or try a private browser window).
PrestaShop 1.6 (legacy)
On PrestaShop 1.6, clear Smarty/tmp cache files on the server (via FTP/SFTP or file manager):
1. Delete the contents of cache/smarty/compile, cache/smarty/cache, and img/tmp.
2. Keep each folder’s index.php file—do not delete it.
3. Reload the storefront.
How to Create 301 Redirects on PrestaShop After Data Migration
When migrating your store to PrestaShop, maintaining your search engine rankings is crucial. Cart2Cart simplifies this with the "Create 301 redirects on your target store after migration" option, ensuring a seamless transition for both your customers and search engines.
Understanding 301 Redirects and Their Importance for SEO After Migration
301 redirects are permanent redirects that tell search engines that a page has permanently moved to a new location. This is vital for SEO because it passes the link juice (ranking power) from the old URL to the new one. Without 301 redirects, you risk losing your search engine rankings and traffic after migrating your store.
Cart2Cart’s data migration service allows you to create these crucial redirects automatically during the migration process to PrestaShop. By selecting the appropriate additional option during the Cart2Cart migration setup, you ensure that your old URLs seamlessly point to their new equivalents on your PrestaShop store.
How Cart2Cart Creates 301 Redirects in PrestaShop
Here's how the "Create 301 redirects" option works:
Cart2Cart identifies the URLs of your products and categories in your source store. It then creates redirects in your PrestaShop store, mapping the old URLs to the corresponding new product or category pages. The process involves using the URL path from your source store (without the domain name) as the Source URL in the redirect settings and setting the new product/category page on PrestaShop as the Target URL. This ensures that anyone who visits your old URLs is automatically redirected to the correct page on your new PrestaShop store.
By keeping your old domain name active, your customers and search engines won't even notice the switch!
Pre-requisites for Implementing 301 Redirects on PrestaShop with Cart2Cart
Before selecting this additional option within the Cart2Cart migration wizard, you need to purchase and install the "301, 302, 303 URL Redirects and 404 – SEO Module" from the PrestaShop Addons marketplace. This module provides the functionality needed to manage redirects within your PrestaShop environment.
Steps to Create 301 Redirects During Your PrestaShop Migration
- Install the "301, 302, 303 URL Redirects and 404 – SEO Module" in your PrestaShop store (refer to the module's documentation for detailed instructions).
- Navigate to the Cart2Cart Migration Wizard.
- Configure your source and target carts.
- During the migration options selection step, choose the "Create 301 redirects on your target store after migration" additional option.
- Launch the Full Migration.
By following these steps, you can ensure a smooth and SEO-friendly migration to PrestaShop using Cart2Cart. Don't lose valuable search engine ranking - make 301 redirects a part of your migration strategy!
Ready to migrate to PrestaShop? Start your free demo now and experience the ease of data migration with Cart2Cart!
How to Migrate Taxes to PrestaShop with Cart2Cart
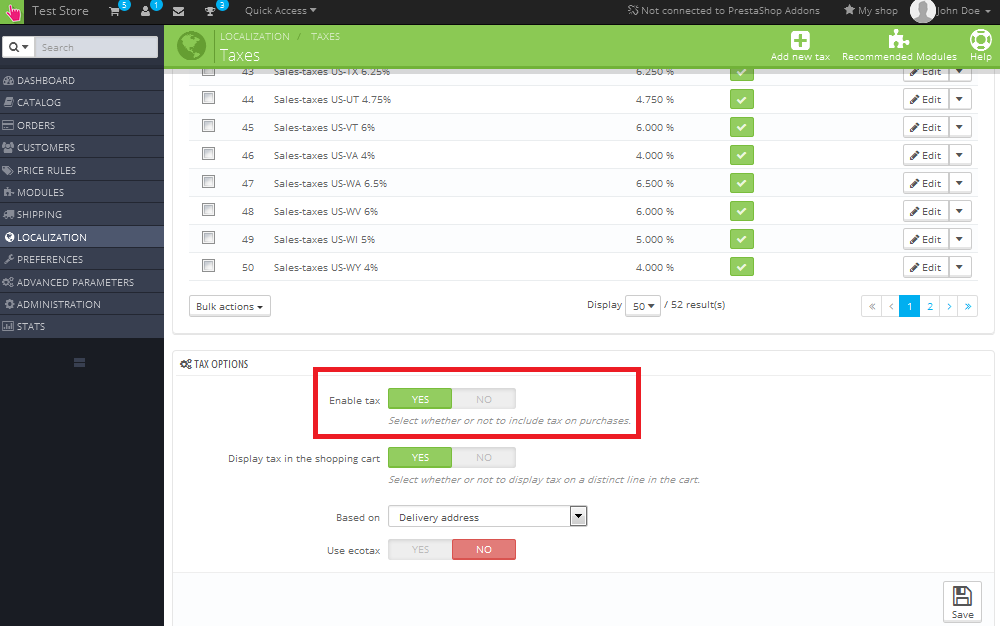
Yes, Cart2Cart supports the migration of taxes to PrestaShop as part of your eCommerce data migration process. However, after the migration, the tax function might be disabled in your PrestaShop admin panel by default. This is a common setting, and you can easily enable it.
Here's how to enable taxes in your PrestaShop store:
- Go to your PrestaShop store's Admin panel.
- Click Localization -> Taxes.
- Scroll down to the bottom of the page and set the Enable Tax option status to Yes.
By following these steps, you'll ensure that taxes are correctly applied in your PrestaShop store after the migration. For more information about migrating specific data entities, or if you encounter any issues during the eCommerce data migration, please contact our support team via Live Chat or schedule a Call with Migration Expert.
Ready to migrate? Start your free demo now!
How to Re-index Products After Data Migration
After migrating your product catalog using a service like Cart2Cart, it's crucial to ensure your products are searchable on your new store. This often requires re-indexing your product data. Re-indexing rebuilds your store's search index, allowing customers to find your products after the data migration process.
If you've enabled the search function on your e-commerce platform, you'll need to re-index your products after updating your catalog via data migration. Here's how to do it, using PrestaShop as an example:
- Go to your store's Back Office -> Preferences -> Search.
- In the Indexation section, click either "Re-build entire index" or "Add missing products to index," depending on your needs. "Re-build entire index" is generally recommended after a full data migration.
The exact steps for re-indexing may vary depending on your specific e-commerce platform (e.g., Magento, Shopify, WooCommerce, OpenCart, PrestaShop). Consult your platform's documentation for specific instructions.
Ready to migrate your online store? Start your free demo with Cart2Cart today!
Why Order Totals Might Change After a PrestaShop Migration
If you've recently upgraded your PrestaShop store and migrated data from one version to another, you might notice discrepancies in order totals. This can occur because Cart2Cart doesn't directly migrate the tables containing order totals. The accounting systems for order totals can vary between different PrestaShop versions (e.g., migrating from an older version to the latest version), leading to differences in the final sums.
To ensure accurate order totals, consider the following:
- Verify Tax Settings: Ensure your tax settings are correctly configured in your new PrestaShop store to match your previous setup.
- Review Shipping Costs: Double-check that shipping costs and rules are accurately set up in your new store.
- Examine Discount Codes: Confirm that all discount codes and promotions are properly configured.
- Consider a Custom Migration: For complex scenarios or if precise order total migration is crucial, consider a custom migration solution. You can discuss this option with our Cart2Cart support team.
While Cart2Cart automates the migration of essential data like products, customers, and orders, the intricacies of order total calculations sometimes require manual adjustments or a customized approach to ensure complete accuracy after your shopping cart migration.
Ready to migrate to a new PrestaShop version? Start your free demo now and see how Cart2Cart can streamline your data migration!
PrestaShop: Products Not Visible Under Categories? Here's How to Find Them
Are you experiencing difficulty viewing products directly within the categories menu in your PrestaShop store? This is a common scenario due to the way PrestaShop is configured. Here's a simple workaround to locate your products using PrestaShop's built-in filtering options, especially useful if you're planning a data migration.
By default, PrestaShop's interface doesn't allow you to view products assigned to a specific category directly from the category menu. However, you can easily find them by navigating to the Products menu and utilizing the Filter by category option. This will display all products associated with your selected category.
Here's how to find your products:
- Go to the Products menu in your PrestaShop admin panel.
- Locate the Filter by category option.
- Select the category you want to view products for.
This method allows you to effectively manage and view your products within their respective categories. If you're considering migrating your PrestaShop store to another platform like Shopify or WooCommerce, understanding your product structure is crucial for a smooth data migration.

Need help migrating your PrestaShop store? Cart2Cart offers a seamless data migration solution. Start your free demo now or schedule a call with a migration expert.
Yes. Cart2Cart can migrate customer reward / loyalty points to PrestaShop when a compatible loyalty module is installed and active on the target store before you run the migration.
PrestaShop 1.7 / 8.x (current)
1. The native PrestaShop module named Customer loyalty and rewards (loyalty) is archived and is no longer maintained for modern PrestaShop releases. Do not rely on it as the only option for 1.7 / 8.x.
2. In the Back Office, go to Modules → Module Manager (or Modules → Module Catalog / Marketplace) and install a loyalty / reward-points module that is marked compatible with your PrestaShop version (1.7 or 8.x).
3. Configure and enable the module so customers can hold point balances on the target store.
4. In the Cart2Cart Migration Wizard, select the option to migrate reward points (when available for your cart pair), then run Demo / Full migration.
5. After migration, spot-check a few customer accounts in PrestaShop to confirm point balances match expectations for your chosen module.
If you use a third-party loyalty module with a custom database schema, tell Cart2Cart support which module you installed so we can confirm mapping support.
PrestaShop 1.6 (legacy)
On PrestaShop 1.6, install and activate the free Customer loyalty and rewards module from the PrestaShop admin modules list before migrating reward points with Cart2Cart. Points are then linked to the matching customer accounts on the target store.
Yes, you can migrate Orders to PrestaShop Cloud. However, the migration has some peculiarities that you need to consider.
- Unfortunately, Order Statues are not available for migration.
- If a country of the order mentioned in Shipping or Billing address hasn’t been set active on PrestaShop Cloud store, Cart2Cart will activate it via API. This will make the migration of an order possible. If needed, you can deactivate the country afterwards.
- Being default for PrestaShop Cloud, all orders are migrating with “Bank wire” payment method. Although, if a “Bank wire” payment module is deactivated on Target Store, Orders migration will be skipped, thus not moved to PrestaShop Cloud.
- Due to specificity of PrestaShop Cloud, Orders entities can’t be migrated without Products.
Please, take this information into account before performing the switch.
(more…)Meta keywords handling differs by PrestaShop version. Major search engines (including Google) largely ignore the HTML meta keywords tag for ranking, so prioritize meta title and meta description. Cart2Cart can still migrate keyword fields when both carts store them.
PrestaShop 1.7 / 8.x (current)
1. Open a product in the Back Office: Catalog → Products, then open the product’s SEO tab.
2. Fill Meta title, Meta description, and (where shown) Keywords / meta keywords. Use the Friendly URL field for the product slug.
3. For shop pages (homepage, CMS, etc.), go to Shop Parameters → Traffic → SEO & URLs, open the page (for example index), and edit its meta title, description, and keywords.
4. Product Tags (separate from meta keywords) help customers find items via your store’s internal search; they are not a substitute for on-page SEO titles/descriptions.
5. If a Keywords field is hidden in your theme or configuration, clear the Back Office cache under Advanced Parameters → Performance, and confirm your employee profile can edit SEO fields. Prefer fixing titles/descriptions over chasing meta keywords for Google ranking.
PrestaShop 1.6.x (legacy)
By default, the Meta keywords option is not displayed in PrestaShop 1.6.x Back Office product SEO screens.

The field can still exist in the template. To show it:
1. Via FTP/SFTP, open your PrestaShop admin themes path (admin folder is often named /admin plus random characters).
2. Edit /themes/default/template/controllers/products/seo.tpl (path may vary slightly by theme).
3. Find the Meta keywords form group that includes the CSS class hide, and remove the word hide from that class list.
4. Save the file and reload the product SEO screen in the Back Office.
Can Cart2Cart migrate my reviews to and from PrestaShop?
Yes, Cart2Cart offers comprehensive eCommerce data migration services, including the ability to migrate customer reviews to and from PrestaShop. This ensures you retain valuable customer feedback when switching platforms.
To display the migrated reviews in your PrestaShop admin panel, you might need to install a compatible module. A popular option is the free “Prestashop Free product reviews (comments)” plugin, readily available on the PrestaShop marketplace.
If you have any questions or require assistance with your eCommerce data migration , please don't hesitate to contact our Support Team for prompt and helpful guidance!
Ready to move your store? Start your Free Demo now!
How to Clear Cache After PrestaShop Data Migration
Clearing Cache After PrestaShop Migration: Why It's Important
After a data migration to PrestaShop, clearing the cache is crucial to ensure all changes, including migrated products and settings, are visible on your storefront. Here's how to do it:
For PrestaShop 1.6 and 1.7
Follow these steps to clear the cache after your PrestaShop data migration:
- Log in to your PrestaShop Admin panel.
- Go to Advanced Parameters → Performance.
- Press the Clear cache button at the top-right corner of the screen. (For PrestaShop 1.7 and later, this is the recommended method).

That's it! Your PrestaShop store should now display the results of your demo or full migration correctly.
For PrestaShop 8.x and PrestaShop Cloud
On newer PrestaShop versions (including PrestaShop Cloud):
- Log in to your PrestaShop Back office.
- Open Advanced Parameters → Performance.
- Click Clear cache in the top-right toolbar.
For PrestaShop 1.5 and Earlier
If you're using an older version of PrestaShop, follow these steps:
- Log in to your PrestaShop admin panel.
- Go to Advanced Parameters → Performance.
- Set Force compile to Yes and save changes.
- Go to your front-office and refresh the store page.
Ready to see your migrated data in action? Start your free demo now!
PrestaShop Product Description Limits and Data Migration
PrestaShop has limitations on product description lengths, with default limits of 400 characters for short descriptions and 800 characters for full descriptions.
When performing a data migration to PrestaShop, it's crucial to understand how these limitations affect your product data. Cart2Cart will automatically truncate product descriptions to fit within these limits (400 characters for short descriptions and 800 characters for full descriptions) if they exceed the maximum allowed length. This ensures the integrity and functionality of your PrestaShop store. Attempting to migrate descriptions longer than these limits can cause issues with editing and saving product information within PrestaShop.
To overcome these limitations, you can customize your PrestaShop installation. Contact PrestaShop support for assistance with modifying the code to extend the character limits for product descriptions.
Once you've adjusted the description limits in PrestaShop, Cart2Cart can perform a remigration to transfer the complete, uncut product descriptions. This process involves clearing the existing data on your PrestaShop store to prevent duplication and then migrating the full descriptions.
Important Note: Due to PrestaShop's inherent limitations, category meta descriptions will also be truncated to 800 characters during the data migration process.
Next Steps:
- Start your free demo to see how Cart2Cart handles data migration to PrestaShop.
- Schedule a call with a Cart2Cart migration expert to discuss your specific needs.
- Contact our support team via Live Chat for immediate assistance.
Migrating Blogs and Blog Posts to/from PrestaShop using Cart2Cart
Yes, Cart2Cart supports the migration of Blogs and Blog Posts to and from PrestaShop with the following platforms:
To ensure successful shopping cart migration of blog content, please note that the additional paid PrestaBlog (Professional blog) module must be installed on your PrestaShop store before initiating the migration.
Here’s what you need to know about migrating blogs with PrestaShop:
- When migrating to Shopify, WooCommerce, or BigCommerce, only blogs and posts created using the PrestaBlog module in PrestaShop will be migrated.
- When migrating to PrestaShop, only Shopify, WooCommerce, or BigCommerce blogs and posts can be migrated to a PrestaShop store with the PrestaBlog module installed.
Important: Blog migration with the PrestaBlog module is supported for PrestaShop. If you are migrating data to multiple PrestaShop stores, your blogs and posts will be moved to the default store, regardless of mapping configurations in the Migration Wizard.
Ready to migrate your store? Start your free demo now and experience seamless shopping cart migration with Cart2Cart!
Just set up the migration and choose the entities to move – the service will do the rest.
Try It FreeDelegate the job to the highly-skilled migration experts and get the job done.
Choose Package