How can we help you?
Most Common Questions6
Where can I get my Shopify API Token for Data Migration?
To perform a Shopify data migration using Cart2Cart, you'll need the Shopify API token. Here's how to obtain it:
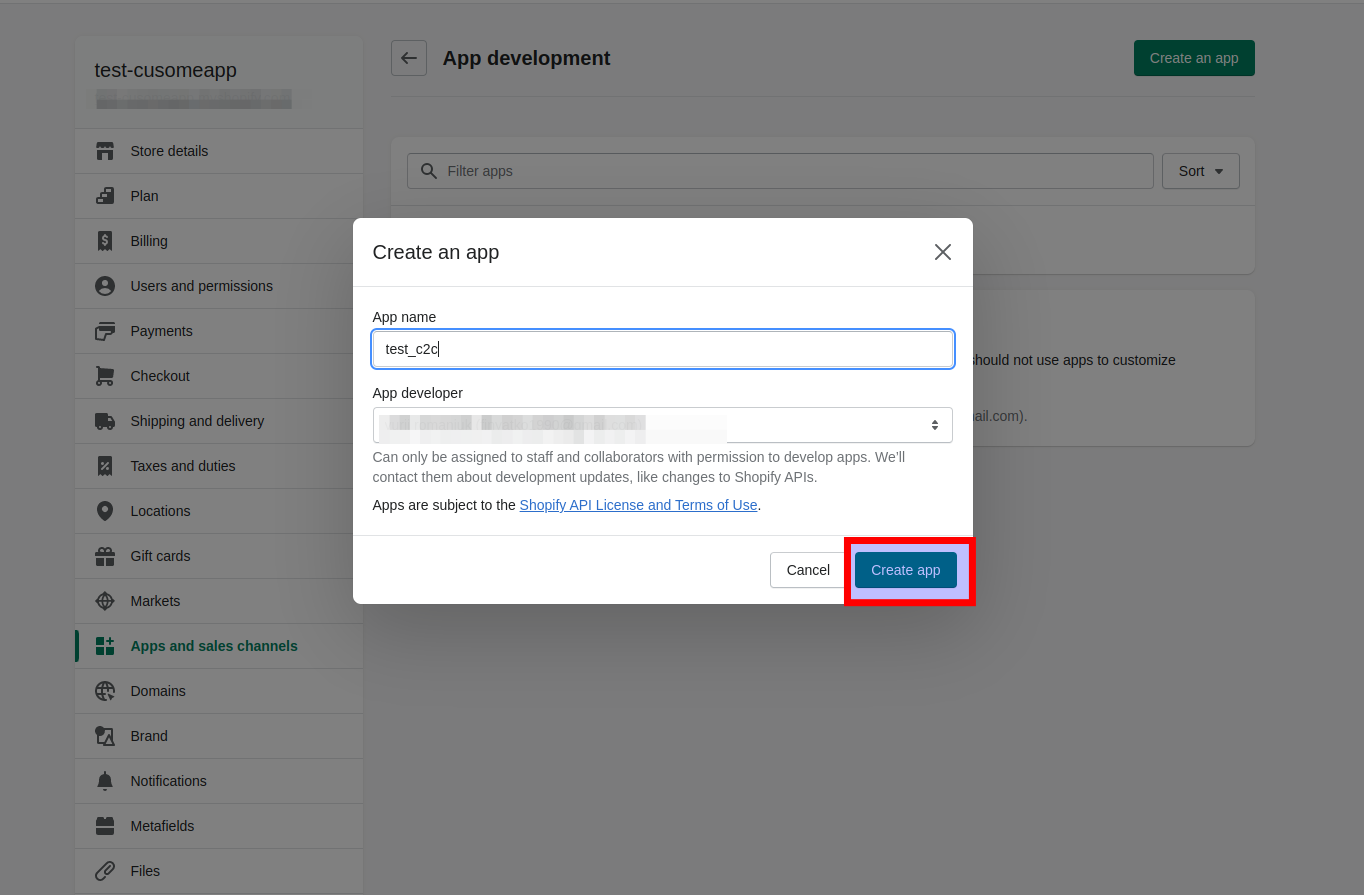
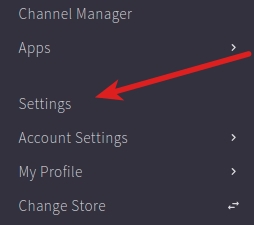
Navigate to Settings -> Apps and sales channels -> Develop apps -> Allow custom app development (if needed) -> Create an app in your Shopify admin panel.
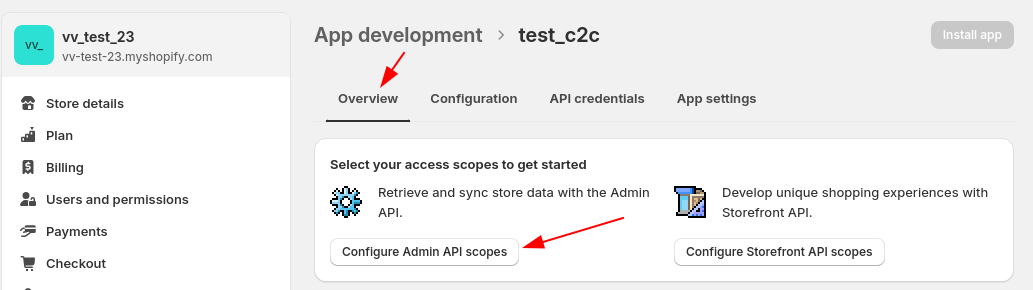
Click the Configure Admin API scopes, and select the necessary permissions for data migration. It's generally recommended to tick all checkboxes to ensure full access for the migration process.
Click the Save and then the Install App buttons.
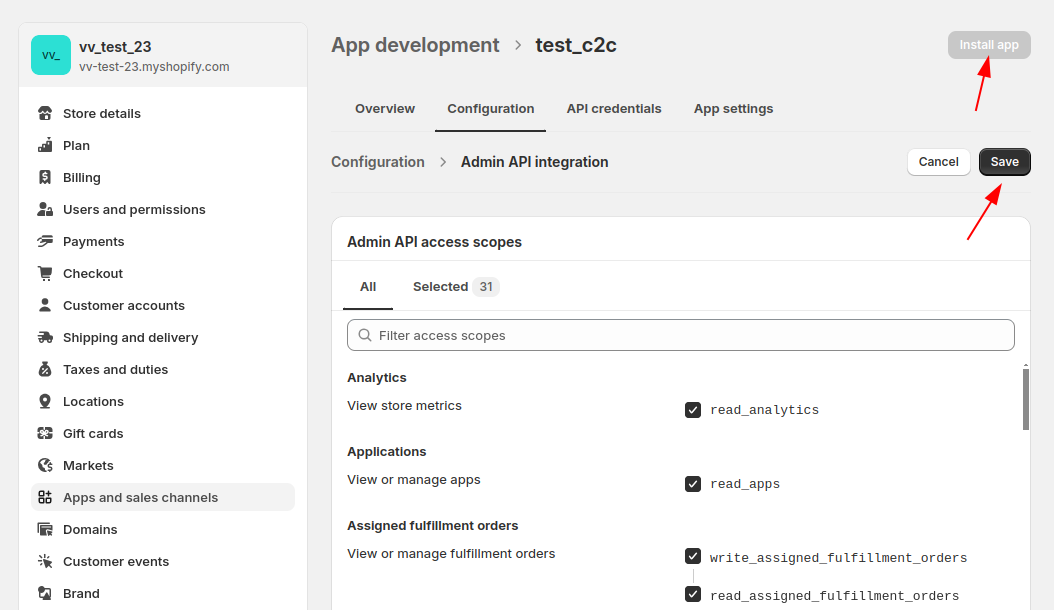
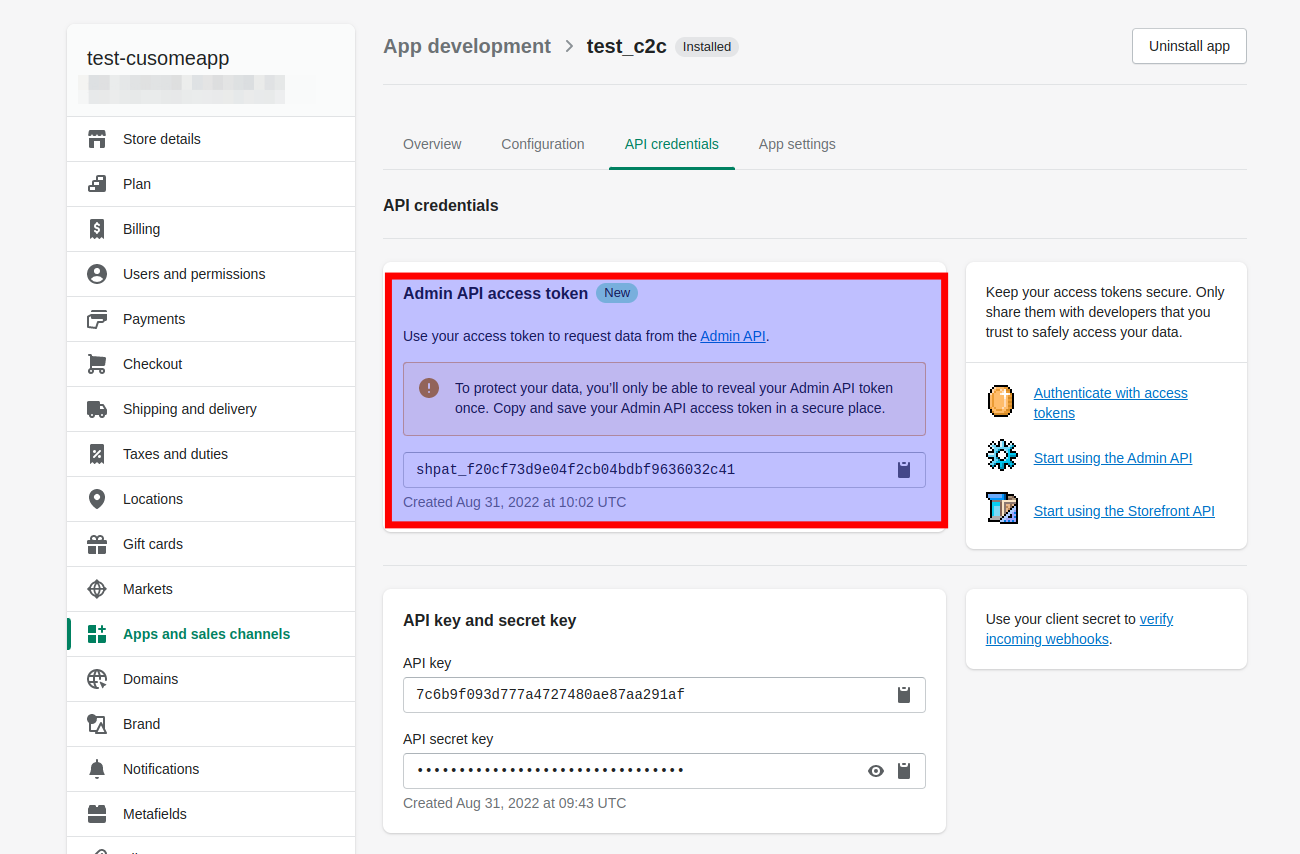
Install the App to generate the Admin API access token. This token will be used within the Cart2Cart migration wizard to connect to your Shopify store.
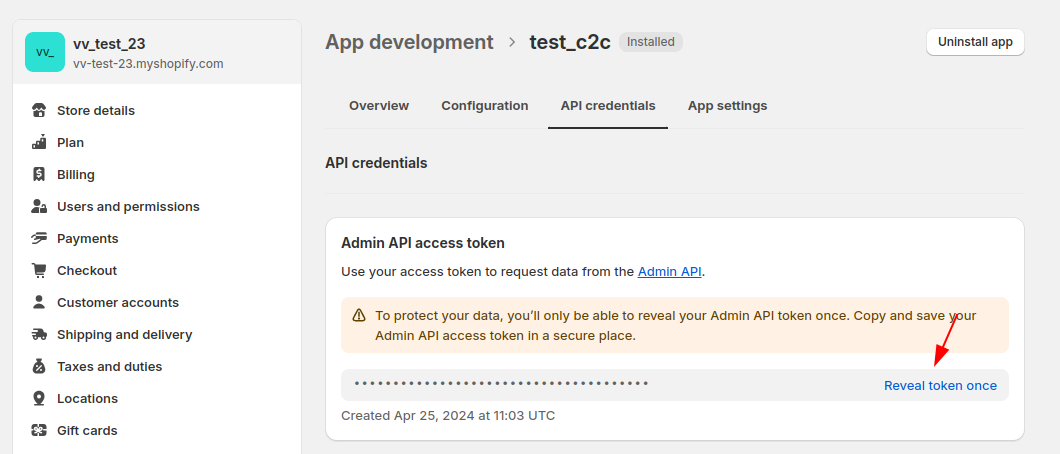
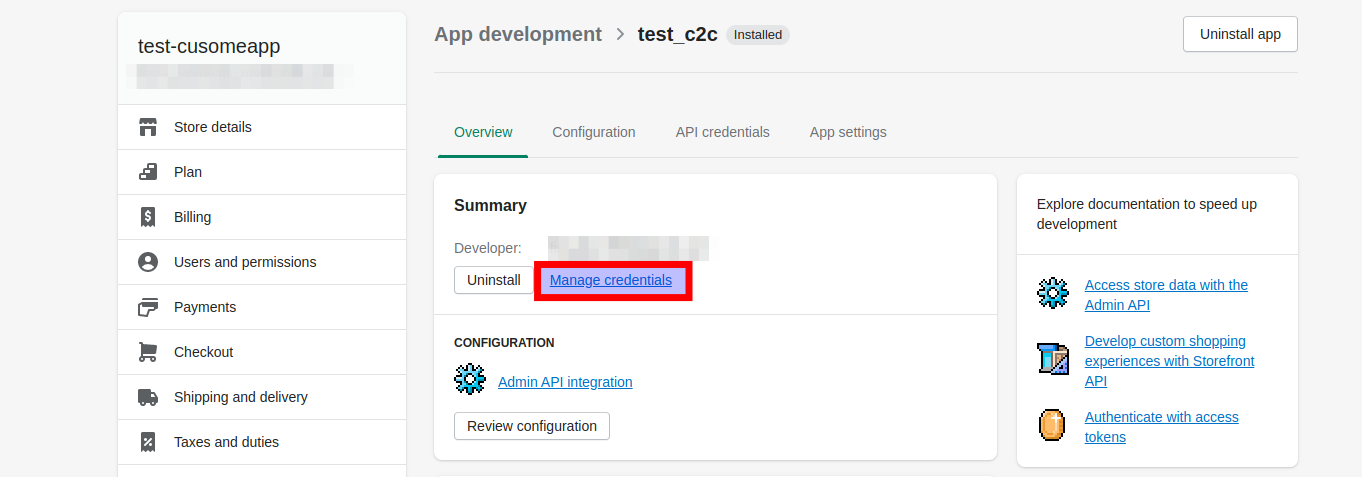
If the Admin API access token has already been created, log in to your Shopify store admin interface. Go to Settings -> Apps and sales channels -> Develop apps -> Create an app for your store. Select your custom app and then click Manage credentials.
Note: For security reasons, the Admin API token is only revealed once. If you need a new token, you'll have to uninstall and reinstall the app. Press the Uninstall app button -> Uninstall -> and get the new token.
Watch our video tutorial for a visual guide on obtaining your Shopify API token:
Ready to migrate your store to or from Shopify? Start your free demo now!
Password Migration to Shopify: Understanding the Limitations
Cart2Cart, a leading eCommerce data migration service, understands the importance of a seamless transition when switching to Shopify. However, due to security protocols, Cart2Cart cannot directly migrate customer passwords from other platforms to Shopify.
The reason for this limitation lies in the unique password encryption methods employed by each shopping cart platform. For security reasons, these encryption methods are generally incompatible. Directly transferring encrypted passwords between systems could compromise data security.
Also, it's important to note that Cart2Cart migrates customer *data*, not customer accounts themselves. This means that while customer information like names, addresses, and order history are transferred, the actual account credentials (usernames and passwords) are not.
Therefore, the best practice after migrating to Shopify is to send account invite emails to your customers, prompting them to reactivate their accounts and reset their passwords. Learn more about sending account invite emails in bulk.
While direct password migration isn't possible, Cart2Cart ensures a smooth and comprehensive migration of all other essential customer data. This allows your customers to quickly regain access to their accounts and continue shopping on your new Shopify store with minimal disruption.
Ready to experience a seamless eCommerce data migration to Shopify? Start your free demo now!
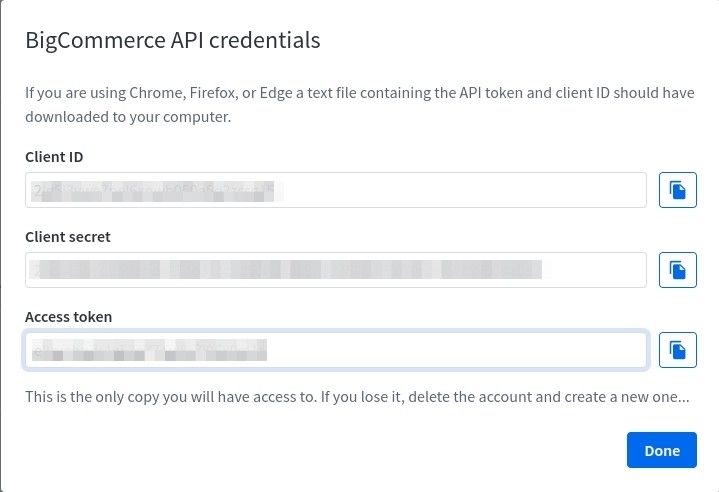
Where can I get BigCommerce API Credentials for Data Migration?
Follow the steps below to get the API Client ID and Access Token of your BigCommerce store for your eCommerce data migration:
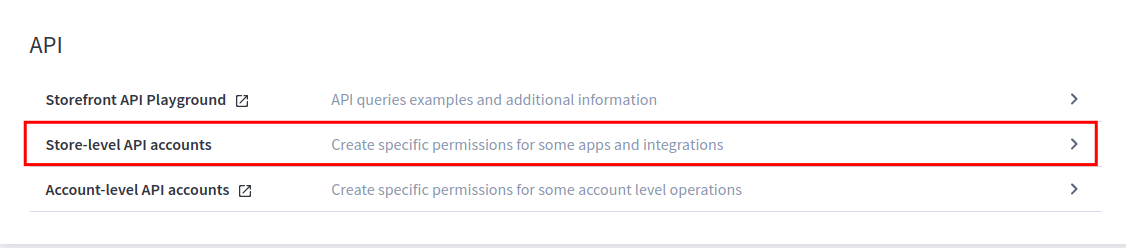
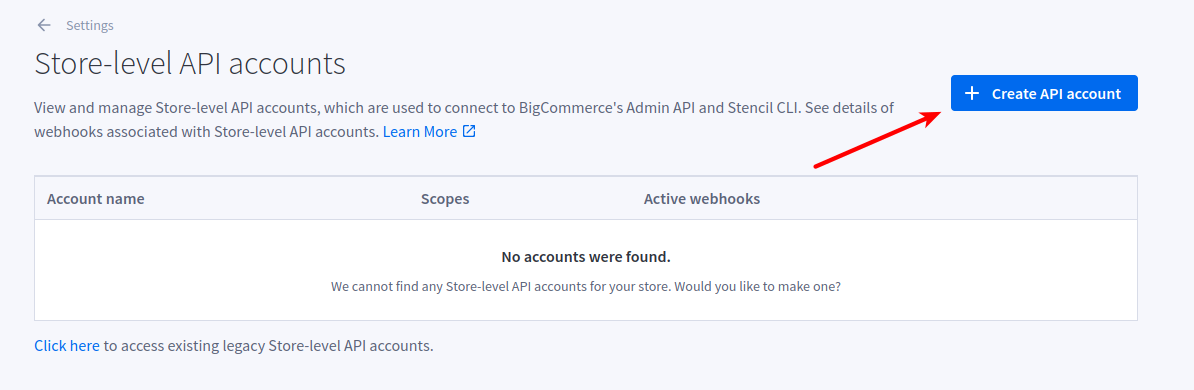
1. Once you've logged into your BigCommerce store's control panel, go to Settings.
2. Navigate to API accounts section (previously "Store-level API accounts").
3. Click the Create API Account button.
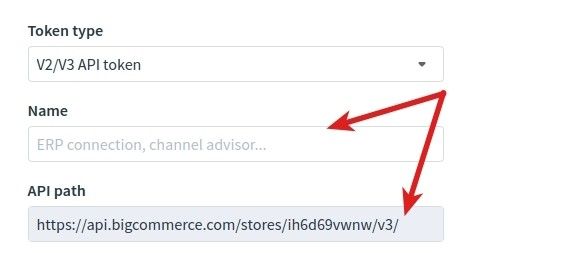
4. Enter a Name for the app/integration corresponding to your account. The API Path is no longer required with the latest BigCommerce API. You will need the Client ID and Access Token.
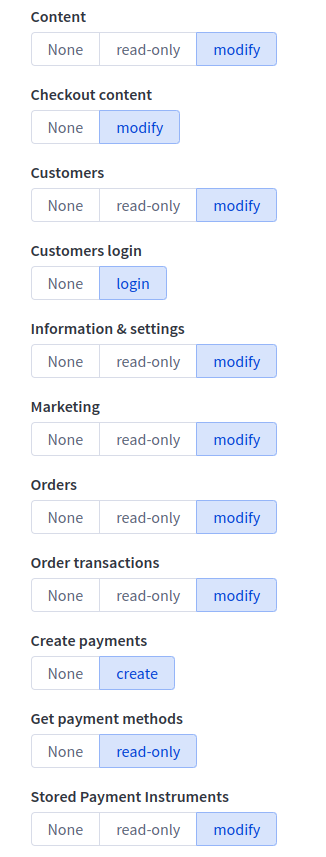
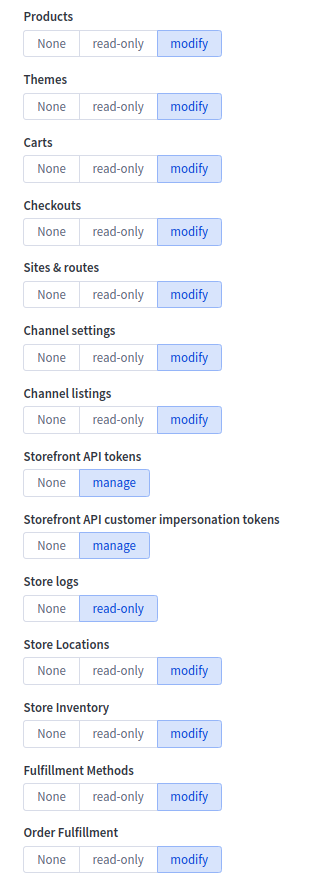
5. Under OAuth Scopes, specify the API resources and permissions to which your app/integration requires access. Choose Modify for all items to ensure full data access for your eCommerce data migration.
6. After making changes, activate the Save button.
7. Copy your API Credentials from the pop-up shown below and paste them into appropriate fields on the Migration Wizard. You need only the Client ID and Access Token for eCommerce data migration with Cart2Cart.
Ready to migrate your data to or from BigCommerce? Start your free demo now!
To pay for your Cart2Cart service and initiate your data migration, you'll need to add funds to your Cart2Cart account balance. Here's how:
- Log in to your Cart2Cart account.
- Navigate to the Add Funds page.

- Enter the amount you wish to add to your balance and click the Add Funds button.

Connection Bridge files are essential for establishing a secure connection between your shopping carts, enabling seamless data exchange during your eCommerce data migration with Cart2Cart. These files act as secure gateways, protected by unique Security Tokens linked to your personal account and provided by Cart2Cart. For the Connection Bridge to function correctly, the bridge2cart folder must be located in your store’s root directory.
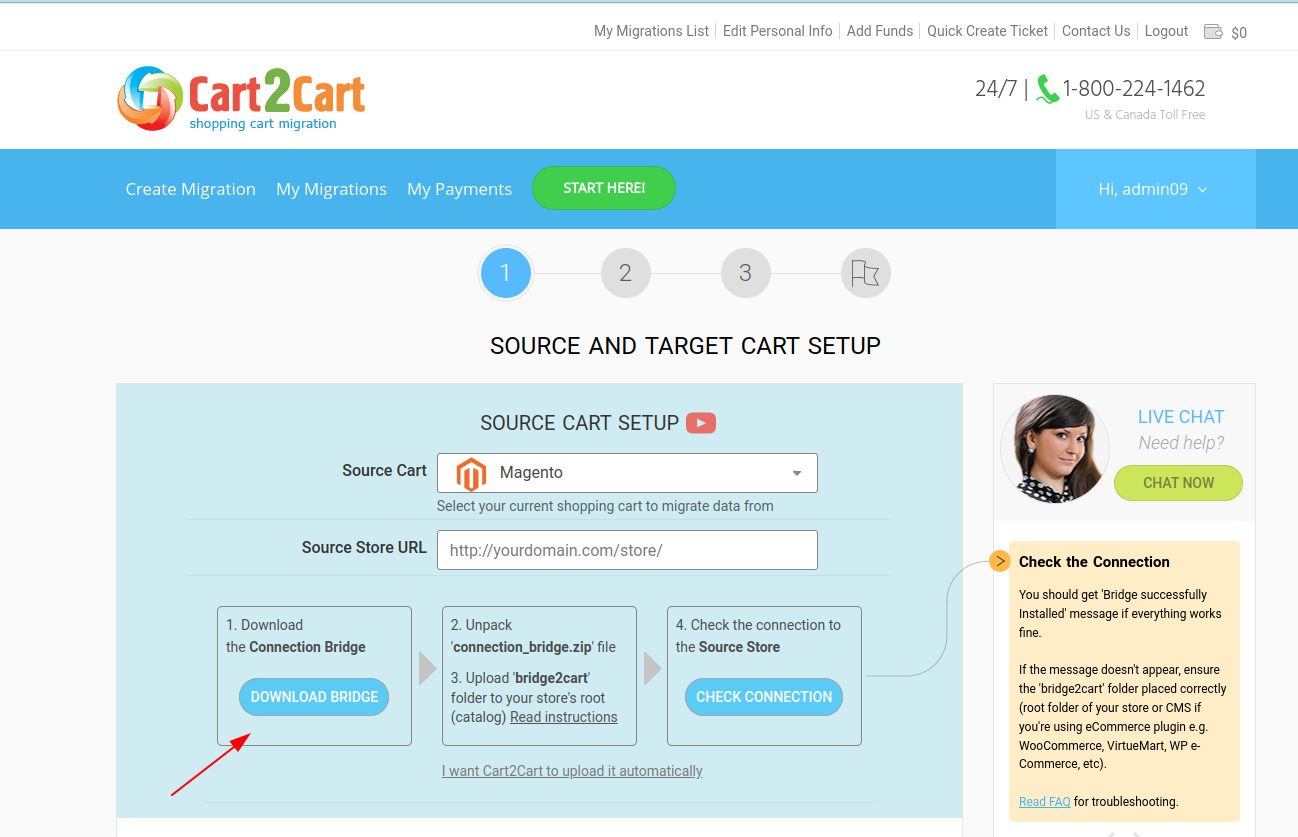
During the "Setting Up" step of the Migration Wizard, you'll be prompted to provide the URLs for your Source and Target shopping carts. You'll also need to download the Connection Bridge files. This download is required only for self-hosted carts such as Magento, WooCommerce, and PrestaShop. For hosted platforms like Shopify and BigCommerce, you'll typically provide API information instead.
The following video demonstrates the Connection Bridge installation process for Magento, but the steps are generally applicable to all self-hosted shopping carts.
How to Install the Connection Bridge for Your Data Migration
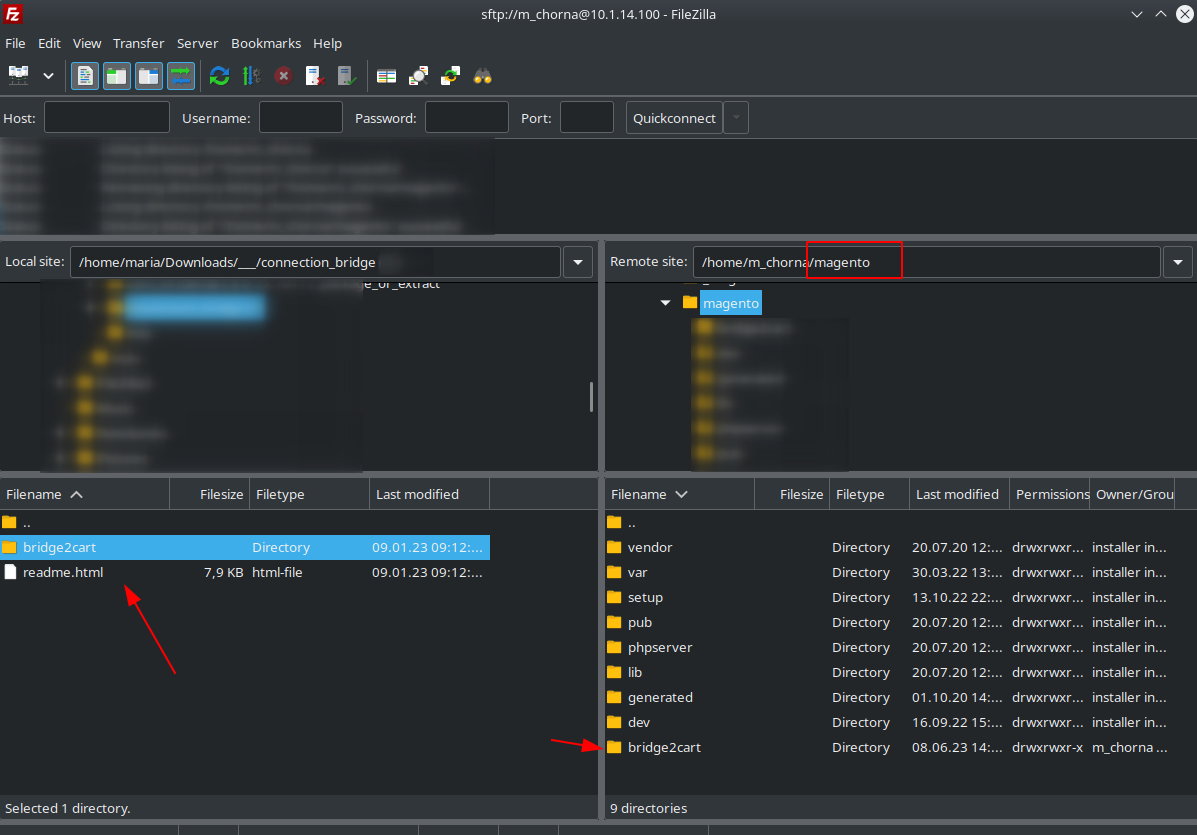
The Connection Bridge installation procedure using FileZilla FTP client is the same for macOS, Windows, and Linux users.
There are two methods for setting up the Connection Bridge: manual and automatic. The manual method is the default option.
Manual Connection Bridge Installation:
1. Download Connection Bridge files. After entering your Source/Target store URL, download the Connection Bridge zip file and extract it to your computer.
2. Upload the bridge2cart folder to your Source/Target store via FTP. Using your preferred FTP client (e.g., FileZilla, WinSCP), navigate to the root folder of your store and upload the bridge2cart folder you extracted from the zip file.
3. Verify the Connection Bridge installation. Click the confirmation link provided to ensure the Connection Bridge is set up correctly.
If you see the message "BRIDGE_INSTALLED," the Connection Bridge is working and you can proceed to the next step: Entities Selection.

Automatic Connection Bridge Installation:
Provide your FTP details: host, port (if different from "21"), login, password, and the path to your store's folder.
The fields should be filled in similar to the following examples:
- Host: 10.4.5.24
- Port: 72 (or skip if your port is 21)
- Login: User
- Password: 555222
- Path: /path/to/your/store (or skip if your store is located directly in the "home" folder)
Troubleshooting Manual Connection Bridge Setup for Data Migration
Q: I'm clicking the link, but the "BRIDGE_INSTALLED" message doesn't appear. What should I do?
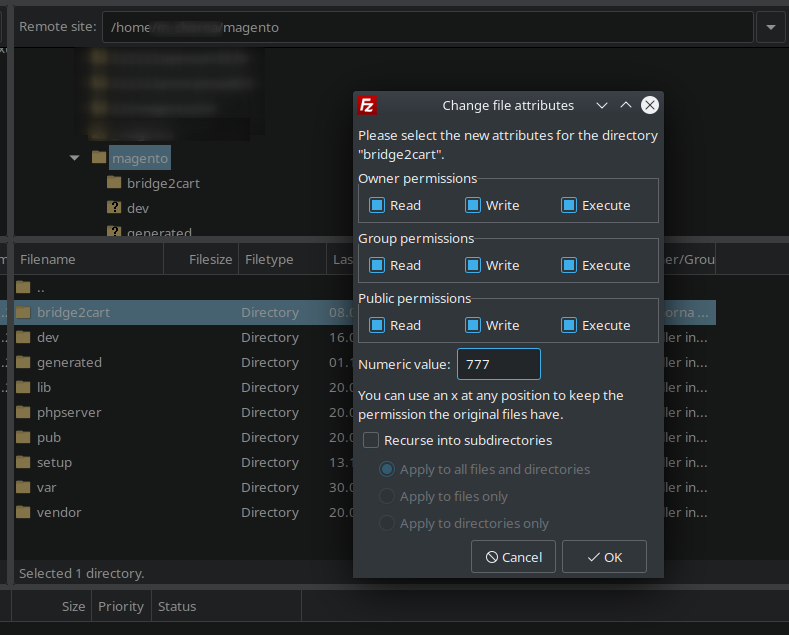
A: Try re-uploading the Connection Bridge files and setting the appropriate permissions:
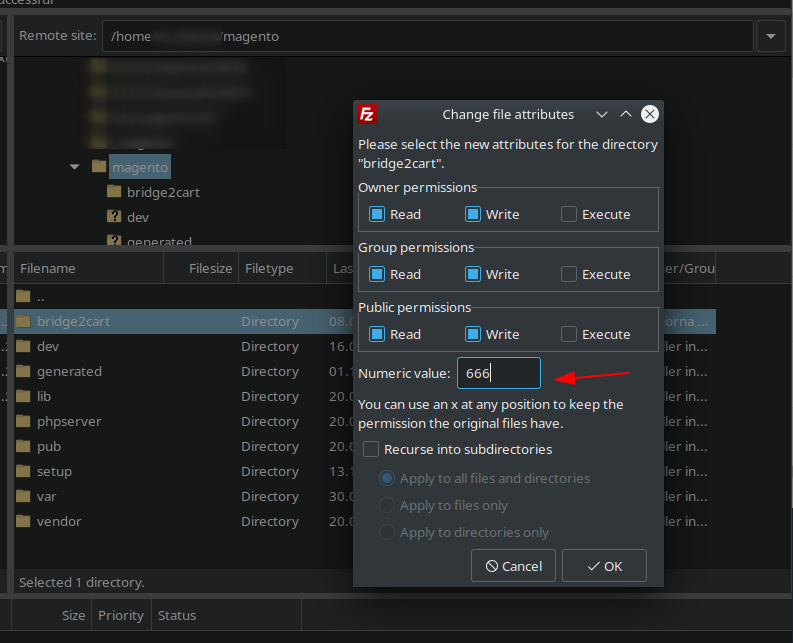
1. Set the permissions to 755 or 777 for the "/bridge2cart" folder, depending on your server configuration. In FileZilla, right-click the bridge2cart directory, select "File permissions," and enter the necessary value.
2. Set the permissions to 644 (if "/bridge2cart" folder permission is set to 755) or 666 (if "/bridge2cart" folder permission is set to 777) for "bridge.php". Open the bridge2cart folder, right-click on bridge.php, select "File permissions," and set the necessary value.
If you're using a different FTP client, adjust the permissions accordingly.
Q: It's still not working!
A: Don't worry! Your issue is likely easily resolved. Please describe your problem in detail and submit a ticket to our Support Team for assistance.
Is the Connection Bridge Secure?
The Connection Bridge's sole purpose is to facilitate data exchange. By installing it, you allow our service to copy the data you want to migrate to your target store; we do not modify your data.
Each Connection Bridge includes a unique Security Token, preventing unauthorized access to your source store database.
You can safely delete the Connection Bridge after the migration is complete.
Note! We strongly recommend turning off website redirects to ensure the Connection Bridge files function correctly. Visit http://[yourstore url]/bridge2cart/bridge.php to check if redirects need disabling. If the link redirects you, disable redirects in your .htaccess file (usually located in your "shop" folder).
Please, do not remove Connection Bridge files from your FTP during the data transfer process. Otherwise, we can't guarantee proper migration results. You will be able to delete Connection Bridge files right after your store migration is over.
Ready to migrate your store? Start your free demo now!
The list of IPs you need to add:
- 167.235.90.117
- 116.202.82.183
- 213.239.192.181
- 148.251.79.211
- 154.38.131.128
- 23.19.116.29
- 23.19.116.79
- 31.186.35.73
- 188.116.4.137
- 154.28.7.237
- 31.186.36.47
- 154.3.253.131
- 168.81.17.21
- 154.13.146.69
- 86.125.93.231
- 196.18.158.249
Check the following steps to add Cart2Cart IPs to whitelist and prevent accidental blocking during your data migration.
How to Whitelist Cart2Cart IPs for Seamless Data Migration
To ensure a smooth and uninterrupted eCommerce data migration with Cart2Cart, it's crucial to whitelist our IPs. This prevents your server's firewall from accidentally blocking our access during the migration process. Below are instructions for different hosting environments:
Whitelisting Cart2Cart IPs in WHM (Web Host Manager)
Here’s how to whitelist IPs in WHM:
- Login to WHM (Web Host Manager).
- Go to the bottom of the left menu to the Plugins section.
- Click on the ConfigServer Security&Firewall option.
- Next to the “Quick Allow” button, type the IP address you wish to allow and press “Quick Allow”.


Whitelisting Cart2Cart IPs in cPanel
Refer to these external resources for whitelisting IPs in cPanel:
- inMotion Hosting: How to Add IP to Firewall
- HostGator: How to Whitelist Your IP in cPanel for Remote MySQL Access
Whitelisting Cart2Cart IPs in Plesk
Follow these steps to whitelist IPs in Plesk:
- Login to Plesk.
- Click the Websites & Domains tab at the top.
- Click the SQL Whitelist Beta icon.
- Click Add IP, select the service, and type the IP address. Click OK.
Note: Ensure that ports 443 (for HTTPS) and 80 (for HTTP) are open on your server. These ports are essential for secure and standard web communication during the data migration process.
Need help with your data migration? Schedule a call with a migration expert or explore Cart2Cart's services today!
Just set up the migration and choose the entities to move – the service will do the rest.
Try It FreeDelegate the job to the highly-skilled migration experts and get the job done.
Choose Package