How can we help you?
Volusion-related questions8
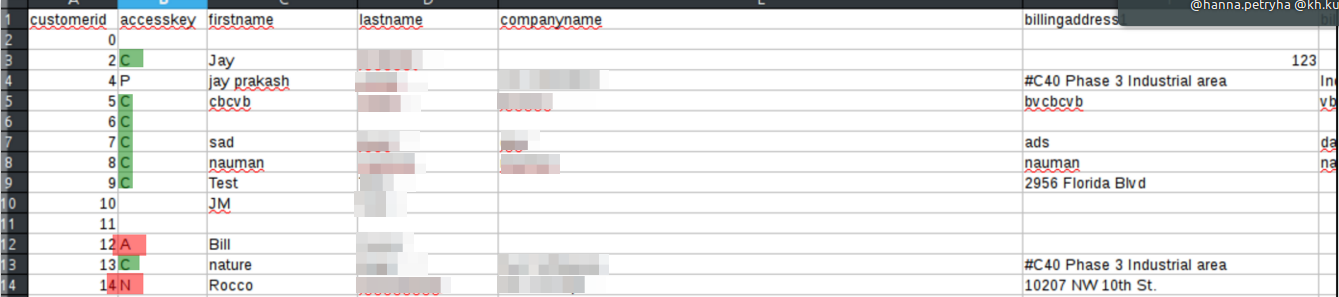
On a Volusion to WooCommerce migration with Cart2Cart, only Volusion users with Customer status are migrated by default. That status is indicated by C in the accesskey field of Volusion’s exported customer/user data. Users marked as Admin, Wholesale, Partner, or other roles are skipped.

What to do if customers are missing
1. Export customers/users from Volusion and confirm missing accounts are not status C.
2. Re-run migration after adjusting source data (where allowed) so legitimate shoppers are Customer status, or request a custom mapping via Cart2Cart support.
3. Remember orders may still migrate even when the related user type was skipped—check Orders in WooCommerce separately.
Background: Peculiarities of users migration from Volusion.
Migrating from Volusion with Cart2Cart often requires exporting store data to CSV (file-based connection). Use Volusion’s Import/Export tools, then upload the files in the Migration Wizard.
Export with Standard Export (current)
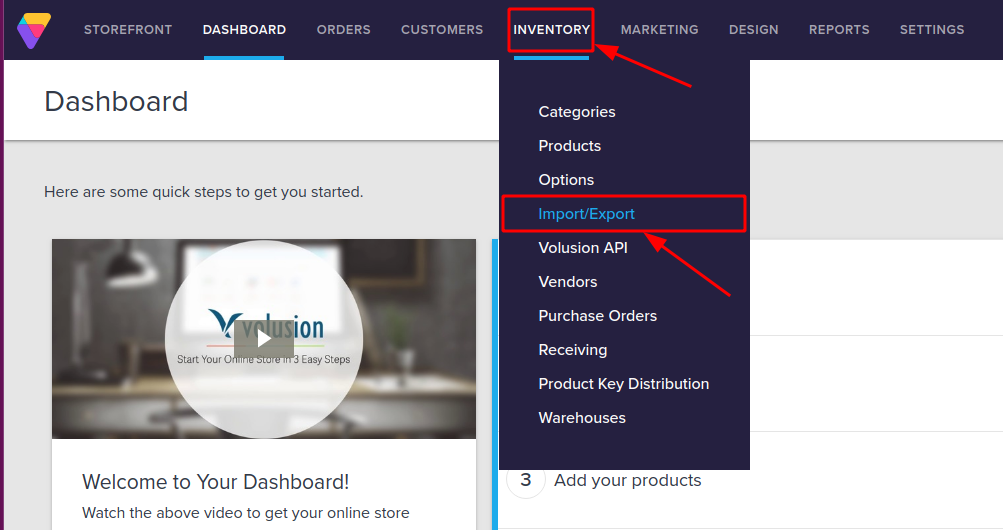
1. Log in to your Volusion admin.
2. Go to Inventory → Import/Export.
3. Open Standard Export (or Export Wizard from the menu, depending on your admin build).
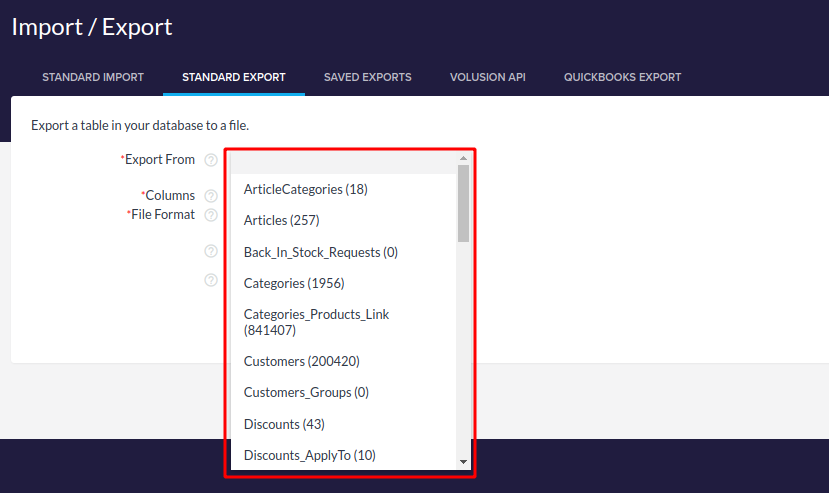
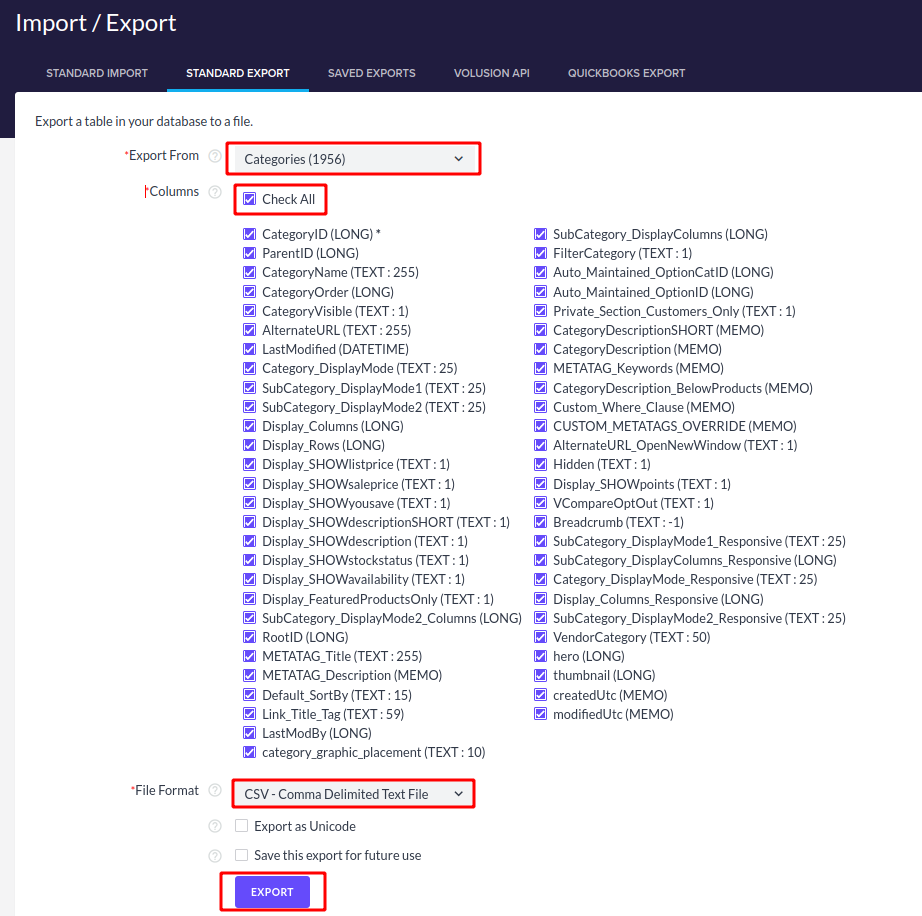
4. From Export From, choose the table you need (for example Products). Export one table at a time.
5. Select the columns Cart2Cart / your migration checklist requires.
6. Set the file format to CSV.
7. Click Export, then download the file when it is ready.
8. Repeat for other entities (customers, orders, categories, etc.) as required by your Cart2Cart setup.
Optional: Saved Exports / product search export
For repeatable product extracts, use Inventory → Import/Export → Saved Exports, or from Inventory → Products search results use the actions menu Export Results. See Volusion’s Import/Export help.
Older admin wording (legacy)
Older Cart2Cart screenshots may show different labels (for example generic “export” under Inventory). If your menu differs, look for Import/Export, Standard Export, or Saved Exports under Inventory—the CSV export goal is the same.
After you have the CSV files, continue in the Cart2Cart Migration Wizard.
For migrations to Volusion, Cart2Cart typically writes product image URLs rather than uploading every binary into Volusion storage. Enable Preserve product image URLs in the Migration Wizard when available, then copy the source media folder to Volusion so images keep working if the source store goes offline.
Recommended workflow (current)
1. In the Cart2Cart wizard, select Preserve product image URLs (when offered for your source→Volusion pair).
2. Complete Demo / Full Migration.
3. Obtain Volusion FTP/SFTP credentials from your Volusion hosting/admin settings (or Volusion support).
4. With an FTP client (FileZilla or similar), connect to Volusion:
— Protocol: FTP or SFTP as provided by Volusion
— Host, username, password from your account
— Prefer encrypted FTP/SFTP when your plan supports it
5. Upload the source cart’s product images folder into the Volusion path that matches the URLs written during migration (often under the store’s public/images or equivalent media directory—confirm path with Volusion support if unsure).
6. Spot-check product pages on the Volusion storefront.
Related: Preserve product image URLs; Additional images limitation.
When migrating to Volusion with Cart2Cart, the Preserve product image URLs option keeps product records pointing at image URLs derived from your source store (instead of relying only on live hotlinks that break when the source goes down—after you also copy files into Volusion).
1. On the Migration Wizard options step, enable Preserve product image URLs.
2. Run Demo Migration and confirm images load as expected.
3. After Full Migration, copy the source media/images folder to Volusion via FTP/SFTP so those URLs resolve on Volusion hosting.
4. If images still 404, verify the uploaded folder path matches the URLs stored on products (or ask Cart2Cart support to confirm the expected path for your migration).
Full FTP steps: How to migrate images to Volusion?
Yes. You can export store data from Volusion for a Cart2Cart file-based migration, provided your Volusion plan includes Import/Export (and API access if you use an API connection). On lower-tier plans, export/API features may be restricted—confirm your plan or upgrade if export menus are missing.
How to export (current)
1. In Volusion admin, go to Inventory → Import/Export.
2. Use Standard Export (or Export Wizard) and export each needed table as CSV (products, customers, orders, etc.).
3. Download the files and upload them in the Cart2Cart Migration Wizard.
Detailed steps: How to export data from Volusion in CSV Based Format. Official reference: Volusion — All About Import/Export.
Some Volusion target setups require you to import Cart2Cart-generated CSV files in the admin after the wizard finishes.
Import CSVs in Volusion (current)
1. Log in to Volusion admin.
2. Go to Inventory → Import/Export.
3. Open the Standard Import tab.
4. In Import To, select the table matching the CSV (Products, Categories, Orders, Customers, etc.).
5. Browse to the CSV file from the Migration Wizard and upload it.
6. Choose an overwrite option carefully:
— For most tables when replacing demo/full data: clear/replace options as instructed in your Cart2Cart delivery notes (often “delete all records and replace with this import file”).
— For Customers: prefer an option that does not wipe existing accounts unless you intend a full replace (for example “do not change any records already in the database” / update-only, depending on your Volusion wording).
7. Click Import and wait for completion. Repeat for each entity file.
Official reference: Volusion — Import a file into a table.
When migrating from Volusion with Cart2Cart, only users with Customer status are migrated automatically. In Volusion CSV user exports, that status is typically marked with C in the accesskey field. Other statuses (Partner, Admin, wholesale roles, etc.) are skipped in the standard automated flow.
What about orders from skipped users?
Orders are still migrated. Order records that belonged to skipped user types may appear without a matching customer account on the target, or linked according to Cart2Cart’s order-customer matching rules for your cart pair.
Need non-customer users too?
Ask Cart2Cart support or use a Data Migration Service Package if you must transfer Partners / other access levels as customers on the target.
Related: Why weren’t my Volusion customers migrated to WooCommerce?
Just set up the migration and choose the entities to move – the service will do the rest.
Try It FreeDelegate the job to the highly-skilled migration experts and get the job done.
Choose Package