How can we help you?
Miva Merchant-related questions5
How to Create a Miva Merchant API Token for Data Migration
To migrate from Miva Merchant with Cart2Cart, create an API token in your Miva admin and copy the values into the Migration Wizard.
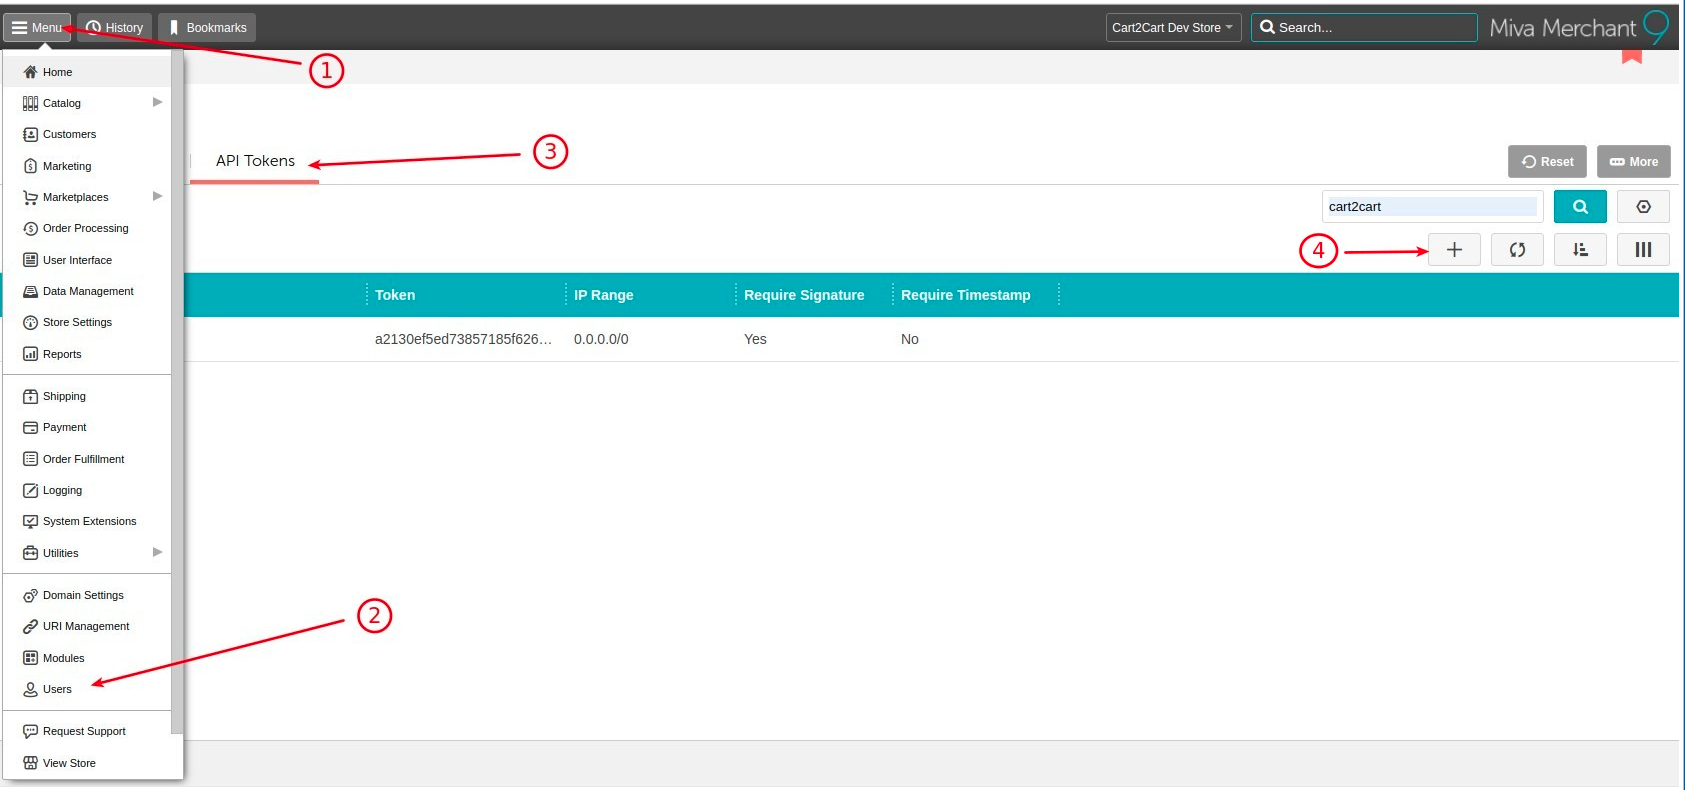
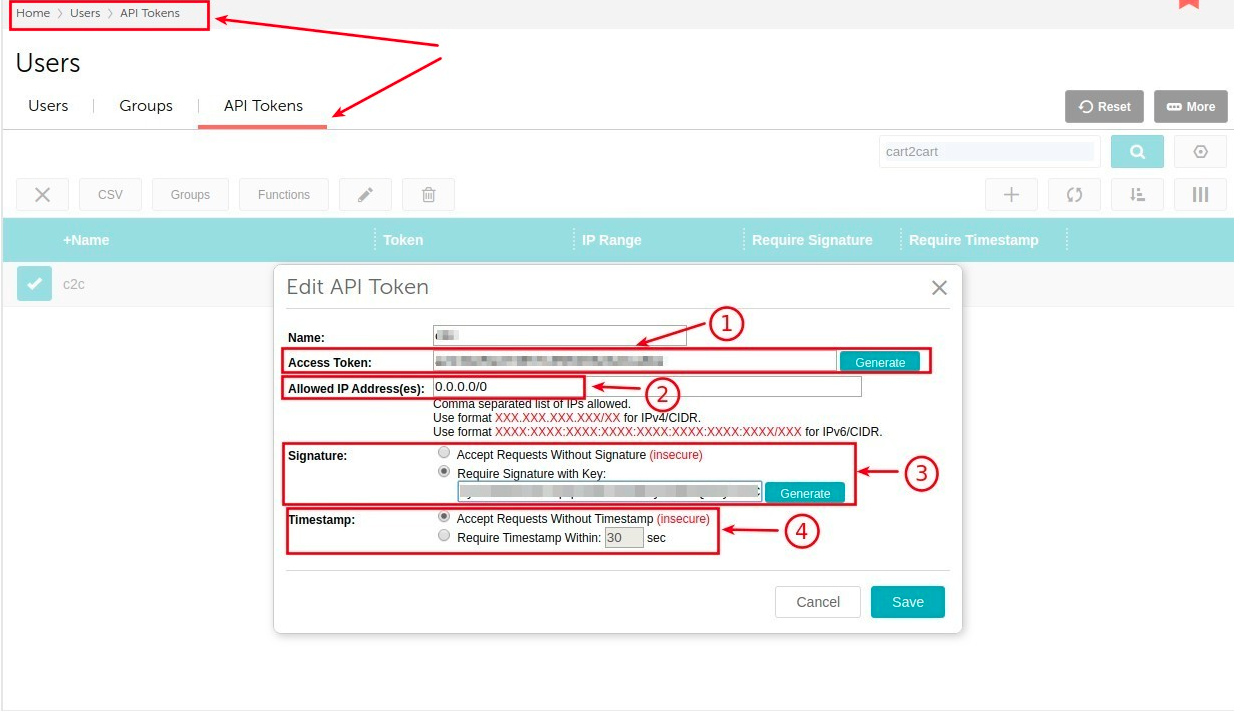
- Go to Users → API Tokens and click Add API token.
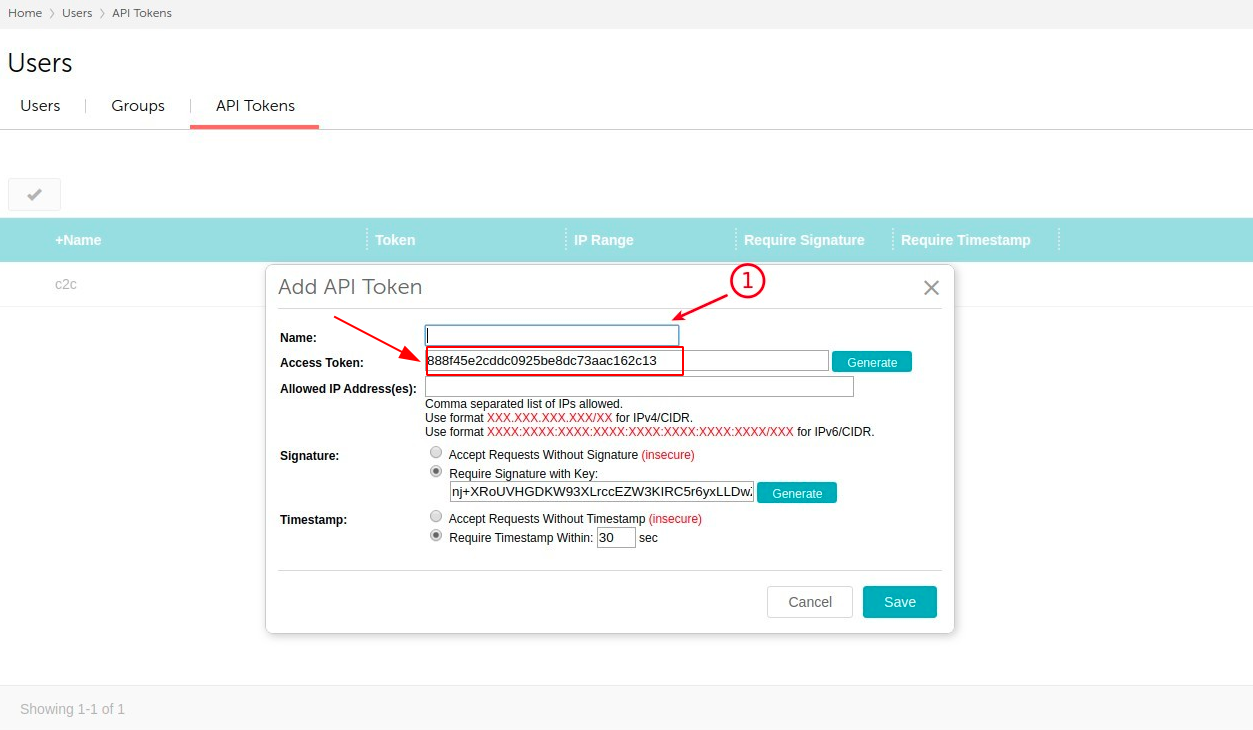
- Enter a Name (for example, Cart2Cart Migration).
- Copy the Access Token value.
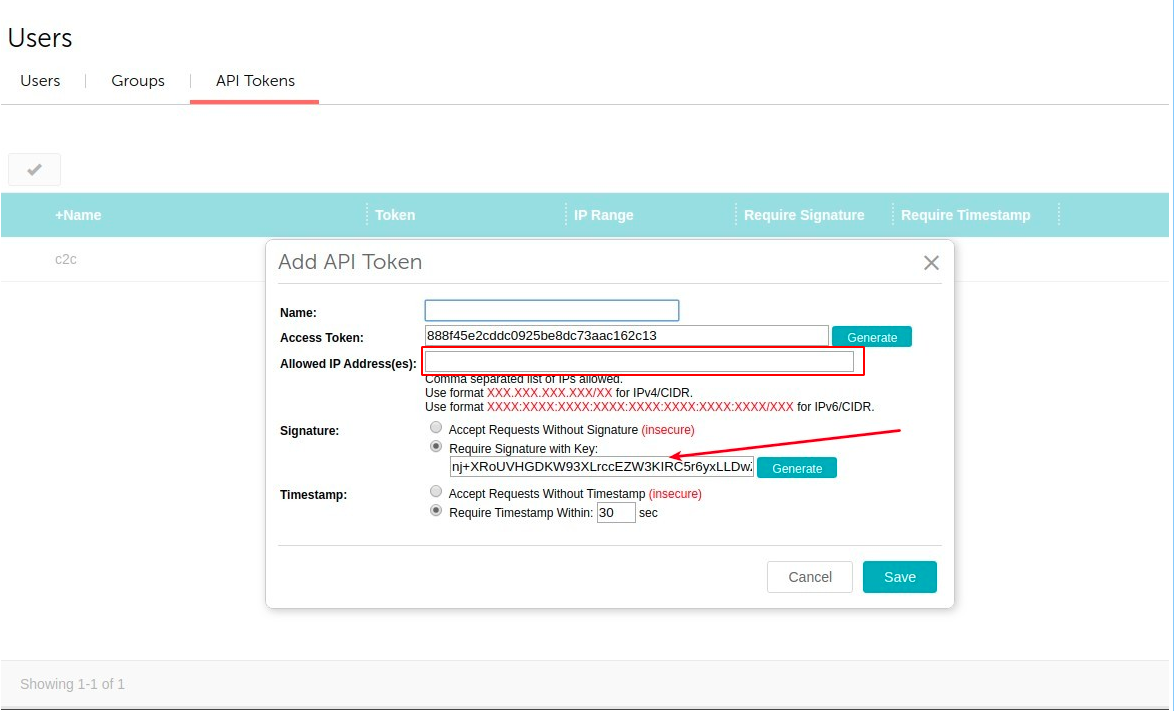
- For Allowed IP Address(es), enter
0.0.0.0/0so Cart2Cart can connect from its servers. - Copy the Signature value.
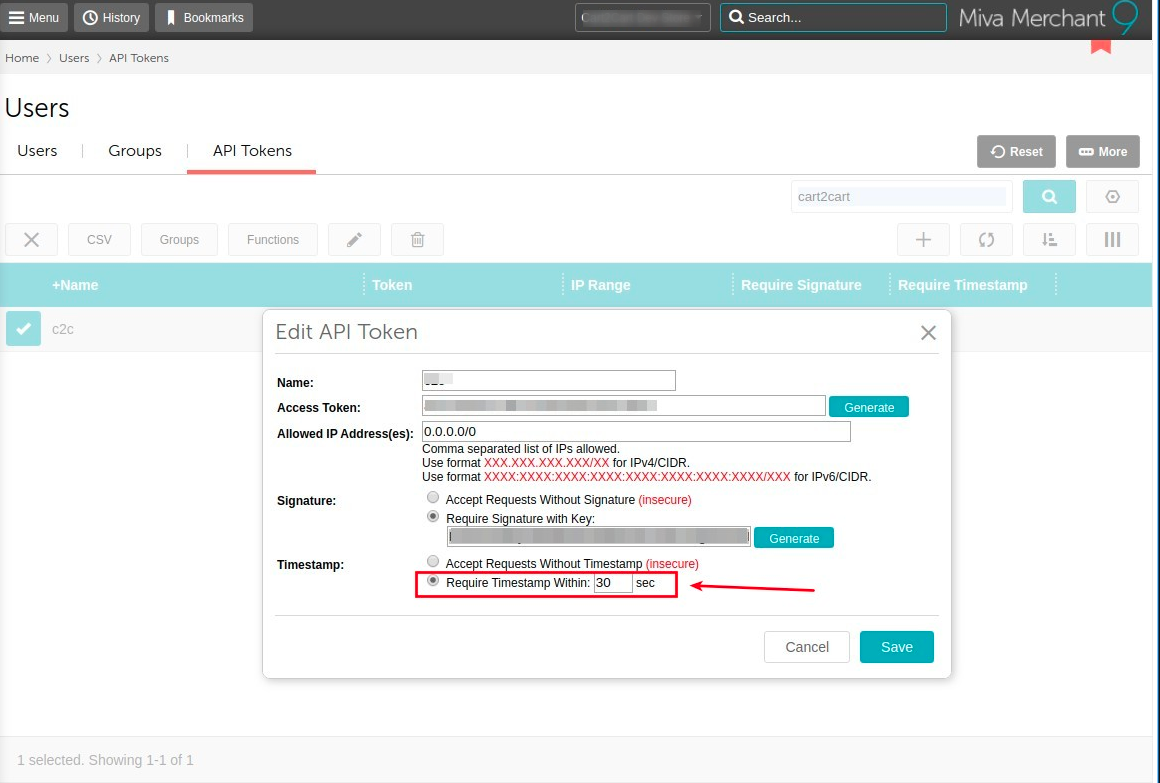
- Under Timestamp, choose Require Timestamp Within (or the option your Miva version labels for timestamp validation), then click Save.
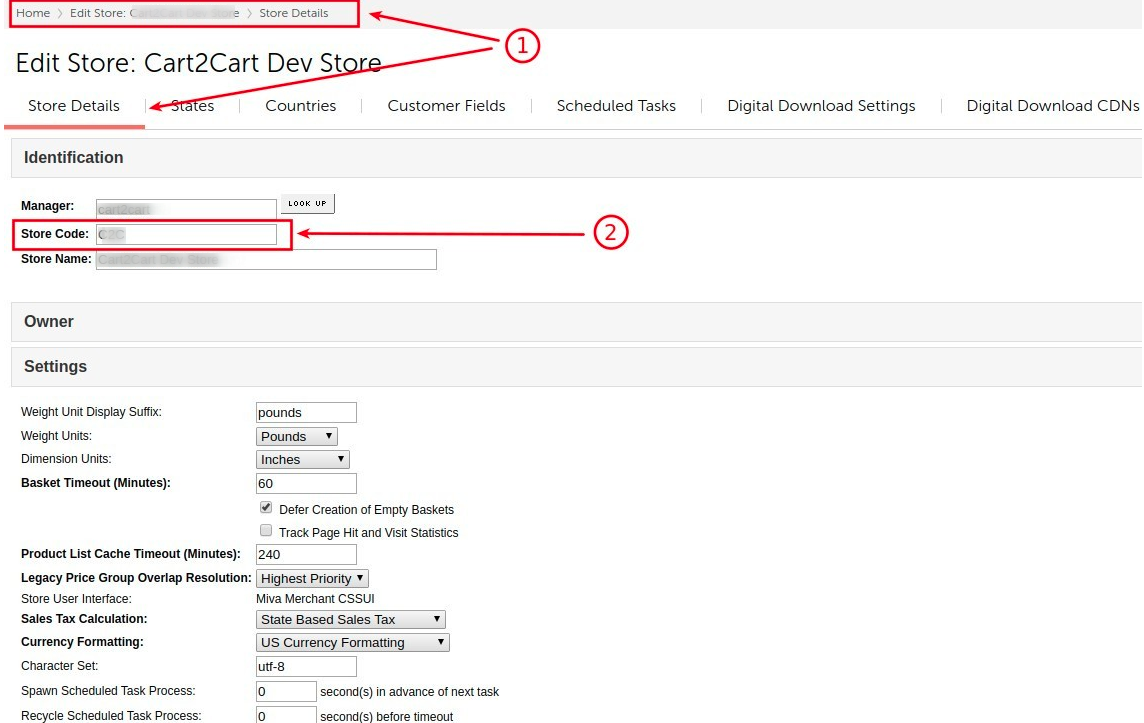
- Go to Store Settings and copy your Store Code.
- Enter the Access Token, Signature, and Store Code in the Cart2Cart Migration Wizard.
Start your free demo to test your Miva Merchant migration with Cart2Cart.
Why Categories Might Not Migrate During a Miva Merchant Demo Migration
Unfortunately, due to Miva Merchant's unique structure, Cart2Cart currently does not fully support automated migration of categories to this platform. This is due to underlying differences in how Miva Merchant handles category data compared to other e-commerce platforms.
While a demo migration might show some aspects of your data being transferred, category migration requires custom solutions and is not included in the standard automated process. If category migration is critical for your store, contact our support team to discuss custom migration options.
Alternative Solutions for Migrating Categories to Miva Merchant
Although direct automated category migration isn't available, there are alternative approaches you can consider:
- Manual Category Creation: Recreate your categories manually within your Miva Merchant store. This gives you full control over the structure and ensures it aligns perfectly with your business needs.
- CSV Import: Miva Merchant may offer a CSV import functionality for categories. You might be able to export your categories from your source store and format them to be compatible with Miva Merchant's import requirements. Check Miva Merchant's official documentation for more details.
- Custom Data Migration: Cart2Cart offers custom data migration services. Our team can develop a tailored solution to migrate your categories to Miva Merchant, taking into account the platform's specific requirements. Schedule a call with a migration expert to discuss your options.
We understand that category migration is often essential, and we are continuously working to improve our service and platform compatibility. We recommend contacting our support team for the most up-to-date information and personalized guidance.
Next Steps:
- Explore other platform migration options with Cart2Cart.
- Schedule a call with a migration expert to discuss custom category migration solutions.
- Start your free demo to test the migration of other data entities.
Will Customer Usernames Migrate to Miva Merchant?
Unfortunately, Cart2Cart doesn't support the direct migration of customer usernames to Miva Merchant. Due to differences in platform architecture and data structures, transferring customer usernames requires custom solutions beyond the scope of a standard migration.
Why is username migration not supported?
- Platform Differences: Miva Merchant employs a unique system for managing customer accounts and usernames, which may not directly align with the structure of the source platform.
- Data Security: Usernames often have security implications, and direct transfer could pose risks if not handled carefully.
- Potential Conflicts: Existing usernames in Miva Merchant could conflict with imported usernames, leading to account access issues.
Alternative Solutions:
While direct username migration isn't possible, here are some alternative approaches:
- Customer Notification: Inform your customers that they will need to create new accounts on your Miva Merchant store. Provide clear instructions on how to do so.
- Simplified Registration: Streamline the registration process on Miva Merchant to make it as easy as possible for customers to create new accounts.
- Incentives: Offer incentives (e.g., discounts, free shipping) to encourage customers to re-register on your new store.
Migrating Other Customer Data:
Cart2Cart seamlessly migrates other crucial customer data to Miva Merchant, including:
- Customer names
- Billing and shipping addresses
- Order history
- Contact information
Ensure a smooth transition to your new Miva Merchant store by leveraging Cart2Cart's comprehensive data migration services. While username migration presents a unique challenge, the rest of your customer data can be transferred accurately and securely.
Next Steps:
- Start your free demo to see how Cart2Cart works.
- Schedule a call with a Migration Expert to discuss your specific needs.
- Contact support via Live chat for any questions.
Miva Merchant Data Migration: Migrating Order Statuses
Yes, Cart2Cart supports the migration of order statuses from Miva Merchant 9. However, due to the inherent differences in how shopping cart platforms handle order statuses, all your orders on the Target Cart will initially have a single, unified order status. This status is selectable during the data migration setup process.
Understanding Order Status Migration Limitations
It's important to understand why a one-to-one order status migration isn't always possible. Each e-commerce platform has its own unique set of order statuses (e.g., "Pending," "Processing," "Shipped," "Completed," "Canceled"). While we strive to map these statuses as accurately as possible, discrepancies can exist.
Choosing the Initial Order Status After Migration
During your data migration setup with Cart2Cart, you'll be prompted to select the order status that will be assigned to all migrated orders. Consider these options:
- "Completed" or "Processed": This is a good choice if you want to indicate that these orders have already been fulfilled in your Miva Merchant store.
- "Pending" or "Processing": Use this if you want to review the orders on your new platform and potentially take further action.
Once the data migration is complete, you can manually update the order statuses within your new shopping cart platform to reflect their true state. This allows for a more granular and accurate representation of your order history.
Need Help with Your Miva Merchant Data Migration?
Cart2Cart simplifies the process of migrating your data from Miva Merchant to a new e-commerce platform. Get started with a free demo today to see how easy it is!
Next Steps:
How to Export Your Data from Miva Merchant for Migration
Migrating your store from Miva Merchant? To ensure a smooth and complete data transfer using Cart2Cart, you'll first need to export your data from your Miva Merchant store. This guide provides step-by-step instructions for exporting your product, order, and customer data.
Exporting Data from Miva Merchant (Versions 4-9+)
The process for exporting data from Miva Merchant varies slightly depending on your store version. Follow the instructions below that best match your Miva Merchant version.
Exporting Data from Miva Merchant 4.x
Follow these steps to export data from Miva Merchant 4.x:
- To transfer Products, log into your Miva Merchant admin panel.
- Go to Utilities -> Export Data -> Export Products to Flat File.
- Name the file products.dat and set Import Product From Flat File as the format, with Tab as the File Delimiter.
- Check the box to Export Field Names as Header.
- You can also check Category Settings to export products from a specific category if needed.
- Press the Export button and save the file to your computer.
- Upload this data to Migration Wizard and proceed to the next step.
- To export Orders, log into your Miva Merchant admin panel.
- Go to Utilities -> Export Data -> Export Orders to Flat File.
- Name the file orders.dat, and set Tab as the File Delimiter.
- Check the box to Export Field Names as Header.
- Press the Export button and save the file to your computer.
- Upload this data to Migration Wizard and proceed to the next step.
- To export Customers, log into your Miva Merchant admin panel.
- Go to Utilities -> Export Data -> Export Customers to Flat File.
- Name the file customers.dat, set Import Customers From Flat File Format as the format and Tab as the File Delimiter.
- Check the box to Export Field Names as Header.
- Select the following fields to export: ‘Login Pass; Recovery Email Ship; First Name Ship; Last Name Ship; Email Ship; Phone Ship; Fax Ship; Company Ship; Address Ship; City Ship; State Ship; Zip Ship; Country Bill; First Name Bill; Last Name Bill; Phone Bill; Fax Bill; Email Bill; Company Bill; Address Bill; City Bill; State Bill; Zip Bill; Country’.
- Press the Export button and save the file to your computer.
- Upload this data to Migration Wizard and proceed to the next step.
Exporting Data from Miva Merchant (Versions 5.x - 9.x and later)
The file export procedure for Miva Merchant versions 5 through 9 and later is slightly different. The path for export differs depending on your version.
- To transfer Products, log into your Miva Merchant admin panel.
- In Miva 5.x go to Utilities -> Export Data -> Export Products to Flat File.
- In Miva 9.x and later go to Menu -> Data Management -> Export Products to Flat File.
- Name the file products.dat, set Legacy Import Product From Flat File Format as the format and Tab as the File Delimiter.
- Choose Replace File instead of Append To File in the If File Exist select box.
- Check the box to Export Field Names as Header.
- You can also check Category Settings to export products from a specific category if needed.
- Press the Export button and save the file to your computer.
- Upload this data to Migration Wizard and proceed to the next step.
- To transfer Attributes, log into your Miva Merchant admin panel.
- In Miva 5.x go to Utilities -> Export Data -> Export Attributes to XML File.
- In Miva 9.x and later go to Menu -> Data Management -> Export Attributes to XML File.
- Name the file provide.xml and press the Export button.
- Choose Replace File instead of Append To File in the If File Exist select box.
- Download the file to your computer and save it in an easily accessible location.
- Upload the XML file to Migration Wizard and proceed to the next step.
- To export Categories, log into your Miva Merchant admin panel.
- In Miva 5.x go to Utilities -> Export Data -> Export Categories to Flat File.
- In Miva 9.x and later go to Menu -> Data Management -> Export Categories to Flat File.
- Name the file categories.dat, then set Legacy Import Categories From Flat File Format as the format and Tab as the File Delimiter.
- Check the box to Export Field Names as Header.
- Choose Replace File instead of Append To File in the If File Exist select box.
- Select 'Code, Name, Active, Parent Category Code' fields to export.
- Press the Export button and save the file to your computer.
- Upload this data to Migration Wizard and proceed to the next step.
- To transfer Orders, log into your Miva Merchant admin panel.
- In Miva 5.x go to Utilities -> Export Data -> Export Orders to Flat File.
- In Miva 9.x and later go to Menu -> Data Management -> Export Orders to Flat File.
- Name the file orders.dat and set Tab as the File Delimiter.
- Choose All Orders instead of All Unbatched Orders in the Batch to Export select box.
- Choose Replace File instead of Append To File in the If File Exist select box.
- Check the box to Export Field Names as Header.
- Press the Export button and save the file to your computer.
- Upload this data to Migration Wizard and proceed to the next step.
- To transfer Customers, log into your Miva Merchant admin panel.
Just set up the migration and choose the entities to move – the service will do the rest.
Try It FreeDelegate the job to the highly-skilled migration experts and get the job done.
Choose Package