CSV file is universal data format that can be used by any web application including online stores and accounting systems. Merchants can migrate and entire live store into a CSV file, or alternatively, a storeowner can choose to migrate CSV File to another platform, for instance, Shopify.
The migration process allows you to securely transfer store data, design, and functionality from your universal CSV file to Shopify. With Cart2Cart, it’s a four-step procedure to migrate CSV to Shopify. The migration process will preserve your order IDs and SEO, and move all your store data safely.
We have prepared a store migration checklist for you with four simple steps to help you with your website migration.
Table of Contents:
CSV to Shopify migration
In short, store migration is the process of transferring data, design, and functionality from the existing store to a new store. The process allows merchants to export the database (products, customers, orders, etc.) to the new store and configure the store’s look and feel. Moreover, it allows to install the necessary apps to add functionality.
What is CSV to Shopify Migration?
The eCommerce migration is the transfer of data like products, customers, orders and more from your current CSV store to the new Shopify one. It consists of a few simple steps if done in automated manner, takes only a couple of hours and requires no tech skills.
With Cart2Cart it’s a four-step procedure to migrate CSV to Shopify. The migration process will preserve your order IDs and SEO, and move all your store data safely.
Pre-Migration Tips
Prepare your CSV files
Get your CSV files ready for the move by auditing all your CSV file data. Audit all the current records of your CSV files, and make use of this opportunity to decide what data needs to be edited or deleted so you only transfer necessary data.
Prepare your Shopify store
Get your Shopify store ready. Do this by creating an account at Shopify.com. Following a universal eCommerce migration checklist and knowing how to prepare your target store can help you prepare all the necessary steps.
Set up the theme for your new store
Choose a default theme for your Shopify store. Keep the default Shopify store theme you decide on and don’t change it at this stage. You can do that after the migration. If you do any customization at this stage, it might affect the migration process.
CSV to Shopify Migration checklist
Set up CSV to Shopify data transfer by first configuring the Source cart and then specifying the Target cart.
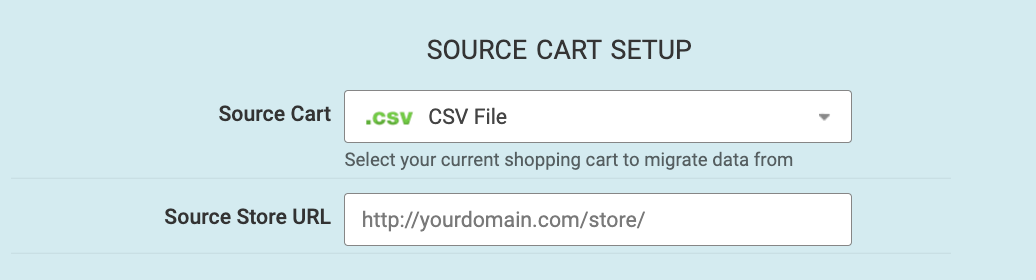
Set up the Source cart
Choose CSV as your source platform from the drop-down menu. Next, you will be prompted to upload your CSV files for products, customers, and orders. Ensure your files are correctly formatted and follow the sample files provided by Cart2Cart for a smooth process.
Specify the Target cart
Choose Shopify from the drop-down list and click the “Install Plugin” button and provide your store’s URL.

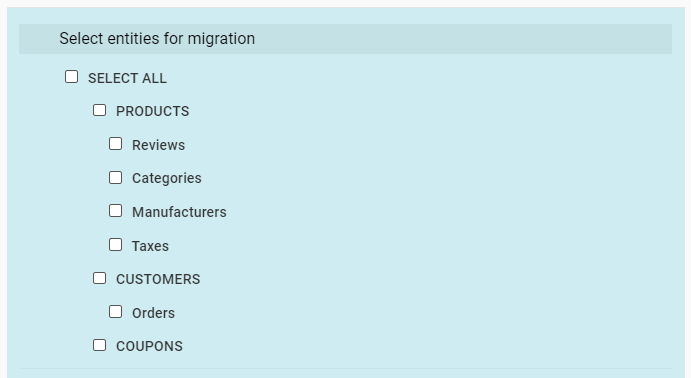
Select data for migration
You can transfer every aspect of your store, such as customers, orders, products and product categories, manufacturers, coupons, reviews, and CMS pages.
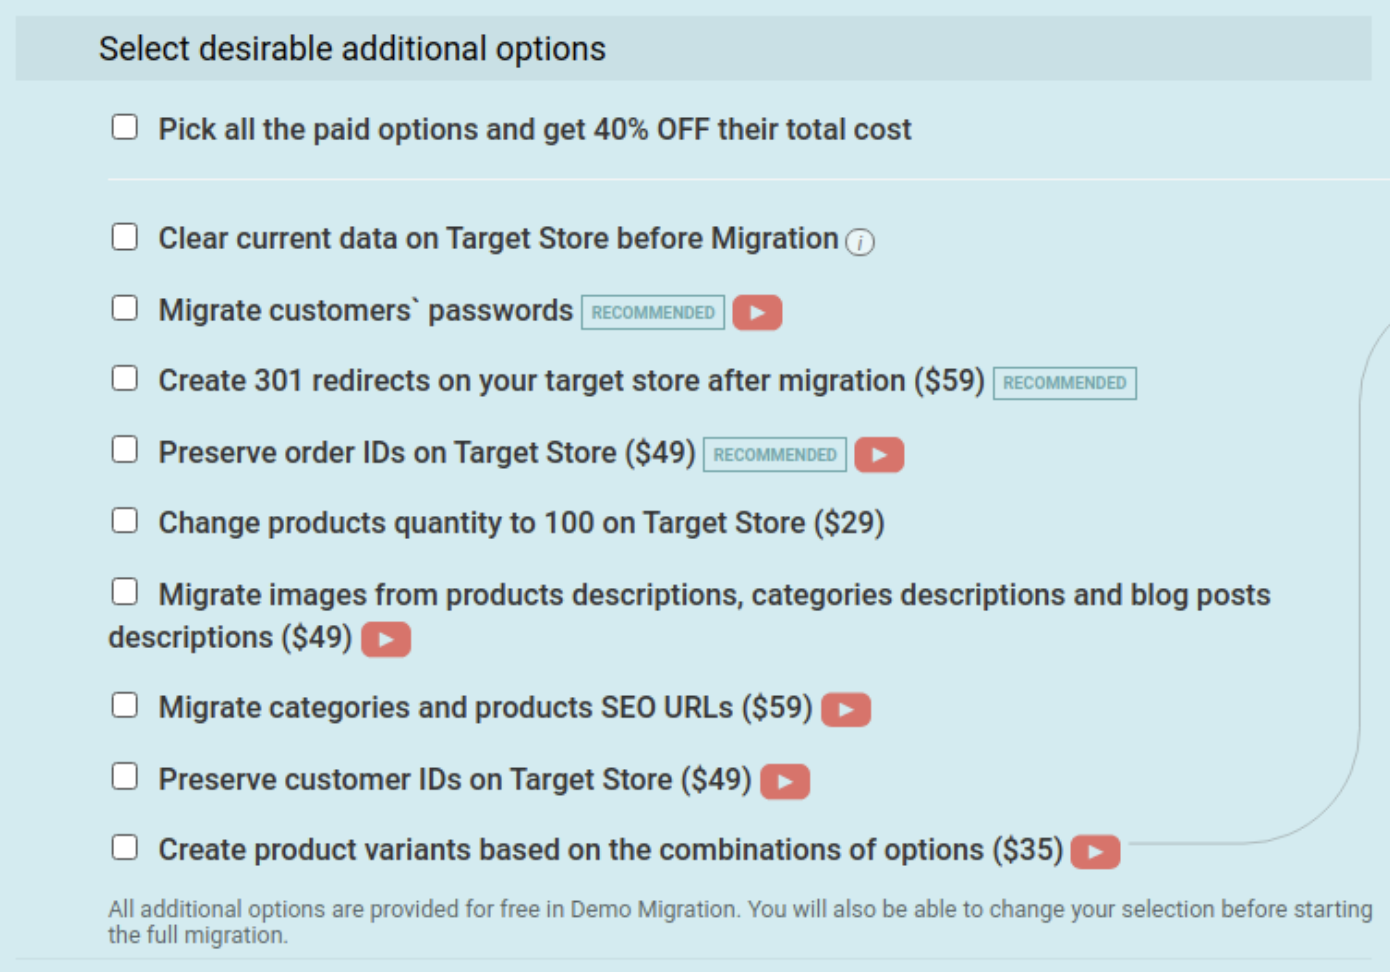
Specify migration extras
Cart2Cart offers many migration extras, and recommend the following: 301 redirects or preservation of product, customer and order IDs on the Target Store, Migrate Source Store customer groups into customer tags. For more information on these, check out Cart2Cart additional options. There are many more to choose.
Map customer groups & order statuses
Match your CSV order statuses and fulfillment statuses to the corresponding ones on Shopify.
Launch a free Demo migration
Launch a free Demo migration. For this, a limited number of products and other data will be transferred in a short time so you can check that the transfer works as you envisaged.
Start Full migration
Click the Start Full Migration button to start the Full CSV database transfer to your new Shopify store. When it’s completed, check the migration results by following these post migration suggestions.
Post-Migration Recommendations
- Test the shopping process by creating a test product and placing and order. Select shipping and payment options and check that everything works smoothly.
- Make full use of the vast array of Shopify apps and extend the functionality of your new store.
- Now you can go ahead and customize your store to look the way you want.
- Notify your customers that your store operates from a new platform and invite them to activate their accounts. For more details on this process, you can read about password migration.
Congratulations! You have successfully transferred your store to Shopify. Enjoy the new experience!
Monthly Update – March 2026
As we navigate the dynamic e-commerce landscape in March 2026, a critical focus for store owners, particularly after a successful platform migration from CSV to Shopify, must be on refining mobile user experience and optimizing site performance. With a significant portion of online traffic originating from mobile devices, a fast, responsive, and intuitive mobile storefront is paramount for retaining customers and maximizing conversions. Following your migration, dedicate time to comprehensive testing of your new Shopify store across various smartphones and tablets. Evaluate page load speeds, ensure all interactive elements function flawlessly, and verify that product images and descriptions are displayed optimally. Leverage tools like Google's PageSpeed Insights to identify and address bottlenecks, such as oversized images or inefficient code. A streamlined mobile experience not only enhances customer satisfaction but also positively influences your search engine rankings, driving organic traffic. Investing in post-migration mobile optimization guarantees your new Shopify store is positioned for sustained growth and success in the current competitive market.
For more details, explore our FAQ section or schedule a call with a migration expert.