Webflow to PrestaShop Migration - Step-by-Step Guide & Expert Services
Webflow to PrestaShop migration doesn't have to be complicated. If you're looking to move Webflow store to PrestaShop, Cart2Cart offers a streamlined solution. Successfully switch from Webflow to PrestaShop with our automated service, ensuring your critical data transfer is fast, secure, and preserves all your SEO, all with zero downtime. Explore our comprehensive step-by-step guide for a seamless DIY experience, or opt for our expert-assisted services for a completely hands-off Webflow to PrestaShop migration.
What data can be
migrated from Webflow to PrestaShop
-
Products
-
Product Categories
-
Manufacturers
-
Customers
-
Orders
Estimate your Migration Cost
To determine your Webflow to PrestaShop migration price, click the button below. The migration price varies in accordance with the number of data types and the additional migration options selected.
How to Migrate from Webflow to PrestaShop In 3 Steps?
Connect your Source & Target carts
Choose Webflow and PrestaShop from the drop-down lists & provide the stores’ URLs in the corresponding fields.
Select the data to migrate & extra options
Choose the data you want to migrate to PrestaShop and extra options to customise your Webflow to PrestaShop migration.
Launch your Demo/Full migration
Run a free Demo to see how the Cart2Cart service works, and when happy - launch Full migration.
Webflow to PrestaShop Migration: The Ultimate Step-by-Step Guide
A Comprehensive Guide to Migrating Your E-commerce Store from Webflow to PrestaShop
Transitioning your e-commerce store to a new platform is a strategic decision that can unlock new opportunities for growth and scalability. While Webflow offers exceptional design flexibility and powerful CMS capabilities, businesses often seek out platforms like PrestaShop for its robust, open-source e-commerce ecosystem, extensive module marketplace, advanced inventory management, and complete control over data and customization.
This detailed guide will walk you through the entire process of moving your online store from Webflow to PrestaShop. Since Webflow does not provide a direct API for automated migration tools, our process will involve exporting your valuable store data into CSV files and then seamlessly importing them into your new PrestaShop store using a dedicated migration solution. Prepare to give your online business a powerful new foundation!
Prerequisites for a Successful Migration
Before initiating the data transfer, a few crucial preparatory steps are required to ensure a smooth and efficient replatforming process.
1. Prepare Your Webflow Data for Export
Your first step involves extracting all essential e-commerce data from your Webflow store. This data will need to be exported into a structured CSV (Comma Separated Values) format. Ensure you cover all critical entities:
- Products: Including SKUs, variants, descriptions, images, prices, stock levels, and product metadata.
- Product Categories: The hierarchical structure of your product organization.
- Customers: Customer accounts, names, addresses, and contact information.
- Orders: Complete order history, order statuses, customer associations, and transaction details.
- Product Reviews: Any customer feedback or testimonials.
- CMS Pages & Blog Posts: Important static content and blog articles.
Thorough data hygiene is paramount during this stage. Cleanse your data of any inconsistencies or redundancies to ensure data integrity upon import.
2. Set Up Your PrestaShop Store
You will need a fresh installation of PrestaShop ready to receive your Webflow data. If you haven't already, install PrestaShop on your chosen hosting environment. Ensure you have:
- Admin Access: Full administrative credentials for your PrestaShop backend.
- FTP/SFTP Access: Required for uploading the connection bridge file.
- Basic Configuration: Complete the initial setup, including language, currency, and general store settings.
For more detailed preparation steps, refer to our FAQs: How to prepare Source store for migration? and How to prepare Target store for migration?
Performing the Migration: A Step-by-Step Guide
With your data prepared and PrestaShop installed, you are ready to begin the data transfer using the migration wizard. This guide assumes the use of an automated migration service.
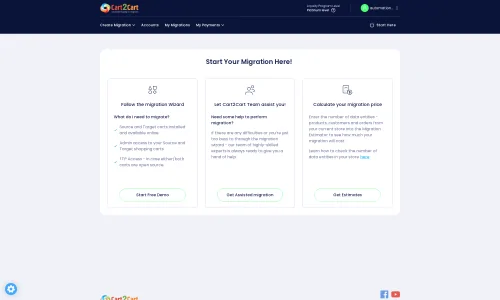
Step 1: Initiate Your Migration
Begin by navigating to the migration service's website. You'll typically find an option to start a new migration.
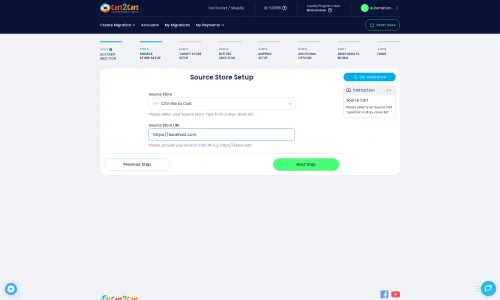
Step 2: Set Up Your Source Store (Webflow via CSV)
In the migration wizard, select "CSV File to Cart" as your source platform. You will then be prompted to upload the CSV files containing your Webflow data.
- Upload your exported CSV files for products, categories, customers, orders, and other entities.
- The system will process these files to prepare your data for transfer.
The data entities supported for migration via CSV include Products, Product Categories, Product Manufacturers, Product Reviews, Customers, Orders, Invoices, Taxes, Stores, Coupons, CMS Pages, and Blog Posts. Available source options include "Preserve Category IDs", "Preserve Product IDs", "Preserve Customers IDs", "Preserve Orders IDs", "Create Variants from Attributes", "SEO URLs", "Migrate Images in Description", and "Password Migration". For more details on this process, visit our CSV.File Data Migration page.
Step 3: Set Up Your Target Store (PrestaShop)
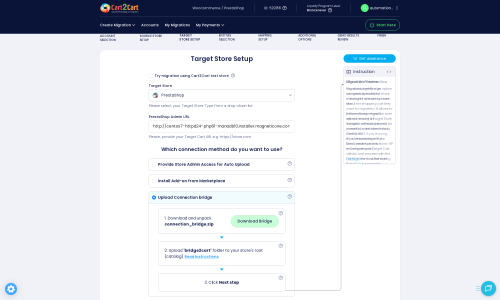
Next, select "PrestaShop" as your target shopping cart from the dropdown menu and enter your PrestaShop store's Admin URL.
To establish a secure connection, you will need to upload a Connection Bridge. This step configures the target PrestaShop store for migration. The user selects PrestaShop, provides the Admin URL, and chooses a connection method. The 'Upload Connection bridge' option requires downloading a zip file, extracting the 'bridge2cart' folder, and uploading it to the store's root directory before proceeding to the next step in the migration wizard.
If you're unsure about the root folder, consult our What is a root folder and where can I find it? guide. Note that the Cart2Cart Universal PrestaShop Migration module is required for this connection method.
Step 4: Select Data Entities for Migration
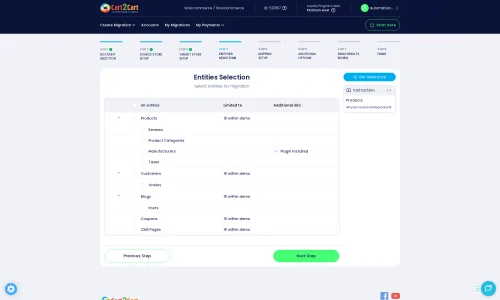
This critical step allows you to specify exactly which types of data you wish to transfer from your Webflow CSVs to PrestaShop. You can typically select all entities or pick and choose based on your requirements.
- Products: Including images, attributes, and descriptions.
- Product Categories: Structure and hierarchy.
- Customers: Account details and associated data.
- Orders: All historical transaction records.
- Product Reviews: User-generated content.
- Manufacturers, Invoices, Taxes, Stores, Coupons, CMS Pages, Blogs, Blog Posts: Other essential e-commerce elements.
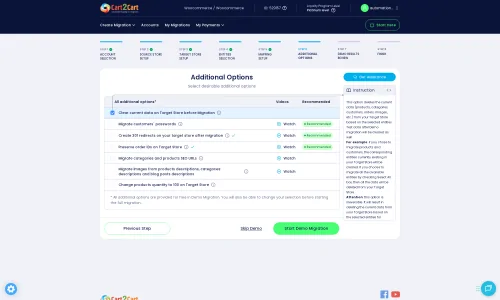
Step 5: Configure Additional Migration Options
Enhance your data transfer with a range of additional options designed to preserve data integrity and SEO value. These options can significantly impact the quality of your replatforming.
- Clear Target: Opt to remove all existing data from your PrestaShop store before migration (use with caution).
- Preserve Product IDs, Orders IDs, Customers IDs: Maintain original IDs for consistency, which can be useful for external integrations.
- Create 301 SEO URLs: Essential for redirecting old Webflow URLs to their new PrestaShop counterparts, preserving link equity and SEO rankings.
- Migrate Images in Description: Ensure product and CMS page images embedded in descriptions are transferred correctly.
- Password Migration: Securely migrate customer passwords, allowing users to log in with their existing credentials on PrestaShop.
Learn more about specific options here: Clear current data on Target store before migration option and How Preserve IDs options can be used?
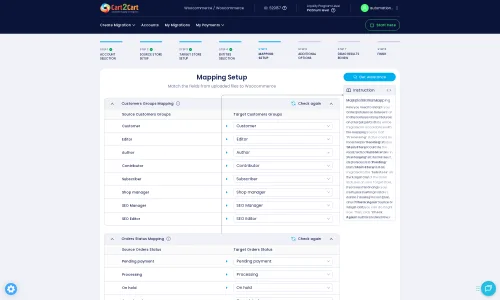
Step 6: Map Your Data Fields
This step ensures that your Webflow data (from CSVs) correctly aligns with PrestaShop's data structure. Specifically, you'll map customer groups and order statuses.
- Customer Groups Mapping: Match customer roles from your source data to corresponding groups in PrestaShop.
- Order Status Mapping: Align the various order statuses (e.g., "Pending", "Processing", "Shipped") from your Webflow exports to PrestaShop's equivalents.
Step 7: Run a Free Demo Migration
Before committing to the full transfer, it's highly recommended to perform a demo migration. This transfers a limited number of entities, allowing you to:
- Verify the accuracy of the data transfer.
- Check for any potential errors or inconsistencies.
- Confirm that your selected options are working as expected.
This critical step helps identify and rectify issues early, saving time and effort during the full migration. For more information, consider our Migration Preview Service.
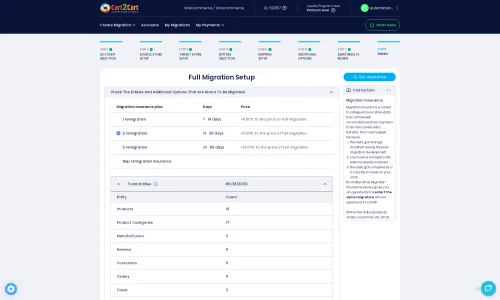
Step 8: Complete the Full Migration
Once you are satisfied with the demo results, proceed with the full migration. This will transfer all your selected Webflow data from your CSV files to your new PrestaShop store. Monitor the process closely. For added peace of mind, you might consider a Migration Insurance Service which offers remigrations if any issues arise, as detailed in How Migration Insurance works?
For complex migrations or hands-off service, explore our Basic Data Migration Service, Extended Data Migration Service, Premium Data Migration Service, or Ultimate Data Migration Service.
Post-Migration Steps
The migration doesn't end when the data transfer is complete. Several crucial post-migration tasks are essential to ensure your new PrestaShop store is fully optimized and ready for business.
1. Verify Data Integrity
- Products: Check product pages, images, descriptions, prices, SKUs, and stock levels. Ensure variants and custom attributes are correctly displayed.
- Customers: Test customer logins and review account histories.
- Orders: Confirm that all historical orders, statuses, and associated customer data are accurate.
- Content: Review CMS pages and blog posts for formatting and link integrity.
2. Configure SEO and Redirects
SEO is paramount for maintaining visibility and search engine rankings. Even if you used the 301 redirects option during migration, thorough verification is necessary.
- Set Up 301 Redirects: Manually implement any remaining 301 redirects for URLs that may have changed and were not automatically handled. This preserves link equity and prevents 404 errors.
- Update Sitemaps: Generate and submit new XML sitemaps to search engines.
- Review Canonical Tags: Ensure proper canonicalization for products and categories.
3. Customize Design and Functionality
- Theme Customization: Customize your PrestaShop theme to align with your brand identity and ensure a seamless user experience.
- Install Essential Modules: Set up necessary modules for payment gateways, shipping carriers, marketing tools, and any other specific functionalities your business requires.
4. Conduct Thorough Testing
Before officially launching your PrestaShop store, rigorously test every aspect of its functionality.
- User Experience (UX): Navigate the site as a customer.
- Checkout Process: Perform test orders from product selection to payment completion.
- Mobile Responsiveness: Ensure your store looks and functions perfectly on all devices.
- Integrations: Verify that all third-party integrations (e.g., ERP, CRM, marketing automation) are working correctly.
5. Go Live
Once all checks are complete and you're confident in your new store, update your DNS records to point your domain to the new PrestaShop store. Be prepared for a short period of downtime during this transition. If any new orders or customer data are created on your old Webflow store during this final switch, consider using a Recent Data Migration Service to transfer them.
Ways to perform migration from Webflow to PrestaShop
Automated migration
Just set up the migration and choose the entities to move – the service will do the rest.
Try It Free
Data Migration Service Package
Delegate the job to the highly-skilled migration experts and get the job done.
Choose Package

Benefits for Store Owners

Benefits for Ecommerce Agencies
Choose all the extra migration options and get 40% off their total Price

The design and store functionality transfer is impossible due to Webflow to PrestaShop limitations. However, you can recreate it with the help of a 3rd-party developer.
Your data is safely locked with Cart2Cart
We built in many security measures so you can safely migrate from Webflow to PrestaShop. Check out our Security Policy
Server Security
All migrations are performed on a secure dedicated Hetzner server with restricted physical access.Application Security
HTTPS protocol and 128-bit SSL encryption are used to protect the data being exchanged.Network Security
The most up-to-date network architecture schema, firewall and access restrictions protect our system from electronic attacks.Data Access Control
Employee access to customer migration data is restricted, logged and audited.Frequently Asked Questions
What types of data can be migrated from Webflow to PrestaShop?
How long does a Webflow to PrestaShop data migration typically take?
Can customer passwords be transferred from Webflow to PrestaShop?
Will my Webflow store experience downtime during migration to PrestaShop?
Is my Webflow store data secure during the migration to PrestaShop?
How can I prevent SEO ranking loss when migrating from Webflow to PrestaShop?
How can I ensure data accuracy after migrating my Webflow store to PrestaShop?
Should I use an automated tool or hire an expert for Webflow to PrestaShop migration?
What factors influence the cost of migrating from Webflow to PrestaShop?
How is my existing Webflow store design handled during migration to PrestaShop?
Why 150.000+ customers all over the globe have chosen Cart2Cart?
100% non-techie friendly
Cart2Cart is recommended by Shopify, WooCommerce, Wix, OpenCart, PrestaShop and other top ecommerce platforms.
Keep selling while migrating
The process of data transfer has no effect on the migrated store. At all.
24/7 live support
Get every bit of help right when you need it. Our live chat experts will eagerly guide you through the entire migration process.
Lightning fast migration
Just a few hours - and all your store data is moved to its new home.
Open to the customers’ needs
We’re ready to help import data from database dump, csv. file, a rare shopping cart etc.
Recommended by industry leaders
Cart2Cart is recommended by Shopify, WooCommerce, Wix, OpenCart, PrestaShop and other top ecommerce platforms.


