PrestaShop is an open-source eCommerce platform that offers everything you need to set up a shop online. PrestaShop is used by thousands of merchants across the world and is very popular in Europe and South America. It is the tenth most popular eCommerce platform.
More than a thousand developers are constantly working to improve the open-source platform. PrestaShop is free, but users need to pay for hosting and a domain. PrestaShop users also have to pay for plugins and themes.
In this PrestaShop tutorial, we will show you how to set up your PrestaShop store.
How do I set up my new PrestaShop store?
If you do your homework and choose your hosting company wisely, you may be able to set up your PrestaShop with one click of your mouse, as some website hosting companies enable one-click installation. In this case, simply follow the hosting company's installation wizard.
Installing PrestaShop manually
Installing PrestaShop manually requires five steps.
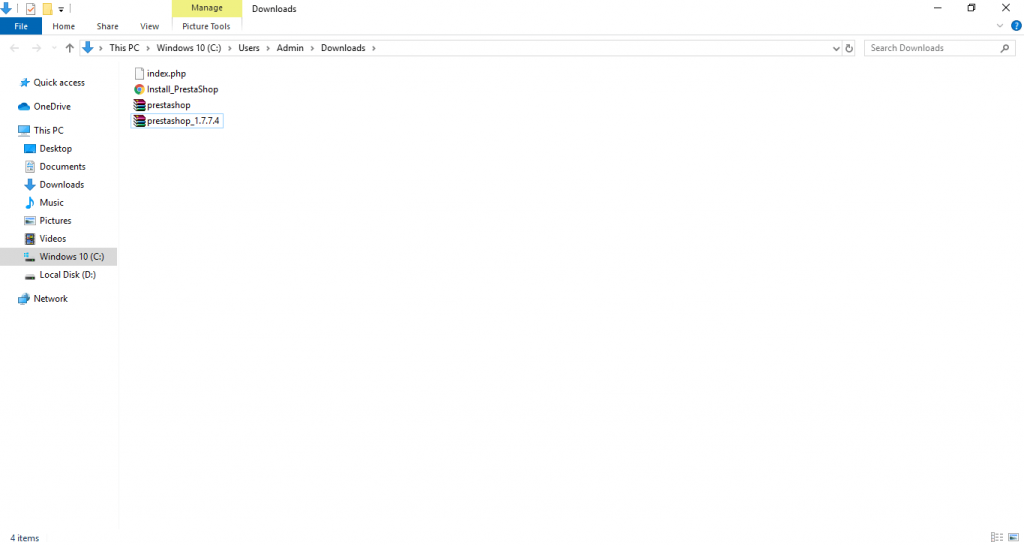
Step 1: Download and unpack PrestaShop
On the PrestaShop dashboard, locate Download PrestaShop. Provide the required information and hit the big pink button. You will receive a zip file containing three items
Step 2: Upload the database to your server
Next, upload PrestaShop into your root folder using cPanel. Log onto your cPanel and provide a username and password.
Next, upload the PrestaShop Zip file to your server. Go to File Manager and access your domain by clicking on the "public_html" folder. Next, click Upload. Click Select File to add the PrestaShop file.
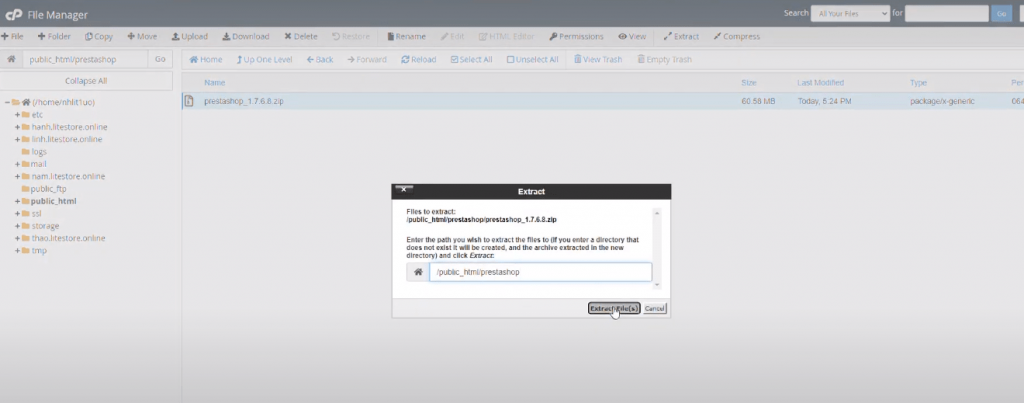
Next, click Go Back to your website to extract the PrestaShop Zip file. When finished, click Close.
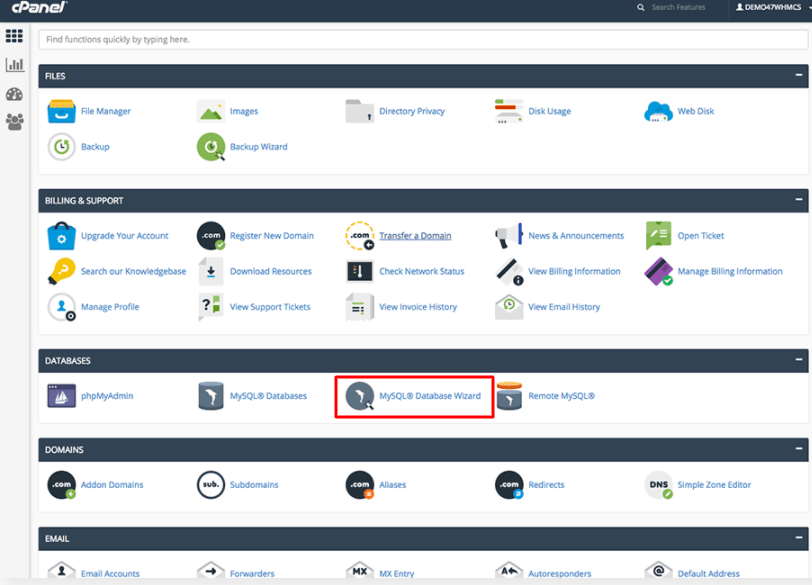
Step 3. Create a Database
The next thing you need to do is to create a database. Navigate to cPanel and find the MySQL Database Wizard. Follow the prompts providing your database name and password. Click “Create User”.
You will see a list of privileges the user will have. Check the boxes that correspond to the privileges you want. You can also choose All Privileges. Lastly, click Next Step.
Step 4: Install PrestaShop
Now there is a new database and PrestaShop on your server, so you can proceed with the PrestaShop installation.
First, go back to your website to get to the Installation Assistant. Once there, choose your language, and agree to the terms and conditions. Complete all the information about your store and provide your database information. The next step is to connect your database. To do this, click Test your database connection now and click Next to initiate the installation.
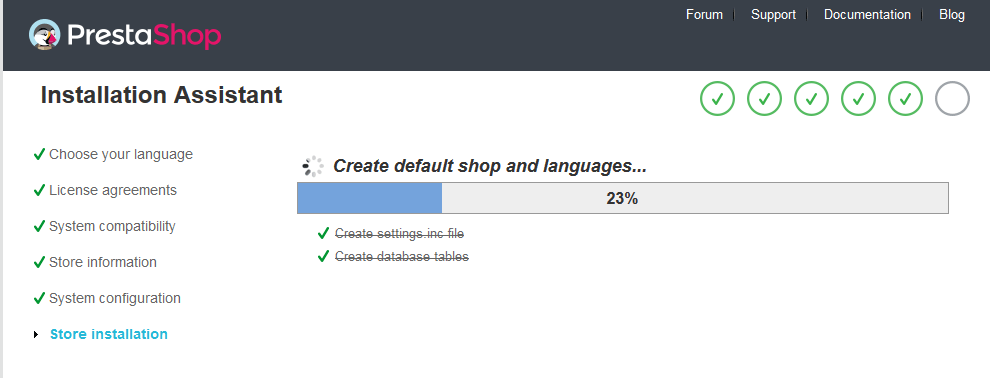
Remember to delete the "/install/"folder once the installation is completed.
Step 5: Complete the setup
If the installation is successful, you’ll get a notice that reads Your installation is finished! You'll also receive your PrestaShop login information.
An easy way to improve your installation's security is to delete some key files and folders. This is done using your FTP client, directly on the server. The items to delete are:
- The "/install" folder (imperative).
- The "/docs" folder (optional).
- The "README.md" file (optional).
Note: look through the Cart2Cart Blog for useful tips & tricks on how to migrate data across various shopping cart solutions.
To complete the setup, go back to your website. PrestaShop will require you to access your store with a new URL. Click on "Manage your store" to go to your site's administration area. Change the "admin" folder to something unique. Make sure to write down the name of your new admin folder as it will be how you access your administration pages.
How to setup new pages
To set up a new page, enter your dashboard. Click as follows: Design > Page > Add new page.
Next, complete the following sections: Page category, Title, Meta Title, description, keyword, appropriate URL, Page content, and Language. Select Save And Preview or Save.
How to setup payment methods
To set up the payment method, click as follows: Payment > Payment methods. Click Configure to set up PrestaShop check-out. Alternatively, click Install to activate a third-party provider.
Adding an SSL Certificate to PrestaShop
SSL stands for Secure Sockets Layer. It is a digital certificate that authenticates a website's identity and enables an encrypted connection. SSL certificates are essential for ranking on search engines.
Normally, you get an SSL certificate when you pay for your domain. If that's not the case, you can get one from the PrestaShop marketplace.
To enable your SSL, click as follows: from the dashboard > Shop Parameters > General> Enable SSL > Yes > Enable SSL on all pages.
How to setup currencies
To set a default currency, go to International > Localization > Configuration. Click on the Default currency drop-down menu and choose your currency. Click Save.
Follow the steps below to enable customers to pay in their local currencies using current exchange rates.
Go to International > Localization
Choose the currency you want to add. Enter the exchange rate according to your current default currency. Set the Status to Yes to enable the currency. Click Save.
Conclusion
In this PrestaShop tutorial, we outlined the different PrestaShop pricing options for you and we covered the steps you need to take to set up PrestaShop. We also discussed how to set up several important aspects of your online store to help you with some questions you might have about setting up PrestaShop.
If you already have an eCommerce store and you want to migrate to PrestaShop, let Cart2Cart smooth the process for you. No matter what store you own and what shopping cart you want to migrate to, Cart2Cart can handle it for you with no fuss and no loss of data.
 April 25, 2024


Comment by eshalboutique
Thanks for your information it helped me a lot
Comment by Svitlana Kryskova
Hi there! Thank you for such a positive commentary. We appreciate this feedback about our blog. Hope to hear from you soon!